How to Clean a Storm Drain Safely: Step-by-Step Guide for Homeowners
To clean a storm drain safely, start by inspecting it for debris, standing water, and any damage. Equip yourself with gloves, eye protection, waterproof boots, and a mask. Set up traffic cones and enlist a partner for safety. Begin by removing surface leaves and trash, then carefully lift the grate. Use a rake or hook to extract sediment and flush any remaining fines downstream if allowed. Finally, bag the waste and dispose of it according to local regulations. For more complex issues, follow municipal guidelines and obtain any necessary permits.
What a homeowner needs to know before cleaning a storm drain
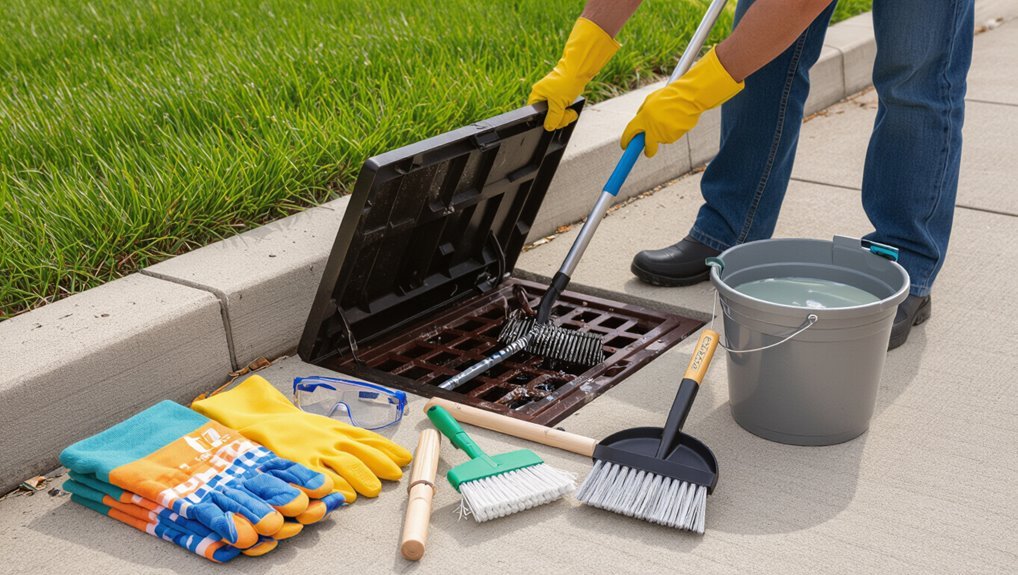
Before beginning work, a homeowner should understand that clearing a storm drain protects property from localized flooding and helps maintain neighborhood drainage.
They must also check local rules and permits, since many municipalities regulate who may interfere with public stormwater infrastructure.
Finally, homeowners should look for signs that cleaning is needed—standing water, slow drainage, and seasonal leaf buildup—and time maintenance before heavy rainfall or during peak debris seasons.
Why cleaning storm drains matters for property and neighborhood drainage
Understanding why cleaning storm drains matters helps homeowners prioritize maintenance that protects both individual property and the surrounding community.
Regular debris removal prevents localized flooding, foundation damage, and landscape erosion while improving neighborhood drainage flow.
Knowing how to clean storm drain correctly reduces pollutant runoff, protects infrastructure, and minimizes costly repairs.
Consistent attention preserves property values and community resilience during heavy rainfall.
Legal and municipal considerations (permits, local rules, stormwater ordinances)
Because storm drains often fall under municipal jurisdiction, homeowners must check local rules and permits before performing any work. Regulations can dictate who is allowed to access drains, what tools or disposal methods are permissible, and whether a certified contractor is required.
They should contact the public works or stormwater department, review ordinances on pollutant discharge and yard waste disposal, and obtain required permits.
When to clean signs and seasonal timing
When should a homeowner schedule storm drain maintenance?
Homeowners should inspect drains after heavy leaf fall, before freeze-thaw cycles, and following major storms.
Signs to clean include standing water, slow drainage, visible debris, or unpleasant odors.
Routine checks every autumn and spring prevent blockages; urgent clearing is warranted when water pools, drains gurgle, or local alerts recommend action.
Safety precautions and personal protective equipment
Before beginning work, the homeowner should assemble required PPE—gloves, eye protection, waterproof boots, and a suitable mask—and set up traffic control with cones or signage while working with a partner.
They must scan for hazards such as sharp or submerged objects, biohazards, and chemical runoff and avoid contact if risks are present.
If conditions are beyond safe DIY measures or an injury/exposure occurs, professionals or emergency services should be contacted immediately.
Required PPE checklist (gloves, eye protection, boots, mask)
Several essential items of personal protective equipment should be worn while cleaning a storm drain to reduce exposure to sharp objects, contaminants, and airborne particles: chemical-resistant gloves, impact-rated eye protection, waterproof steel-toe or puncture-resistant boots, and a respirator or particulate mask appropriate to the hazard.
Additional items include long sleeves, durable work pants, and disposable coveralls; inspect and replace damaged PPE before use.
Traffic and site safety (cones, signage, working with a partner)
Two people are preferable for most storm drain jobs to control traffic and maintain site safety; one worker manages the drain while the other sets up and monitors cones, signs, and pedestrian controls.
Position cones to create a clear work zone, place visible signage for motorists and pedestrians, and guarantee high-visibility clothing.
Maintain communication, rotate tasks to reduce fatigue, and secure tools within the perimeter.
Hazard recognition (sharp objects, biohazards, submerged hazards, chemical runoff)
Many storm drains contain unexpected hazards—sharp debris, biological waste, submerged objects, and chemical runoff—that can cause injury or illness if not recognized and managed.
Inspect visually from a safe distance, use tools to probe unseen depths, and avoid direct hand contact.
Wear puncture-resistant gloves, eye protection, waterproof boots, and a respirator if fumes or contaminated water are suspected.
Dispose of waste safely.
When to call professionals or emergency services
When should a situation escalate beyond homeowner intervention?
If hazards include entrenched chemical spills, exposed electrical wiring, deep or fast-flowing water, large obstructions requiring heavy equipment, or suspected sewage contamination, professionals must be called.
Dial emergency services for immediate danger (fire, electrocution, injuries).
For non-emergent but complex issues, contact municipal stormwater crews or licensed contractors trained and insured for safe remediation.
Tools and materials needed for a homeowner storm drain cleaning
A concise list of tools and materials helps a homeowner prepare for storm drain cleaning.
Basic hand tools and supplies, plus optional rental equipment for tougher jobs, will be outlined.
Guidance on eco-friendly cleaning products and proper disposal supplies completes the overview.
Basic hand tools and supplies ()
Proper preparation reduces time and risk: a homeowner should assemble a compact set of hand tools and safety supplies before approaching a storm drain.
Essential items enable efficient, safe debris removal and minor clog clearing without heavy machinery.
- Sturdy gloves, eye protection, and a dust mask
- Long-handled scoop or trowel and a drain hook
- Heavy-duty trash bags and a small broom for cleanup
Optional tools and rental equipment for tougher jobs ()
Consider renting or borrowing powered augers, wet/dry vacuums, or hydraulically assisted root cutters for clogs that resist manual clearing.
These tools extend reach and power safely when used with basic protective gear and by following manufacturer instructions.
Professionals recommend matching tool size to pipe diameter, securing permits if required, and practicing on small sections before full use.
- Portable electric auger
- Commercial wet/dry vacuum
- Root cutting attachment
Eco-friendly cleaning products and disposal supplies
Several eco-friendly cleaners and containment supplies help minimize pollution while effectively removing oily residues, organic buildup, and sediment from storm drains.
Biodegradable degreasers, citrus-based solvents, and enzyme cleaners break down grime without harming waterways.
Absorbent pads, granular spill kits, sealable buckets, and heavy-duty trash bags contain and transport waste.
Labels and local disposal guidance guarantee compliant, responsible waste handling to protect the environment.
Step-by-step process to clean a storm drain safely
The homeowner should begin by evaluating the drain and surrounding area to identify hazards and access points.
Next, the work area is secured with safety markers before surface debris and litter are removed manually.
With the grate opened and interior inspected, sediment, leaves, and blockages are cleared by hand or with tools.
Step 1 Assess the drain and surrounding area
Before any tools or cleaning begins, a visual inspection of the drain and its surroundings must be performed to identify hazards, blockages, and access points.
The inspector notes debris type, water pooling, structural damage, and nearby traffic or utilities.
Photographs and clear notes document conditions.
This assessment determines necessary equipment, personal protective gear, and whether professional assistance is required before proceeding.
Step 2 Secure the work area and position safety markers
Establish a secure perimeter around the drain using cones, barricades, or high-visibility tape to protect workers and redirect pedestrians and traffic.
Position warning signs upwind and visible from both directions.
Place reflective vests and portable lighting for low-light conditions.
If on-road, use advance warning signs and a vehicle with flashers.
Assign a spotter to monitor traffic and maintain the barrier.
Step 3 Remove surface debris and litter manually
Begin by donning the required PPE—gloves, safety glasses, high-visibility vest, and steel-toed boots—then approach the drain from the upwind side to reduce exposure to dust and odors.
Using a hand rake or gloved hands, remove leaves, paper, and visible trash into a sturdy bag.
Inspect surrounding pavement, collect sediments, and seal waste for proper disposal.
Step 4 Open grate or cover safely and inspect interior
Lift the grate or cover using an appropriate tool (grate hook or pry bar) while maintaining stable footing and keeping hands clear of pinch points; if the cover is heavy, use team lifting techniques or mechanical assistance to prevent strain.
Once open, secure the cover, shine a flashlight into the cavity, note pipe alignment, water level, visible damage, odors, and hazards, and document findings before proceeding.
Step 5 Remove sediment, leaves, and blockages by hand or tools
With the cover secured and interior conditions noted, attention turns to removing sediment, leaves, and other blockages.
Using gloved hands, a rake, or a hand-held scoop, debris is lifted and placed into a bucket or bag.
Stubborn deposits are loosened gently with a scraper or pry bar.
All removed material is disposed of according to local regulations; tools are cleaned afterward.
Step 6 Use water flushing and suctioning techniques safely
Proceed to flush and, if available, use suction to remove remaining fine sediment and liquids without disturbing surrounding areas.
Use low-pressure hoses to loosen debris, directing flow toward the drain inlet.
Operate wet/dry vacuums or pump systems from stable positions, avoiding sudden surges.
Collect and contain returned waste for proper disposal.
Monitor for obscured hazards and stop if unexpected resistance occurs.
Step 7 Inspect downstream flow and confirm clearance
After flushing and vacuuming, personnel should verify that water and remaining solids move freely through the outlet by inspecting downstream flow points and accessible manholes.
They should observe flow velocity, note obstructions or pooling, and check lateral connections for backflow.
Document findings, photograph blockages, and mark areas requiring further clearing or maintenance.
Confirm clear passage before restoring normal site operations.
Step 8 Replace cover, clean up site, and dispose of debris properly
Secure the drain cover, restore the work area, and handle collected material according to regulations to conclude the cleaning operation.
The cover is seated and fastened; tools are gathered and rinsed, contaminated rags contained.
Debris is bagged, labeled if required, and transported to approved disposal or recycling.
Records of disposal and any permits are completed.
Final visual check verifies cleanliness and safety.
Proper disposal and environmental best practices
The discussion turns to proper disposal and environmental best practices, emphasizing sorting collected debris into green waste, recyclables, and hazardous materials.
It addresses safe handling of oil, chemicals, and contaminated runoff to prevent further pollution.
Finally, it outlines appropriate disposal options and municipal resources for each waste type.
Sorting debris: green waste, recyclables, hazardous materials
Many types of debris removed from a storm drain should be separated immediately into green waste, recyclables, and hazardous materials to prevent contamination and enable proper disposal.
Green waste (leaves, twigs) goes to compost or yard-waste bins; recyclables (plastic, glass, metal) to curbside or drop-off centers.
Hazardous items (batteries, electronics, chemicals) require labeled containment and delivery to certified disposal facilities.
How to handle oil, chemicals, and contaminated runoff
Once hazardous materials are separated, attention shifts to oil, chemicals, and contaminated runoff, which pose acute risks to waterways and wildlife if mishandled.
Contain spills with absorbent pads or sand, prevent runoff to gutters and drains, and transfer contaminated sorbents into sealed, labeled containers.
Use personal protective equipment, document quantities, and contact local hazardous-waste authorities for guidance on safe transport and disposal.
Where to dispose of collected waste and municipal options
Dispose collected materials according to local regulations by sorting waste into designated streams—household trash, recyclables, hazardous waste, and contaminated sorbents—and using municipal collection points or licensed facilities for each category.
Homeowners should contact municipal solid waste departments for pickup schedules, hazardous waste drop-off, and special disposal events.
Document disposal actions, retain receipts, and never dispose of contaminants in storm drains, waterways, or regular trash if restricted.
Preventive measures to reduce future clogs
Preventive steps can greatly reduce the frequency of clogs by addressing sources of debris and improving inlet protection.
Practical measures include thoughtful landscaping and curb maintenance to limit leaf and sediment runoff, plus installing guards, screens, or inlet protection devices.
A seasonal maintenance schedule—covering leaf clearance, inspection of guards, and post-storm checks—helps guarantee these measures remain effective.
Landscaping and curb maintenance tips to limit debris
Proper landscaping and regular curb maintenance reduce the volume of leaves, grass clippings, and sediment that reach storm drains, lowering clog risk and maintenance needs.
Homeowners should mow away from curbs, rake gutters, plant groundcovers to stabilize soil, prune overhanging trees, and use edging to catch debris.
Schedule seasonal cleanups and inspect curbs after storms to remove accumulated sediment before it enters drains.
Installing guards, screens, or inlet protection ()
After improving landscaping and keeping curbs clear, homeowners can further reduce blockages by installing guards, screens, or inlet protection on storm drains.
These devices catch leaves, trash, and sediment before entry, are available in metal, plastic, or mesh, and require periodic inspection and cleaning to remain effective.
- Choose durable materials sized to the inlet
- Guarantee secure fastening and easy removal
- Inspect after storms and clear accumulated debris
Seasonal maintenance schedule and what to include
A seasonal maintenance schedule breaks the year into actionable tasks tied to weather patterns and vegetation cycles, ensuring routine inspections and cleanings occur before peak debris events.
It lists spring leaf removal, summer gutter checks, autumn leaf and seed cleanup, and winter ice clearance.
Include inspection frequency, tools, safety steps, debris disposal methods, and a contact for emergency or contractor assistance.
Common problems and how to troubleshoot them
Common problems include stubborn blockages that may require mechanical clearing or professional intervention, visible structural damage or erosion that needs temporary stabilization, and recurring flooding even after drains are cleared.
For each issue, the text will outline straightforward troubleshooting steps, criteria for when to call a specialist, and short-term fixes to reduce immediate risk.
Practical signs to watch for and next-step recommendations will help readers prioritize actions safely.
Stubborn blockages mechanical vs. professional solutions
Tackle stubborn storm drain blockages by first distinguishing between obstructions amenable to mechanical removal and those requiring professional intervention.
Many clogs stem from compacted debris, tree roots, or collapsed pipe sections, each demanding different tactics and risks.
For debris and sediment, use a hand auger, drain snake, or high-pressure nozzle cautiously.
For root intrusion or suspected collapse, hire a licensed contractor with camera inspection and excavation equipment.
Structural damage or erosion signs and interim fixes
When visual signs such as settled grates, undermined edges, exposed pipe sections, or persistent undermining after storms appear, they indicate structural damage or erosion that can worsen rapidly if unaddressed.
Homeowners should mark hazards, avoid heavy loads, and clear loose debris.
Apply temporary soil fill, use sandbags or geo-fabric to stabilize edges, and contact municipal or qualified contractors for inspection and permanent repairs.
Recurrent flooding despite clear drains causes and next steps
Although surface grates may be clear, recurrent flooding often stems from upstream blockages, inadequate conveyance capacity, or subsurface issues such as collapsed pipes or clogged culverts.
Inspect upstream channels, check outlet elevations, and verify pipe integrity via camera or contractor assessment.
Consider increasing capacity, repairing collapsed sections, clearing culverts, or installing backflow prevention.
Document findings and coordinate with municipal drainage authorities for persistent or large-scale problems.
When to hire a professional and how to choose one
If blockages involve structural damage, confined spaces, contaminated runoff, or work on public property, a licensed contractor or municipal crew should be engaged.
Homeowners should ask about licensing, insurance, experience with storm systems, specific methods and safety measures, and request detailed written quotes that list labor, equipment, permits, disposal, and warranty terms.
Estimates typically vary by scope and location, ranging from modest single‑drain fees to several hundred or thousands of dollars for complex repairs, with factors such as access, materials, and required permits driving cost.
Situations that require licensed contractors or municipal crews
Recognize scenarios that exceed routine homeowner maintenance and warrant professional intervention, such as deep blockages, damaged or collapsed pipes, recurring backups, evidence of structural failure, or storm drains connected to municipal systems.
Licensed contractors or municipal crews handle confined-space entry, heavy equipment, CCTV inspection, structural repairs, and permits.
Homeowners should notify municipality for public systems and hire licensed, insured contractors when work involves complex diagnostics, excavation, or liability.
Questions to ask contractors and what quotes should include ()
When hiring a professional for storm-drain work, what should a homeowner ask and expect from written estimates?
Contractors should explain scope, timeline, permits and insurance, plus references. Estimates must detail labor, materials, cleanup, and warranty terms.
- Verify license, insurance, and local permit responsibility.
- Request itemized, time-bound written quote.
- Ask for references and before/after photos.
Estimated cost ranges and factors affecting price
Cost is influenced by scope and site conditions: routine debris clearing and gutter-mouth cleaning often runs low, while full-line jetting, camera inspection, or catch basin repairs raise costs considerably. Homeowners should weigh frequency, access difficulty, permits, and environmental disposal. Hire licensed pros for complex work; compare quotes, references, and insurance.
| Service | Typical range | When needed |
|---|---|---|
| Basic cleaning | $75–$250 | Annual/seasonal |
| Jetting/inspection | $300–$1,200 | Clogs/unknowns |
| Repairs | $200–$5,000+ | Structural damage |
Quick checklist for a safe homeowner storm drain cleaning
The homeowner is provided with a concise checklist covering steps to take before starting, actions to maintain safety while on site, and tasks to complete after finishing.
Each section highlights essential items such as required tools and permits, personal protective equipment and hazard controls, and proper debris disposal and inspection.
Following the checklist helps reduce risk and guarantee the drain is left functioning correctly.
Pre-cleaning checklist
One clear checklist item before cleaning a storm drain is to confirm personal protective equipment—gloves, sturdy footwear, eye protection, and a mask—are on hand and fit properly.
Additional pre-cleaning checks establish readiness and reduce risk.
- Verify weather and avoid imminent rain.
- Guarantee basic tools and a first-aid kit are available.
- Notify a household member of planned work and timing.
On-site safety checklist
Having confirmed weather, tools, and PPE, a homeowner should follow a concise on-site safety checklist before touching the drain:
- Verify stable footing and mark the work area with cones or barriers.
- Confirm ventilation and avoid leaning over openings; use a pole or hook for initial inspection.
- Keep a charged phone and a partner nearby; do not work alone if the drain is deep or obstructed.
Post-cleaning checklist
Once debris removal and basic rinsing are complete, the homeowner should run a brief post-cleaning checklist to confirm the drain and surrounding area are safe and fully restored:
- Inspect grate seating, replace or secure any loose hardware and guarantee proper alignment.
- Verify water flows freely without pooling; test with a modest hose stream.
- Remove and properly dispose of collected debris, sanitize tools, and store protective gear.
Conclusion
Like a careful gardener coaxing life through tangled roots, the homeowner who tends a storm drain restores flow and peace to the landscape. Armed with knowledge, proper gear, and respect for waterways, small, steady efforts prevent floods and protect wildlife. Yet some tangles exceed backyard skill; knowing when to call a professional keeps safety intact. Regular attention transforms a risky chore into a simple routine that lets rainwater travel where it belongs.