How to Hand Dig a Well: Step-by-Step Guide for Safe, Low-Cost Water Wells
A hand-dug well is a shallow, manually excavated shaft ideal for areas with high water tables and stable soils. To safely and effectively dig a well, start by selecting a suitable site and securing necessary permits. Ensure safety checks are in place as you use tools like shovels, picks, and ladders, while managing the risk of collapse and contamination. Line the shaft with rings or masonry, install a sanitary seal and cap, and conduct microbiological and chemical tests on the water. Costs, time, and maintenance will vary based on soil conditions and depth. The following sections will outline detailed procedures and necessary precautions.
Overview of Hand-Dug Wells and When They’re Appropriate
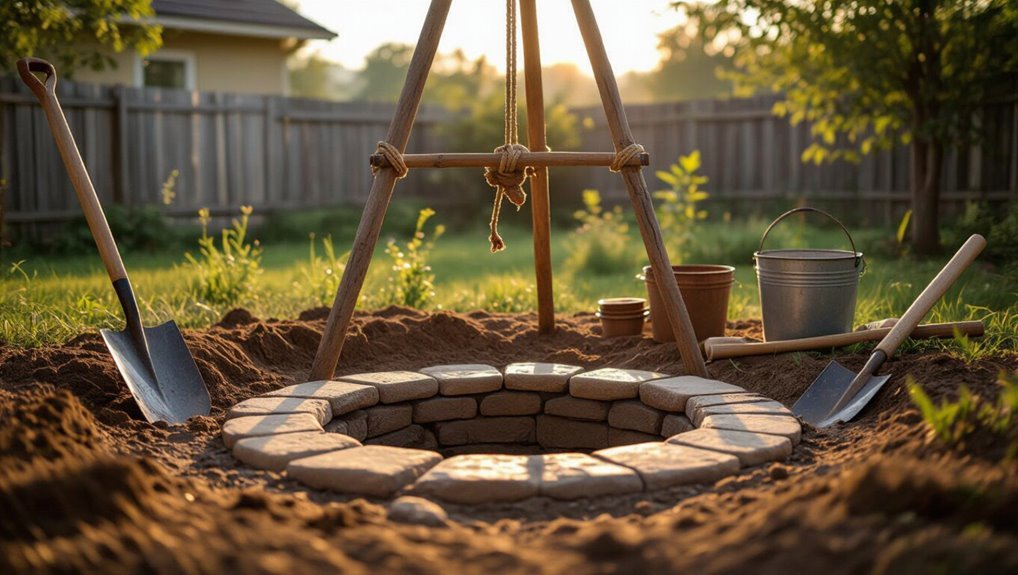
A hand-dug well is excavated by hand to access shallow groundwater and typically features a wide, unlined or stone-lined shaft, distinguishing it from deeper, mechanically drilled or driven wells.
They are best suited to rural or low-demand sites with high water tables and stable soils where access for heavy equipment is limited.
Before proceeding, local regulations, zoning restrictions, and water rights should be verified to guarantee legal compliance and responsible water use.
What a hand-dug well is and how it differs from drilled or driven wells
Because hand-dug wells are excavated by people using shovels, buckets, and simple tools rather than heavy machinery, they occupy a distinct niche among groundwater access methods.
Hand-dug wells are shallow, wide excavations lined with stone, brick, or concrete rings. Unlike drilled or driven wells, they rely on manual labor, simple materials, and accessible skills—see how to hand dig a well for practical steps and limitations.
Typical use cases and ideal site conditions
Hand-dug wells suit situations requiring low-cost, locally maintainable water access where groundwater is shallow and aquifers are laterally extensive. They are commonly chosen for small rural communities, homesteads, livestock watering, and emergency or temporary installations.
Ideal sites have high water table, permeable soils or shallow sand/gravel layers, low contamination risk, accessible materials and labor, and gentle topography minimizing runoff and collapse hazards.
Legal, zoning, and water rights considerations
Sites that meet the practical criteria for shallow, low-cost wells must also be evaluated against legal, zoning, and water-rights frameworks that can restrict or permit their construction and use.
Local ordinances, permitting requirements, setbacks, and sanitation standards vary; groundwater extraction may be regulated or allocated.
Consulting municipal planning, health departments, and water-rights registries guarantees compliance, avoids fines, and protects neighbors’ supplies.
Quick Safety Summary and Essential Precautions
Hand-dug well work presents immediate hazards including collapse, asphyxiation, contamination, and drowning that must be recognized before any excavation begins.
Workers should use appropriate personal protective equipment, have a clear emergency plan, and monitor air and water conditions continuously.
If risks exceed available controls—such as deep excavations, unstable soils, or suspected contamination—professionals should be hired.
Immediate hazards: collapse, asphyxiation, contamination, drowning
Excavation of a domestic well carries several immediate hazards that require strict control: trench or shaft collapse, oxygen-deficient or toxic atmospheres, contamination of the water source, and the risk of drowning during wet work.
Workers must recognize unstable soils, voids, nearby utilities, and rising groundwater.
Preventive measures include controlled excavation methods, atmospheric monitoring, maintaining sanitary barriers, and immediate evacuation if conditions deteriorate.
Personal protective equipment and emergency plan
A concise set of personal protective equipment (PPE) and a clear emergency plan are essential before any digging begins: at minimum, hard hats, steel-toe boots, gloves, eye protection, high-visibility clothing, respiratory protection when air quality is uncertain, and suitable harnesses or retrieval gear for confined-space entries. Teams must assign roles, carry communication devices, and rehearse rescue steps.
| Item | Purpose | Action |
|---|---|---|
| Helmet | Head protection | Wear always |
| Boots | Foot protection | Lace securely |
| Harness | Fall/rescue | Inspect before use |
| Radio | Alert/rescue | Test daily |
When to hire professionals instead
After establishing PPE and an emergency plan, the team should recognize situations that require professional intervention rather than continuing with hand digging.
Call trained contractors for unstable soil, deep water tables, buried utilities, contaminated groundwater, or complex casing and grouting.
Hire licensed drillers or geotechnical engineers for permits, heavy equipment, confined-space rescue, or any condition beyond the crew’s verified skills and local code compliance.
Tools, Materials, and Equipment Needed
Effective hand excavation requires a clear inventory of tools, materials, and support equipment tailored to the site and depth.
Basic hand tools (shovels, picks, hoes, buckets and rope) combine with cribbing, ladders, tripod and winch for safe digging, while water must be managed with pumps, bailers, buckets and drainage trenches.
Finishing uses lining materials (concrete rings, gabions, stone, gravel, sand) and optional upgrades such as screened casing, sanitary seals and well caps.
Hand tools: shovels, picks, hoes, bucket and rope
Select sturdy, purpose-specific hand tools to guarantee safe, efficient progress when hand digging a well.
Choose a pointed shovel for cutting, a flat shovel for scooping, a pick for breaking compacted strata, and a hoe for loosening soil.
Use a durable bucket with a secure rope for spoil removal.
Inspect handles and replace damaged tools to prevent accidents and delays.
Support and digging equipment: cribbing materials, ladder, tripod and winch
Cribbing, ladders, tripods, and winches form the essential support system that keeps a hand-dug well safe and workable as excavation proceeds.
Durable timber or treated posts, metal brackets, and spacer blocks stabilize shaft walls. A secure ladder provides access; a tripod and manual winch enable controlled lifting of spoil and materials.
Components must be inspected, anchored, and sized for expected loads.
Water management: pumps, bailers, buckets, drainage trenches
Manage water continuously during excavation to keep the shaft dry and safe: a combination of pumps, bailers, buckets, and temporary drainage trenches removes seepage, surface runoff, and accumulated spoil-water. Use submersible or hand pumps for steady removal; bailers for localized lowering; buckets for short-term work. Trenches divert surface flow away from the pit.
| Tool | Purpose | Notes |
|---|---|---|
| Pump | Continuous removal | Power source needed |
| Bailer | Local lowering | Manual operation |
| Bucket | Short lifts | Simple, quick |
Well lining and finishing materials: concrete rings, gabions, stone, gravel, sand
A durable lining prevents collapse, limits contamination, and simplifies maintenance; common choices include precast concrete rings, gabion cages, dry-stacked stone, and filtered gravel-and-sand collars.
Concrete rings offer immediate structural support; gabions adapt to irregular shafts and drain well; dry-stacked stone suits local material use; gravel-and-sand collars provide natural filtration and stabilize the bore while allowing controlled inflow.
Optional upgrades: screened casing, sanitary seal, well cap
Optional upgrades — screened casing, a sanitary seal, and a secure well cap — enhance water quality and protect the shaft from surface contamination and pests.
Screened casing prevents sediment and coarse particles entering the intake. A sanitary seal blocks surface runoff and vermin at the top.
A lockable, vented well cap prevents debris and unauthorized access while allowing air pressure equalization.
Regular inspection preserves integrity.
Site Selection and Pre-Dig Assessment
Before breaking ground, the site must be evaluated for likely water presence using surface signs and local knowledge to improve success odds.
A brief soil and geology assessment—probing for sand, clay, rock, and potential collapse hazards—helps determine digging method and shoring needs.
The assessor should confirm minimum safe distances from contamination sources (septic systems, livestock areas, fuel storage), mark the chosen spot, and plan clear access for equipment and spoil removal.
Locating water sources: surface indicators and local knowledge
Where is the most promising place to begin digging? Observers seek surface signs: damp ground, lush vegetation, springs, animal trails, low-lying depressions, and seasonal seeps.
Local knowledge complements observation—neighbors, farmers, and elders often know reliable spots and past water locations.
Combine visible indicators with community information, verify accessibility and contamination risks, then prioritize sites for further assessment and testing.
Soil and geology assessment: testing for sand, clay, rock, and collapse risk
After narrowing candidate locations by surface indicators and local reports, attention turns to soil and subsurface conditions that determine feasibility and safety.
Assess soil texture, stratigraphy, and water table depth via test pits or auger borings. Identify sand, silt, clay, and bedrock layers, note fissures and perched zones, and evaluate collapse or sloughing risk.
Record findings to inform lining, depth, and excavation method.
Minimum safe distances from contamination sources (septic, livestock, fuel)
When siting a hand-dug well, maintain clear minimum distances from contamination sources—septic systems, livestock areas, fuel and chemical storage—to protect groundwater quality and reduce health risks.
Recommended separations: at least 30 meters from septic tanks, 15–30 meters from leach fields, 30–50 meters from livestock yards depending on slope and soil, and 50 meters from fuel or chemical storage; local regulations may require greater distances.
Marking the dig location and planning access
With potential contamination sources identified and setbacks established, the exact dig location must be clearly marked and access routes planned to secure safe, efficient work.
Stake corners with durable markers, flag utility lines, and record GPS coordinates.
Designate a stable spoil and equipment staging area, confirm vehicle turnaround and emergency egress, and minimize vegetation disturbance to protect soil stability and nearby water features.
Legal Permits, Testing, and Notifications Before Digging
Before breaking ground, the operator should confirm local permitting requirements and notify utility companies to obtain clearances.
Baseline water-quality tests—typically for bacteria, nitrates, and common minerals—should be scheduled before construction and repeated after completion according to local guidelines.
Environmental and cultural resource checks must also be completed to avoid protected areas or archaeological impacts.
How to check local permitting requirements and notify utilities
Although local regulations vary widely, confirming permitting rules and notifying utility companies is a mandatory preparatory step that prevents legal issues and safety hazards.
The digger should contact the municipal building or planning office to learn permit types, setbacks, inspections, and fees.
Call the national/local utility notification service (e.g., 811) to locate buried lines, document confirmations, and obtain any required written approvals before excavation.
Water quality testing timeline and baseline tests to order
When should initial water testing occur and which analyses establish a reliable baseline?
Initial testing should occur immediately after well completion and annually thereafter.
Baseline analyses include bacterial (total coliform, E. coli), nitrate/nitrite, pH, conductivity, turbidity, total dissolved solids, major ions (calcium, magnesium, sodium, potassium, chloride, sulfate), and arsenic.
Additional tests depend on local geology and land use.
Environmental and cultural resource checks
Several checks are required to guarantee digging a hand-dug well complies with environmental and cultural resource protections.
Authorities should be contacted for permits, setback and depth regulations, and endangered species or wetland inventories.
Archaeological surveys or notifications may be mandated for culturally sensitive areas.
Local health departments must approve sanitation measures and sample-testing plans.
Documentation of approvals should be retained before excavation begins.
Step-by-Step Hand-Digging Process
The hand-digging process begins with preparing the site and installing safety systems before any soil is removed.
Workers then excavate topsoil and softer layers using controlled techniques while progressively installing temporary cribbing and a ladder as the shaft deepens.
Methods for managing groundwater inflow are employed until stable water-bearing strata are reached and the shaft is expanded to final dimensions.
Preparing the site and setting up safety systems
Before digging begins, a compact but thorough site assessment and safety setup must be completed to protect workers and preserve surrounding structures.
Survey utilities, mark boundaries, check soil stability and drainage. Establish shoring plans, install temporary barriers, signage and access ladders.
Provide PPE, first-aid kit and communication means. Assign roles, emergency procedures and permit confirmations before any excavation activity commences.
Initial excavation: techniques for removing topsoil and soft layers
Begin by removing vegetation and the loose topsoil in controlled lifts, working outward from the marked rim to maintain a clear, stable perimeter.
Crew members shovel and wheelbarrow spoil away, screening for roots and debris. Soft layers are excavated with hoedads and mattocks, placing material in discrete spoil heaps.
Progress is monitored for soil changes and moisture to adjust excavation technique and pace.
Installing temporary cribbing and ladder as depth increases
Install temporary cribbing and a ladder as excavation deepens to protect workers and maintain shaft stability.
Use sturdy, evenly spaced timbers to form a collar and successive rings, fastening securely.
Position a fixed ladder for safe access and egress, extending above the rim.
Inspect cribbing and ladder after each lift, replace damaged members, and keep the work area clear of loose materials.
Managing groundwater inflow during digging
When groundwater is encountered, control measures must be implemented immediately to keep the shaft dry and safe.
Workers install temporary diversion trenches, use hand-operated pumps or bailers, and place sandbags or clay seals to reduce inflow.
Continuous monitoring of seepage rates, shoring reinforcement, and staged dewatering prevent collapse.
All actions prioritize worker safety and maintain workable excavation conditions.
Reaching stable water-bearing strata and expanding the shaft
Continue excavating cautiously, advancing by measured lifts and frequent inspections until the dig reaches the stable water-bearing stratum; at that point, workers widen the shaft incrementally, shore the walls, and establish a controlled inlet for groundwater to allow safe, gradual expansion while maintaining structural stability and access for materials and personnel.
They remove loosened spoil, install temporary bracing, monitor seepage, and adjust supports as needed.
Final shaft dimensions and settling considerations
Final shaft dimensions are determined by the chosen lining method, expected flow, and access requirements; typical hand-dug wells finished for domestic use have diameters between 0.6–1.2 meters and a depth that extends several meters into stable water-bearing strata plus an allowance for settlement.
Allow 0.3–0.6 meters additional depth for consolidation; provide a stable bench for lining installation and anticipate modest perimeter subsidence during initial seasonal fluctuations.
Proper Lining, Casing, and Sanitary Completion
Selection of lining—stone, concrete rings, or pre-cast masonry—depends on soil type, depth, and available materials.
Techniques for creating a sanitary seal and grout, plus placement of screened sections with an appropriate gravel pack, are essential to protect water quality and promote filtration.
The finished wellhead must be capped and detailed to shed surface water and prevent contamination.
When to use stone, concrete rings, or pre-cast masonry liners
When choosing between stone, cast concrete rings, or pre-cast masonry liners, the decision should be driven by soil type, water table depth, expected well lifespan, and available labor or equipment.
Stone suits shallow, stable soils and low budgets.
Cast concrete rings work for deeper, unstable strata needing modular strength.
Pre-cast masonry liners offer rapid installation and uniformity where skilled labor and transport permit, reducing collapse risk.
Building a sanitary seal and grout procedures
Begin by establishing a sanitary seal and correctly grouting the annulus to prevent surface contamination and lateral inflow. Proper lining and casing isolate the wellbore from shallow, potentially polluted layers and create a durable shift from the surface to the aquifer.
Apply cement-bentonite grout from bottom up, displacing water to guarantee full bond.
Finish with a sealed surface slab and locked cap to deter contamination.
Installing screened sections and gravel pack for filtration
Install the screened interval and surrounding gravel pack to create a stable, permeable filter around the well intake that prevents fine-grained material from entering while preserving hydraulic conductivity. Place screen at target depth, backfill with graded gravel, and tamp gently. Confirm annular space free of fines before sealing above.
| Component | Purpose |
|---|---|
| Screen | Intake filtration |
| Gravel pack | Support and permeability |
Finished wellhead design to prevent contamination
After placing the screened interval and gravel pack, attention shifts to sealing and finishing the wellhead to block surface and shallow subsurface contamination.
The construction includes smooth concrete or bentonite seal above the pack, rigid sanitary casing extending above ground, vermin-proof cap, and sloped concrete pad to divert runoff.
Joints must be watertight and inspected; access should allow maintenance without compromising the seal.
Water Collection, Pumping Options, and Installation
The discussion moves to methods for getting water out of the finished well, comparing hand pumps with solar or electric alternatives and summarizing their relative advantages and limitations.
It then outlines basic shallow-well pump installation and piping layouts, including typical suction and discharge arrangements.
Finally, attention is given to surface drainage and apron construction to divert runoff and protect the wellhead from contamination.
Hand pumps vs. solar/electric pumps: pros and cons
Choosing between a hand pump and a solar or electric pump hinges on site conditions, water demand, and resource availability. Hand pumps: low cost, manual labor, minimal maintenance. Solar/electric: higher flow, less labor, energy-dependent, higher upfront cost. Consider reliability, budget, and maintenance skills when selecting a system.
| Type | Pros | Cons |
|---|---|---|
| Hand | Low cost, simple | Manual effort |
| Solar/Electric | High flow, automated | Energy dependence |
| Both | Durability potential | Varying upkeep needs |
Shallow-well pump installation basics and piping layout
Moving from pump selection to on-site setup, shallow-well pump installation requires attention to siting, suction limitations, and simple piping layouts that guarantee reliable draw and minimal air entry.
Install the pump on firm, level ground near the wellhead. Use short, straight suction piping, quality check valves, and airtight joints.
Provide accessible priming and a pressure or storage tank sized for demand.
Surface drainage and apron construction to divert runoff
Divert runoff away from the wellhead by grading and installing a compacted apron so surface water cannot pool or erode the excavation.
A concrete or gravel apron slopes away six inches over two feet, sealed at the casing. Surrounding ground is contoured to shed water into diversion channels or swales lined with rock.
Regular inspection prevents clogging, erosion, and contamination risks.
Testing, Water Quality, and Ongoing Monitoring
Following construction, the well should undergo immediate microbial and chemical testing to confirm safety and detect contaminants introduced during digging.
A regular testing schedule—covering bacteria, nitrates, pH, and common local contaminants—helps track changes over time and identify emerging problems.
Test results should be interpreted against local health standards, with remediation options (shock chlorination, filtration, or well repair) selected based on the specific contaminants and concentrations found.
Immediate microbial and chemical tests after construction
Once construction is complete, the newly dug well must undergo immediate microbial and chemical testing to confirm potability and detect construction-related contamination. Samples should be taken aseptically, sent to a certified lab, and analyzed for coliforms, E. coli, nitrates, and turbidity. Prompt remediation follows any positive result to protect users.
| Concern | Feeling |
|---|---|
| Contamination | Anxiety |
| Safe water | Relief |
Regular testing schedule and parameters to monitor
Routine monitoring establishes a predictable schedule of tests and specific water-quality parameters to detect changes that could affect health or system performance.
Recommended cadence: bacterial indicators quarterly, nitrates and pH annually, metals and pesticides every 2–3 years or after contamination events, and turbidity after storms or maintenance.
Record results, compare trends, and notify authorities if standards are exceeded or sudden shifts occur.
Interpreting test results and remediation options
Interpretation of well-water test results requires comparing measured values to applicable health-based standards and baseline data, identifying anomalies in contaminants or trends, and evaluating potential exposure pathways for occupants.
After identifying exceedances, prioritize actions: source protection, shock chlorination for bacterial hits, targeted treatment (filtration, UV, adsorption), or alternative supply.
Re-test after remediation and maintain records to track effectiveness and recurrence.
Maintenance, Repair, and Winterization
Routine upkeep focuses on inspecting and replacing caps and seals, and removing surface debris to preserve sanitary conditions.
Typical repairs include relining collapsed sections, sealing leaks, and dewatering the shaft to enable safe work.
For cold climates, winter-proofing emphasizes insulating exposed components and applying freeze-protection measures to prevent ice damage.
Routine maintenance checklist: caps, seals, and debris removal
When the well is in regular use, a concise checklist for caps, seals, and debris removal preserves water quality and prevents equipment damage:
Inspect cap integrity monthly, verify sanitary seal tightness, clear visible debris from top and rim, remove leaves and sediment, check vent screens, test for odors or turbidity, tighten fasteners, replace cracked components, log actions and dates, and schedule professional testing annually.
Common repairs: relining, sealing leaks, dewatering
Addressing common repairs such as relining, sealing leaks, and dewatering requires prompt, methodical action to restore well integrity and protect water quality. Techniques include installing new lining, using sanitary sealants at joints, and pumping or bailing contaminated water before repairs. Safety and contamination control guide each step; professional assessment is advised for structural failures.
| Task | Purpose | Typical tool |
|---|---|---|
| Relining | Restore casing | Flexible liner |
| Sealing | Prevent ingress | Sanitary sealant |
| Dewatering | Clear water | Submersible pump |
Winter-proofing and freeze protection methods
After relining, sealing leaks, and dewatering restore a well’s structural integrity, attention must turn to winter-proofing and freeze protection to preserve that work and maintain water quality through cold months.
Insulate exposed casing and aboveground piping, add heat tape or a thermostatic heater where needed, slope surrounding ground to shed water, insulate or secure the well cap, and regularly check for ice damage and thaw-induced settlement.
Common Problems, Risks, and How to Avoid Them
Common problems when hand digging a well include collapse and cave-in from unstable soils, contamination due to poor sealing or surface runoff, and low yield or drying of the source.
Each risk has identifiable causes—improper shoring, compromised sanitary seals, and mislocated or exhausted aquifers—that require specific preventive steps.
The following section outlines simple diagnostics and practical remedies to reduce hazards and protect water quality.
Collapse and cave-in causes and preventive measures
Because soil weight, water pressure, and weakened walls interact unpredictably during excavation, collapse and cave-ins are the primary hazards when hand digging a well.
Causes include loose or layered soils, perched water, undermined walls, vibration, and overcutting.
Preventive measures: shore walls with timber or metal plates, step or bench sides, control groundwater, avoid working alone, limit overhangs, and monitor conditions continuously.
Contamination sources and sealing failures
When subsurface openings intersect surface water, contaminated fill, or fractured strata, the well becomes vulnerable to biological and chemical infiltration as well as to seal failures that permit cross‑contamination between aquifers.
Identifying likely contamination sources—surface runoff, sewage, animal waste, buried debris, perched water lenses, and improper casing or grout installations—guides targeted prevention and monitoring measures.
Regular sanitary seals, proper surface drainage, setback distances, routine water testing, and documented construction practices reduce contamination risk.
Low yield and drying wells: diagnosis and remedies
Many hand-dug wells exhibit reduced yield or run dry seasonally or after construction, a problem caused by limited aquifer size, inadequate depth or diameter, clogging of the intakes, lowered local water table, or interrupted recharge. Diagnose by pump tests, inspect screens, and monitor seasons. Remedies: deepen, widen, add gravel pack, rehabilitate intakes, or pursue alternative sources.
| Cause | Diagnostic sign | Remedy |
|---|---|---|
| Shallow depth | Low flow | Deepen |
| Narrow diameter | Slow recovery | Widen |
| Clogged intake | Turbid water | Clean |
| Lowered table | Seasonal loss | Alternative |
| Poor recharge | Persistent low yield | Recharge measures |
Cost Breakdown and Time Estimates
Typical material and tool costs for a DIY hand-dug well are outlined in broad ranges to help readers budget.
Estimated labor timeframes vary considerably with soil type and planned depth, from a few days in sandy soils to several weeks in compacted clay or rocky conditions.
Guidance is provided on when aggregated costs and time commitments make hiring a contractor the more practical option.
Typical material and tool cost ranges for DIY projects
Although soil conditions and local regulations influence final expenses, a practical cost framework helps DIYers plan materials and tools for hand-digging a well. Typical ranges: basic shoring, casing, gravel, and seals $200–$800; digging tools and wheelbarrow $100–$400; pump and fittings $150–$600. Contingency 10–25% recommended.
| Item | Typical Range |
|---|---|
| Materials | $200–$800 |
| Tools/Pump | $250–$1,000 |
Labor timeframes by soil type and depth
Estimate labor for hand-digging a well by matching soil type and target depth to hourly or day-based rates: sandy or loamy soils generally allow 3–6 feet of progress per person-day.
Compact clay slows work to 1–3 feet per person-day.
Mixed gravel or cobble can reduce advance to under 1 foot per person-day and often requires extra hands or mechanical assistance.
Digging below the water table adds significant time for dewatering and shoring.
Additional factors: crew experience, rest breaks, tool quality, spoil removal, and weather influence total person-days; plan contingencies and scale labor estimates to depth and site constraints.
When project costs justify hiring contractors
When total excavation time, specialized equipment, or regulatory requirements push projected costs beyond a homeowner’s budget or comfort with risk, hiring a licensed well contractor becomes financially and practically justified. Contractors absorb liability, provide permits, and reduce time. Compare estimates, warranties, and timelines to decide.
| Equipment | Permit | Timeline |
|---|---|---|
| Rig rental | Filing fees | Days–weeks |
| Disposal | Inspections | Variable |
| Labor | Certifications | Predictable |
Practical Tips, Best Practices, and Efficiency Hacks
The section outlines practical measures to keep a hand-digging crew productive and safe, including clear team roles and scheduled rotations to limit fatigue.
It covers efficient soil management and ways to store or repurpose spoil to keep the site organized.
It also suggests affordable options for well liners and manual pumps that balance cost with durability.
Safe team roles and rotation to reduce fatigue
Assign clear roles and a rotation schedule so each team member knows specific responsibilities—digging, shoveling, spoil removal, rim support, and safety lookout—while swapping tasks at regular intervals to prevent muscle fatigue and maintain concentration.
Rotations should be timed, documented, and flexible for conditions. Include rest breaks, hydration checks, and brief handovers to guarantee continuity, reduce errors, and evenly distribute physical and cognitive load.
Soil management and use of spoil effectively
Manage spoil strategically to keep the dig site safe, efficient, and productive.
Excavated soil is piled by texture: fine near edges for backfill, coarse farther to prevent collapse.
Cover spoil with tarps to control erosion and runoff.
Reuse stable material for berms and temporary ramps.
Mark hazardous heaps, maintain clear access paths, and regularly compact returned spoil to preserve well integrity.
Low-cost alternatives for liners and hand pumps
Following careful spoil handling, attention turns to durable, low-cost options for lining and pumping that preserve water quality and reduce project costs.
Locally sourced fired clay, recycled PVC, and galvanized steel casings provide affordable liners when sealed correctly.
For pumping, select simple hand pumps—rope-and-washer, pitcher, or converted bicycle pump—matched to depth.
Regular maintenance and sanitation prevent contamination and extend service life.
Example Case Studies and Real-World Scenarios
A series of concise case studies illustrates common obstacles and the practical choices made on-site.
Each example highlights the problem, the specific technique employed, and the resulting outcome to aid reader learning.
These real-world scenarios clarify how conditions and decisions shape success or require adaptation.
- A small homestead shallow well: staged hand-digging, simple lining, and steady water yield
- Sandy soil challenge: temporary shoring and use of sandbags to keep the shaft stable
- When excavation hit bedrock: switching to rock-breaking tools and creating a narrower, deeper bore
Small homestead shallow well: steps taken and outcomes
Several small homestead projects illustrate the practical steps and outcomes of digging shallow wells, each documenting site selection, digging technique, lining, and simple pumping solutions. Reports note timelines, labor, costs, yield, and maintenance, showing modest yields supporting gardens and livestock with periodic cleaning and basic hand pumps.
| Metric | Result |
|---|---|
| Time | 3–7 days |
| Labor | 2–4 people |
| Cost | Low |
| Yield | 10–50 L/hr |
| Maintenance | Annual cleaning |
Sandy soil challenge and the chosen solution
Confronted with loose, shifting sand that collapses easily and clogs pumps, homesteaders adapted by reinforcing shafts, stabilizing casings, and choosing excavation methods that minimize collapse risk.
They employed timber and metal rings, incremental lining, and careful dewatering to prevent sloughing.
Pump placement prioritized sealed annuli and raised intake screens to reduce silt infiltration, improving longevity and maintaining yield without mechanized trench shoring.
When excavation hit bedrock: adaptive strategies
Striking bedrock halted progress in many hand-dug well projects, forcing crews to pivot from vertical excavation to techniques that either penetrate, bypass, or work around the rock layer. Teams used drilling, blasting alternatives, angled shafts, and lining methods; cost, safety, and local regulations guided choices. Case reviews highlighted success when combining mechanical drilling with manual finishing.
| Strategy | Outcome |
|---|---|
| Percussive drilling | Penetrated thin rock |
| Angled shaft | Bypassed barrier |
| Lining | Stabilized walls |
| Hydraulic jetting | Eroded seams |
Appendix: Measurement Conversions, Tool Checklist, and Supplier Resources
This appendix provides quick-reference measurement conversions, a compact tool checklist tailored for hand-digging, and vetted supplier contacts to streamline planning and procurement.
It lists metric/imperial conversions, essential hand tools, safety gear, and reliable sourcing channels so readers can estimate materials, pack efficiently, and contact suppliers.
- Shovel, mattock, measuring tape, plumb line
- PPE: gloves, helmet, boots, eye protection
- Local hardware, specialty auger suppliers, online retailers
Conclusion
Hand-dug wells remain a viable, low-cost option for many rural properties, offering sustainable access to groundwater when conditions permit. One interesting statistic: properly constructed hand-dug wells can last 20–50 years with routine maintenance, matching lifespan expectations of some mechanized wells. Readers are reminded to prioritize safety, legal compliance, and water testing. With careful planning, adequate tools, and adherence to best practices, hand-digging can provide reliable water while minimizing environmental impact.