How to Use a Pipe Clamp: Step-by-Step Guide for Secure Clamping and Gluing
A pipe clamp is an effective tool for applying strong, parallel pressure during gluing and assembly. To use one, choose the appropriate pipe size, attach the fixed head and movable tail, and dry-fit your parts. Apply the adhesive, then evenly space and tighten the clamps while ensuring proper alignment. Clean any adhesive squeeze-out, and allow the recommended clamp time before handling. For more detailed setup instructions, troubleshooting tips, and best practices, continue reading.
What a Pipe Clamp Is and When to Use It
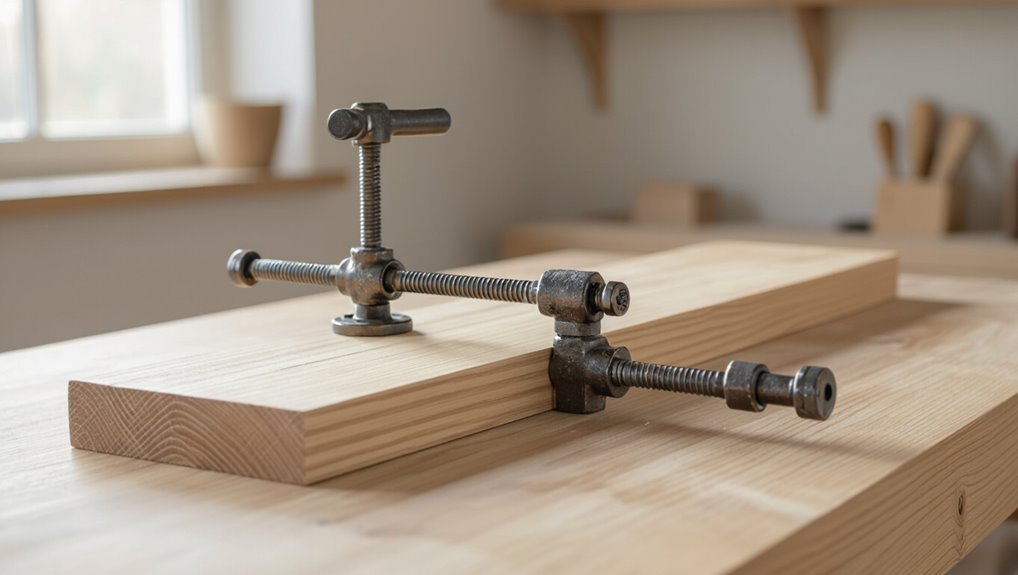
A pipe clamp is a simple clamping system composed of two clamp heads that thread onto a length of pipe to provide adjustable, high-strength pressure.
It is commonly used in woodworking for glue-ups and in metalworking for holding parts during welding or assembly.
Various styles exist for different tasks, and they accommodate common pipe diameters (typically 1/2″ to 1″) and lengths chosen to match the workpiece.
Definition and basic components of a pipe clamp
Pipe clamps are woodworking and metalworking tools that use a length of threaded pipe as the backbone for adjustable clamping pressure. They consist primarily of a fixed head, a movable tail or screw mechanism, and the pipe itself which determines reach.
Components include clamping pads, a tightening handle, and optional swivel heads.
Instructions on how to use pipe clamps emphasize alignment, even pressure, and pipe selection.
Common woodworking and metalworking applications
Serve both woodworking and metalworking tasks by providing long, adjustable clamping capacity for gluing, assembly, bending, and holding parts during fabrication.
Common uses include panel glue-ups, edge joining, frame assembly, jig and fixture clamping, holding stock for drilling or routing, and securing metal plates for welding or bending.
Versatility, reach, and strong parallel pressure make pipe clamps valuable for varied shop operations.
Types of pipe clamps and suitable pipe sizes
When choosing a clamp system, users should match clamp head styles and pipe diameters to the task: standard pipe clamps use threaded fittings and movable heads for general woodworking.
Heavy-duty models add reinforced jaws or larger threads for metalwork, and quick-release versions speed repetitive setups.
- 1/2″ pipe: light assemblies, trim and small glue-ups
- 3/4″ pipe: general woodworking, cabinet panels
- 1″ or larger: heavy frames, metal fabrication
Essential Tools, Materials, and Safety Precautions
The section lists the required clamps, compatible pipe sizes, and common accessories needed for secure setups.
It then outlines recommended glues and adhesives for metal, PVC, and wood applications.
Finally, it covers essential personal protective equipment and steps to create a safe, organized workspace.
Required clamps, pipes, and accessories
A compact set of pipe-clamp components forms the foundation for accurate gluing and assembly: at minimum, one adjustable pipe clamp head and tail, one or more steel or galvanized pipes of the correct diameter and length, protective jaw covers or cauls, and a selection of pads or spacers to distribute pressure.
Necessary accessories include:
- Pipe wrenches or spanners for tightening
- Protective gloves and eye protection
- Measuring tools and marking gauges
Recommended glues and adhesives for different materials
After assembling the necessary clamp heads, pipes, and protective cauls, attention shifts to selecting adhesives that match the materials and joint requirements.
Recommendations focus on bond strength, curing time, and compatibility:
- Wood: PVA or polyurethane for interior/exterior joints; allow full clamp time per label.
- Metal: Epoxy for gap-filling, structural strength.
- Plastic: Solvent cement for PVC/ABS; plastic-specific adhesives for others.
Personal protective equipment and safe workspace setup
One set of basic personal protective equipment (PPE) and a well-organized workspace are essential before beginning any pipe-clamping task to reduce injury risk and confirm efficient work flow.
Wear safety glasses, gloves, hearing protection and a dust mask as needed.
Verify stable bench, clear floor, adequate lighting, proper ventilation, and secure storage for clamps and tools.
Inspect equipment before use.
Preparing Materials and Clamp Setup
Before clamping, the correct pipe length is measured and cut to suit the workpiece span.
Clamp jaws, faces, and protective pads are inspected and fitted to prevent marring and guarantee even pressure.
Workpieces are aligned and pre-positioned so clamps can be applied squarely and without shifting.
Measuring and selecting the correct pipe length
Carefully measuring and selecting the correct pipe length assures the clamp will cover the full workpiece and allow the tail and headstock fittings to engage properly.
Measure total assembly length including end fittings, add clearance for wrenching and handle travel, and choose standard pipe lengths or cut to size.
Verify threaded engagement depth and confirm pipe rigidity sufficient for anticipated clamping pressure.
Preparing clamp jaws, faces, and pads
Prepare clamp jaws, faces, and pads to confirm even pressure distribution and protect the workpiece from marring.
Inspect jaws for burrs, rust, or deformation; file or replace damaged parts. Clean faces of adhesive and debris.
Fit protective pads—leather, rubber, or scrap wood—cut to size and secured.
Verify pads sit flat and parallel to guarantee consistent clamping pressure across the joint.
Aligning workpieces before clamping
Several alignment checks confirm the parts meet squarely and maintain the desired geometry once clamped.
The operator verifies edges, faces, and ends using a square, straightedge, and marking gauge.
Dry-fit components, butt joints, and mating surfaces; adjust with shims or light taps.
Ascertain pipe clamp pads contact evenly and pressure distributes along the joint before applying glue and final tightening.
Step-by-Step Clamping and Gluing Process
A quick dry-fit and test clamp verifies fit before glue is applied for edge, face, or end joints.
Pipe clamps are then positioned and tightened in a planned sequence while checking alignment, squareness, and squeeze-out.
Once cured enough to handle, excess glue is removed and final adjustments are made.
Dry-fitting pieces and performing a test clamp
Before applying adhesive, the pieces should be dry-fitted and a test clamp applied to confirm alignment, fit, and clamping pressure.
The operator assembles parts, checks joints for gaps, guarantees faces are flush, and adjusts cauls or spacers.
A brief trial squeeze verifies even pressure distribution and prevents squeeze-out issues.
Mark reference points for consistent repositioning before final gluing.
Applying glue correctly for edge, face, and end joints
Having confirmed fit and marked reference points during the dry-fit and test clamp stage, the operator proceeds to apply adhesive for edge, face, and end joints with attention to correct quantity and coverage.
Adhesive is spread evenly with a brush or roller; squeezed-out excess is removed.
For end grain, sealer or increased glue is used; alignments are maintained and open time respected before clamping.
Positioning pipe clamps and tightening sequence
Several clamps should be positioned to distribute pressure evenly along the joint: one near each end and additional clamps spaced at regular intervals (typically 6–12 inches for hardwoods, up to 24 inches for softer woods) so the entire seam receives consistent compression.
Tightening proceeds gradually and alternately along the length to equalize pressure, preventing gaps or overbearance; final torque secures uniform contact.
Checking alignment, squareness, and squeeze-out
A quick visual and tactile inspection confirms that boards are aligned, faces are flush, and end joints are square before the glue sets.
The operator checks for gaps, twists, and offsets; uses a straightedge and square where needed; verifies consistent clamping pressure along the length; notes any glue squeeze-out as an indicator of adequate pressure; and records adjustments to prevent movement during curing.
Removing excess glue and final adjustments
Remove excess glue promptly while it is still wet to prevent difficult cleanup and staining; a damp cloth or sponge followed by a dry rag will lift squeeze-out without disturbing the joint.
After initial cleaning, make final adjustments: verify alignment, square, and clamp pressure.
Tighten or relieve clamps minimally to maintain contact.
Allow sufficient open time before moving the assembly for curing.
Strategies for Multiple Clamps and Large Assemblies
When working on large assemblies, the writer outlines spacing clamps to achieve even pressure across the joint.
The piece notes use of cauls, blocks, and parity clamps to prevent bowing and distribute force where needed.
For long panels, frames, and tabletops, it recommends patterns and sequence strategies to keep assemblies flat and aligned.
Spacing clamps for even pressure distribution
Multiple clamps should be spaced to distribute pressure evenly across a joint, preventing gaps, bowing, or squeeze-out.
Clamp spacing depends on board width and material; shorter spans allow wider spacing. Position clamps so force overlaps slightly between adjacent clamps.
Increase clamp count for long assemblies, checking alignment frequently. Apply consistent torque to each clamp to maintain uniform contact and avoid localized pressure peaks.
Using cauls, blocks, and parity clamps to prevent bowing
Use cauls, sacrificial blocks, and parity clamps to control bending and keep long or wide glue-ups flat.
Cauls distribute clamp force across multiple joints, preventing localized squeeze-out and dimpling.
Sacrificial blocks protect edges and allow staggered pressure.
Parity clamps counteract twist by applying opposing forces so each board receives equal compression, ensuring straight, even assemblies without inducing bow or wind.
Clamping long panels, frames, and tabletops
Clamping long panels, frames, and tabletops requires planning clamp placement and sequence to achieve even pressure across the entire assembly.
Use multiple clamps spaced evenly, alternating tightening to avoid bowing. Employ cauls and sacrificial rails for protection and alignment. Monitor glue squeeze-out and joint gaps, adjusting as needed.
- Space clamps evenly, near ends and center
- Alternate tightening sequence
- Use cauls/sacrificial rails for contact protection
Troubleshooting Common Problems
Common assembly issues include misalignment and visible gaps after tightening, glue starvation or excessive squeeze-out, and pipe clamps that slip or apply uneven pressure.
The discussion will outline causes for each problem and concise corrective steps.
Practical tips will focus on adjusting clamp sequence, controlling adhesive application, and securing or replacing slipping components.
Fixing misalignment and gaps after tightening
When a tightened pipe clamp leaves joints slightly offset or with small gaps, the builder should pause and assess alignment before increasing pressure.
Loosen clamps slightly, realign components using light taps or pry bars, then retighten gradually and evenly.
Insert thin shims where necessary to close gaps.
Recheck squareness and uniform pressure to prevent squeeze-out or hinge failure during final cure.
Dealing with glue starvation or excessive squeeze-out
Address glue starvation or excessive squeeze-out by first identifying which issue is present: starvation shows as dry gaps or weak fillets inside the joint, while squeeze-out appears as excessive adhesive expelled along edges.
For starvation, reapply appropriate amount of glue, clamp with even pressure, and allow full open-time contact.
For squeeze-out, wipe excess immediately, reduce applied glue, and adjust clamping sequence to minimize overflow.
Pipe clamp slipping or uneven pressure solutions
After resolving glue distribution issues, attention often shifts to clamp performance; slipping or uneven pressure can undermine an otherwise well-prepared joint.
Confirm pipe and fittings are clean, use rubber or leather pads to increase grip, and check tailstock alignment.
Apply even incremental tightening across multiple clamps, replace worn threads or clamps, and consider temporary stops or cauls to distribute pressure uniformly.
Maintenance, Storage, and Cost-Saving Tips
Routine maintenance keeps pipe clamps reliable: users should clean clamp faces and remove dried glue, inspect threads, pins, and pipe condition, and address any rust or burrs promptly.
Proper storage—hang clamps clear of moisture and stack pipes to avoid bending—extends service life.
Simple cost-saving measures like making DIY clamp pads, building extensions, and repurposing pipes reduce shop expenses.
Cleaning clamp faces and removing dried glue
Clean the clamp faces regularly to prevent dried glue buildup that compromises grip and alignment.
Use a plastic scraper or brass brush to remove cured adhesive, avoiding gouging metal. Follow with solvent (adhesive remover or denatured alcohol) on a rag to dissolve residue; allow drying.
For stubborn deposits, apply heat gently to soften glue before scraping.
Finish with light oil to protect surfaces.
Inspecting threads, pins, and pipe condition
Regular inspections of threads, pins, and the pipe itself prolong clamp life and prevent joint failure by catching wear, corrosion, and deformation early.
Technicians should check threads for stripped or rounded crests, guarantee pins and bolts move freely without bending, and inspect pipes for dents, rust, or pitting.
Replace damaged components promptly, lubricate threads lightly, and store clamps dry to maintain function and safety.
DIY clamp pads, extensions, and repurposing pipes
After confirming threads, pins, and pipe condition, attention can turn to simple, cost‑saving accessories and reuse strategies that protect workpieces and extend clamp utility.
DIY pads, pipe extensions, and repurposed lengths offer versatility. Suggestions include:
- Use scrap leather or rubber glued to jaws for non‑marring pads.
- Threaded pipe extensions increase reach without buying new clamps.
- Cut and cap old pipes for storage, spacers, or cauls.
When to Choose Alternatives to Pipe Clamps
When projects demand different pressure distribution, reach, or material protection, alternative clamps such as bar clamps, band clamps, and strap clamps may outperform pipe clamps.
A brief comparison highlights each type’s strengths—bar clamps for rigid, precise alignment; band clamps for wrapping irregular shapes; strap clamps for gentle, wide-surface pressure.
Choosing the best clamp depends on the workpiece material, geometry, and required clamping force.
Comparing pipe clamps with bar clamps, band clamps, and strap clamps
Several common clamp types—pipe, bar, band, and strap—each suit distinct tasks and materials, so choosing the right one depends on grip type, workpiece shape, pressure distribution, and setup speed. Pipe clamps excel for long glue-ups; bar clamps offer rigid alignment; band and strap clamps conform to irregular or round shapes.
| Clamp Type | Strength | Best Use |
|---|---|---|
| Pipe | High | Long boards |
| Bar | Medium-High | Frames |
| Band/Strap | Medium | Irregular shapes |
Selecting the best clamp type by project and material
Why choose a different clamp for a given job? The decision hinges on material, shape, and required pressure.
Use pipe clamps for long, straight glue-ups; bar clamps for precise, thin stock; band or strap clamps for irregular or round forms; spring clamps for light fixtures; and C-clamps for localized heavy pressure.
Match clamp type to workpiece geometry and glue cure time.
Quick Reference: Clamping Times and Glue Cure Guidelines
A concise table of clamping times and cure guidelines helps woodworkers match glue type, material, and temperature to the minimum hold time required before handling or finishing. Recommended minima vary by adhesive and conditions; longer cures increase strength. Refer to manufacturer data for full cure and sanding times.
| Glue Type | Min Clamping Time |
|---|---|
| PVA | 30–60 min |
| Polyurethane | 60–120 min |
| Epoxy | 4–24 hr |
| CA | 1–10 min |
Conclusion
In conclusion, the pipe clamp quietly earns its keep, a discreet workhorse that eases the burden of joint-making with dependable pressure and sensible simplicity. When wielded with care, proper setup, and a touch of patience, it smooths the path from raw boards to finished pieces. For those seeking alternative approaches or facing awkward assemblies, it politely nudges users toward louder, more elaborate solutions without complaint.