How to Install a French Drain: Step-by-Step DIY Guide for Effective Yard Drainage
To install a French drain effectively, follow this step-by-step DIY guide. A French drain consists of a gravel-filled trench with a perforated pipe designed to divert surface and subsurface water away from your foundation and prevent soggy lawns.
- Plan the Route and Outlet: Determine where the drain will run and where the water will be discharged.
- Check Utilities and Permits: Ensure there are no underground utilities and obtain any necessary permits.
- Excavate the Trench: Dig a trench that is 12–18 inches wide and 18–24 inches deep, maintaining a slope of 1%–2% away from your home.
- Line with Geotextile Fabric: Place fabric along the trench to prevent sediment from clogging the gravel.
- Bedding with Washed Gravel: Add a layer of washed gravel at the bottom of the trench for drainage.
- Place Perforated Pipe: Install the perforated pipe with the holes facing downwards.
- Backfill with Gravel: Cover the pipe with more gravel, ensuring it is well-drained.
- Fold Fabric and Finish: Fold the geotextile fabric over the gravel, then backfill with soil to restore the surface.
By following these steps, you can effectively manage drainage issues in your yard.
What a French Drain Is and When You Need One
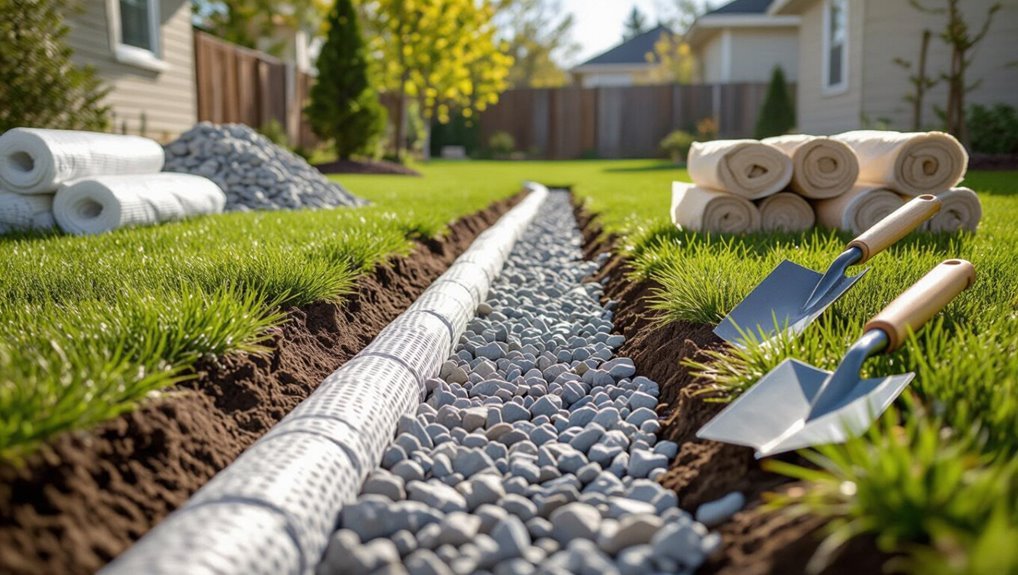
A French drain is a gravel-filled trench containing a perforated pipe that redirects surface and subsurface water away from problem areas.
It is commonly used to address soggy lawns, waterlogged low spots, and runoff that overwhelms grading.
Homeowners should consider one when soil stays saturated, puddles persist after rain, or water begins to seep toward or into the foundation.
Definition and basic components of a French drain
French drains are engineered trenches lined with gravel that contain a perforated pipe to redirect subsurface water away from foundations, low spots, and saturated soil.
Components include trenching, geotextile fabric, washed gravel, perforated pipe, and outlet or discharge point.
Proper slope and backfill prevent clogging.
Guidance on how to install a french drain clarifies component roles and sequence.
Common yard drainage problems solved by a French drain
Persistent standing water, soggy lawns after rain, and damp basements are common indicators that surface or subsurface runoff is not draining properly and that a French drain could help.
It redirects excess water, relieves saturated yard areas, prevents erosion along slopes, protects landscaping and hardscapes, and reduces hydrostatic pressure near foundations.
It also mitigates runoff pooling around driveways and walkways.
Signs you should install a French drain (saturation, pooling, foundation seepage)
Several clear signs indicate when a French drain is needed: repeated yard saturation, visible pooling after storms, and water seeping into basements or crawlspaces.
Other indicators include soggy lawn patches, persistent damp spots near foundations, mildew or musty odors indoors, and basement wall efflorescence.
If gutters and grading don’t resolve these issues, a French drain can redirect groundwater and protect landscaping and structural integrity.
Quick overview: Installing a French Drain in a Nutshell
A French drain is typically installed by trenching from the problem area to a safe discharge point, lining the trench with fabric, adding gravel and perforated pipe, then backfilling and grading for proper flow.
Most DIY installations take a weekend for a small yard, while larger projects can require a few days and sometimes professional help.
Costs range from a few hundred dollars for materials on a small project to several thousand dollars when hiring contractors or handling extensive excavation.
One-paragraph summary of the process
Begin by marking and digging a sloped trench to direct water away from the problem area.
Lay landscape fabric, add a gravel base, position a perforated pipe with holes facing down, cover with more gravel, fold fabric over to block soil, and backfill the trench.
Compact soil surface and add top dressing or sod to restore appearance while maintaining the drain’s function.
Typical time, cost range, and required skill level
How long does a French drain take and what skills are needed?
Typical single-yard installs take a weekend (8–16 hours) for one or two people.
Costs range $200–$1,500 DIY depending on materials and length; contractor rates commonly $1,000–$4,000.
Basic excavation, leveling, and pipe-laying skills suffice; heavy digging, soil assessment, or complex grading may require experienced help or professional contractors.
Planning Your French Drain Project
Before breaking ground, the homeowner should assess yard topography and map water flow to determine the best drain alignment and slope.
They must check local codes, obtain any required permits, and call to locate underground utilities.
Finally, decisions about trench, curtain, or perimeter drain types and a concise materials-and-tools checklist will guide budgeting and scheduling.
Assessing your yard and mapping water flow
When evaluating a yard for a French drain, the homeowner should first identify where water accumulates, where it originates, and the natural flow paths across the property.
Mark low spots, slopes, and pooling after storms. Note down gutters, downspouts, roof runoff, hardscape drainage, and saturated soil areas.
Sketch contour lines and proposed trench routes to guarantee gravity-driven discharge and minimal disruption.
Local codes, permits, and locating utilities
Although regulations vary by jurisdiction, validating local codes and obtaining necessary permits is essential before digging for a French drain.
Verify setback, grading, and stormwater rules with municipal authorities.
Contact utility-locate services to mark underground lines and avoid hazards.
Retain records of approvals and markings.
Compliance prevents fines, protects infrastructure, and guarantees the project proceeds safely and legally.
Choosing between trench, curtain, and perimeter French drains
Which type of French drain will best solve the site’s drainage problem depends on the source and path of the water, the landscape layout, and budgetary and maintenance considerations.
Trench drains redirect concentrated flows; curtain drains intercept shallow groundwater across slopes; perimeter drains protect foundations by collecting around structures.
Select based on water origin, required capacity, disturbance tolerance, long-term access, and available discharge outlet.
Materials and tool checklist
Having chosen the appropriate drain type, planning shifts to assembling the right materials and tools to secure a smooth installation.
The checklist focuses on durability, proper sizing, and efficient workflow: pipe, gravel, fabric, digging tools, and safety gear guarantee function and installer safety.
Gather quality components, measure twice, and verify local code compliance before excavation.
- Perforated PVC or corrugated pipe
- Washed gravel
- Geotextile fabric
- Shovel, trencher, level
- Gloves, goggles, knee pads
Choosing Materials and Sizing
Selection of pipe, aggregate, and fabric shapes the drain’s performance, with choices between perforated PVC and corrugated pipe carrying distinct durability and clog-resistance trade-offs.
Appropriate gravel size, geotextile wrapping, pipe diameter and minimum trench slope must match expected flow and soil conditions, while landscape constraints influence layout.
Termination options include daylighting, routing to a dry well, or connecting to a sump pump, each with different site and maintenance implications.
Pipe types (perforated PVC vs. corrugated) and pros/cons
When choosing drainpipe for a French drain, homeowners typically decide between perforated PVC and corrugated plastic, each offering distinct trade-offs in durability, flow capacity, and ease of installation. PVC is rigid, smooth, and longer-lasting; corrugated is flexible and cheaper but less durable. Selection depends on trench layout, budget, and expected load.
| PVC | Corrugated |
|---|---|
| Durable | Flexible |
| Smooth flow | Cheaper cost |
| Rigid install | Easier bending |
Gravel, geotextile fabric, and landscape considerations
Gravel, geotextile fabric, and site layout determine a French drain’s effectiveness and longevity: the chosen stone size, fabric type, and trench depth must match soil conditions, runoff volume, and nearby landscaping.
Use clean, angular gravel (¾–1½ inch) for void space, nonwoven permeable fabric to prevent fines, and adjust trench placement to protect roots, hardscape, and plantings while facilitating maintenance access.
Pipe diameter and trench slope recommendations
Pipe diameter and trench slope are the two primary sizing variables that control a French drain’s flow capacity and self‑clearing ability.
Typical installations use 3‑ to 4‑inch perforated pipe; 4 inches recommended for higher runoff or longer runs.
Maintain a slope of 1% (1:100) to 2% (2:100) toward the outlet.
Steeper slopes increase velocity but may reduce sediment settlement.
Outlet options: dry well, daylight, sump pump connection
After sizing the pipe and confirming the trench slope, attention turns to where the collected water will discharge: a dry well, a daylight outlet, or a connection to a sump pump system.
Choose a dry well for infiltration where soil drains well; use daylighting to surface grade or storm drains when available; connect to a sump pump for uphill sites or where gravity discharge is impossible.
Step-by-Step Installation Guide
The installation proceeds in a clear sequence: mark the trench route and set the required grade, then excavate to the specified depth, width, and slope while observing safety.
Next, prepare a compacted bedding of gravel, lay filter fabric, position the perforated pipe maintaining slope, and cover with additional gravel.
Finish by wrapping the fabric over the gravel and backfilling with soil to restore the surface.
Marking the trench route and setting grade
Begin by outlining the trench path with a chalk line or marking paint, following the planned slope and avoiding utilities, trees, and hardscape.
Stake route at intervals and string a taut line to visualize consistent grade. Use a line level or laser level to confirm fall toward the outlet.
Mark depth points along the line and note obstacles for rerouting or protective measures.
Excavating the trench safely (depth, width, and slope)
Once the route and grade are confirmed, excavation can proceed with careful attention to depth, width, and slope.
The trench should be dug to the planned depth (typically 18–24 inches), wide enough for pipe plus allowance (12–18 inches), and maintain a consistent slope (1%–2%, about 1/8–1/4 inch per foot) toward the outlet.
Remove roots and unstable soil; avoid undermining structures.
Preparing the trench base and bedding gravel
Prepare a stable, level base by removing loose material and tamping the bottom of the trench to eliminate voids and soft spots.
Spread a 2–3 inch layer of clean, washed gravel as bedding, compacting it evenly to create uniform support.
Check for consistent depth and firmness along the trench length.
Remove oversized stones and debris to prevent future settling or pipe damage.
Laying fabric, pipe placement, and ensuring slope
Lay geotextile fabric along the trench walls and bedding, allowing enough excess to fold over the gravel later; position the perforated pipe on the compacted gravel with the perforations facing down or sideways, secure inline fittings, and verify a continuous, unobstructed path.
Maintain a consistent grade (typically 1% slope) toward the outlet, using a level or string line, and adjust bedding to correct low spots.
Backfilling with gravel, wrapping fabric, and final soil cover
Begin filling the trench by placing clean, washed gravel around and over the perforated pipe to a depth that covers the pipe by at least 2–3 inches, compacting gently to eliminate voids while preserving the designed slope.
Fold the landscape fabric over the gravel to prevent silt infiltration, then add remaining gravel to just below grade.
Top with native soil, tamp lightly, and seed or sod as desired.
Connecting to outlet and testing the system
Connect the drain’s outlet to the chosen discharge point using appropriate fittings and solid pipe or a short flexible connector, ensuring all joints are tight and sloped away from the trench.
After securing connections, run water through the system to confirm unobstructed flow and correct pitch.
Inspect joints for leaks, adjust fittings or add sealant as needed, and verify discharge occurs at the designated location.
Restoring lawn or landscape after installation
Once the drain is confirmed functional, restore the trench by backfilling with the removed soil in layers, compacting each lift to prevent future settling and maintain surface grade.
Sod or seed the area, irrigate as needed, and monitor for erosion. Mulch beds and replace plants carefully to avoid root damage.
- Reuse topsoil for fertility
- Compact without overdoing
- Choose appropriate seed/sod
- Protect new growth
- Inspect after storms
Troubleshooting and Common Installation Mistakes
Common French drain failures often show predictable signs such as standing water or slow drainage from incorrect slope or pipe blockage.
Poorly installed filter fabric and soil intrusion accelerate clogging, while lack of a proper outlet or overflow leads to backup during heavy rain.
The following section explains how to diagnose these issues and outlines targeted fixes to restore proper function.
Incorrect slope or pipe blockage symptoms
Check the drain system for standing water, slow flow, or unexpected surface pooling—these are primary indicators of an incorrect slope or a pipe blockage.
Other signs include gurgling noises, soggy patches near the outlet, foul odors from stagnant water, or repeated overflow during moderate rain.
Inspect pipe grade, joints, and visible obstructions; consider temporary flushing to confirm flow restriction.
Poor fabric use and soil infiltration problems
Improper selection or installation of geotextile fabric often allows fine soil particles to migrate into the gravel and pipe, gradually clogging the drain and reducing permeability; symptoms include rapid loss of free-draining material, silty water at the outlet, and diminished flow after only a few rain events.
Recommended corrective actions include replacing torn or inappropriate fabric, adding a proper filter layer, and excavating and flushing contaminated aggregate to restore function.
Inadequate outlet or overflow planning
Neglect of outlet and overflow planning frequently undermines a French drain’s effectiveness, leaving collected water without a safe, long-term discharge path.
Installers often omit a defined outlet, undersize discharge lines, or fail to include emergency overflow routes.
Proper grading, connection to approved storm drains or daylight outlets, and provision for overflow protect adjacent areas and prevent backup, erosion, and structural damage.
How to diagnose and fix common failures
After confirming outlet and overflow integrity, attention turns to diagnosing and repairing the most common French drain failures.
Inspect standing water, slow drainage, silted pipe, collapsed trench, or root intrusion.
Unclog with hydro-jetting or manual rod, replace crushed pipe, regrade trench, add filter fabric and fresh gravel, and trim roots.
Test flow after each repair to guarantee restoration.
Maintenance and Long-Term Care
Regular inspections should follow a simple checklist and schedule to catch clogs, settlement, or plant intrusions before they worsen.
Cleaning methods—such as flushing, rod access, or replacing sections of pipe and gravel—are described with guidance on when replacement is necessary.
Seasonal advice covers winter precautions and freeze protection to preserve function through cold weather.
Routine inspection checklist and schedule
A concise inspection checklist and a predictable schedule guarantee a French drain remains functional and prevents small issues from becoming costly repairs.
Inspect visually after heavy rain, check outlet flow, verify surface grading, confirm vegetation isn’t obstructing inlets, and monitor for new wet spots.
Maintain quarterly reviews in spring and fall; add post-storm checks as needed.
- Visual condition
- Outlet flow
- Surface grading
- Vegetation control
- Wet-spot monitoring
Cleaning methods and when to replace pipe or gravel
Inspecting and clearing blockages in a French drain preserves its function and extends the life of pipe and gravel.
Use a wet/dry vacuum, water jet, or plumber’s snake to remove sediment and roots from the pipe. Rinse gravel with a hose or replace top layers if clogged.
Replace pipe when cracked, collapsed, or irreparably root‑bound; replace gravel if compacted or contaminated.
Winter considerations and freeze protection
When temperatures drop below freezing, French drain performance can be compromised by ice formation in the pipe, frozen backfill, or saturated soil that heaves and shifts.
Preventive measures like ensuring proper slope, maintaining clear outlet paths, and adding insulating backfill help minimize freeze-related blockages and damage.
Regularly clear surface drains, inspect outlets after thaw cycles, add frost-resistant pipe or heat tape where necessary, and avoid compaction.
Cost Estimates, Timeframes, and When to Hire a Pro
A comparison of DIY cost components—materials, tools, and rental equipment—against professional installation fees helps homeowners set realistic budgets.
Site-specific factors such as rocky soil, steep slopes, and mature tree roots can raise costs and extend timelines.
When complexity or permitting is likely, homeowners should vet contractors by checking licenses, references, insurance, and asking for written estimates and project schedules.
DIY cost breakdown vs. professional installation
Compare upfront expenses and ongoing value before choosing between DIY installation and hiring a professional for a French drain. DIY saves labor costs (materials, rental) and suits simple runs; expect longer time and potential mistakes. Professionals charge higher fees but offer warranties, speed, and compliance. Consider project scale, confidence, and local codes.
| Option | Typical Outcome |
|---|---|
| DIY | Lower cost, more time |
| Pro | Higher cost, faster |
| Small yard | DIY feasible |
| Large project | Pro recommended |
| Warranty | Pro advantage |
Factors that increase complexity (rocky soil, steep slopes, trees)
Costs and timelines can shift dramatically if site conditions are anything other than flat, soft soil.
Rocky ground requires jackhammering or blasting, raising labor and equipment costs.
Steep slopes need retaining measures, erosion control, and staged excavation.
Trees complicate routing, risk root damage, and may need root pruning or removal.
Each factor increases time, permits, and likelihood of hiring specialized contractors.
How to evaluate contractors and what to ask
When should a homeowner move from DIY planning to soliciting professional bids for a French drain? A contractor should be considered if soil, slope, permits, or time exceed DIY capacity.
Request written estimates detailing scope, materials, trench depth, drainage outlet, permit handling, timeline, and payment schedule.
Ask for licenses, insurance, references, past project photos, and warranty terms before hiring.
Alternatives and Complementary Drainage Solutions
The article compares surface grading and swales with French drains to highlight where each method is most effective.
It then notes dry wells, rain gardens, and permeable paving as complementary options for managing runoff and promoting infiltration.
Finally, it addresses how multiple strategies can be combined on large or complex sites to create a tailored, resilient drainage plan.
Surface grading and swales comparison with French drains
Although both surface grading and swales redirect runoff across or along the ground rather than beneath it, they function differently from French drains and are often chosen for distinct site conditions; grading reshapes slope, swales convey surface flow, French drains manage subsurface water.
| Method | Best use | Maintenance |
|---|---|---|
| Surface grading | Broad flattening | Low |
| Swales | Conveying flow | Medium |
| French drain | Subsurface relief | Medium-high |
Dry wells, rain gardens, and permeable paving integration
Beyond surface grading, swales, and French drains, other strategies handle water on or near the surface and support groundwater recharge: dry wells, rain gardens, and permeable paving each offer different ways to capture and infiltrate runoff.
Dry wells collect concentrated flows for deep infiltration; rain gardens slow, filter, and store stormwater biologically; permeable paving reduces runoff by allowing surface infiltration while supporting load-bearing surfaces.
Combining solutions for large or complex sites
When sites are large, varied in grade, or subject to concentrated runoff, combining multiple drainage measures creates a resilient, adaptive system that manages flow, promotes infiltration, and protects structures. Designers integrate French drains, swales, retention basins, rain gardens, dry wells, and permeable paving.
Strategic placement, appropriate sizing, overflow routing, and maintenance plans guarantee redundancy, prevent failures, and distribute peak flows while enhancing groundwater recharge and landscape function.
Safety, Environmental, and Legal Considerations
Before beginning work, the installer verifies buried utilities and follows safe excavation protocols to prevent injury and damage.
They also consider local runoff regulations and neighbor impacts when directing discharged water.
Environmentally preferable materials and practices are chosen to minimize pollution and soil disruption.
Protecting utilities and safe excavation practices
Any excavation for a French drain requires careful identification and protection of underground utilities to prevent service disruptions, safety hazards, and legal liabilities.
Call local utility marking services before digging, verify markings, hand-dig near known lines, and maintain safe slopes and shoring in trenches.
Use proper personal protective equipment, keep excavation sites clearly signed and fenced, and document permits and inspections.
Runoff discharge rules and neighbor considerations
After confirming utility locations and securing the excavation, attention shifts to where the drained water will go and how that affects others.
Local ordinances often restrict discharge to streets, neighbors’ properties, or protected areas; permits may be required.
Designers should route runoff to approved retention, storm drains, or infiltration zones, document plans, and notify adjacent property owners to prevent disputes and liability.
Environmentally friendly material choices
Select materials for a French drain with an emphasis on durability, low pollution risk, and compliance with local regulations.
Choose inert aggregate (washed gravel), UV-resistant, non-toxic geotextile fabric, and PVC or corrugated HDPE pipe rated for buried use.
Avoid treated wood, contaminated fill, and materials leaching chemicals.
Verify local disposal rules for excavated soil and obtain required permits before installation.
Quick Reference: Materials Checklist and Typical Measurements
A concise checklist and a few typical dimensions help guarantee materials are purchased correctly and installation proceeds without delays.
Recommended quantities and measurements depend on yard size; these common items cover most DIY projects.
- 4–6 in. perforated pipe (length by trench run)
- Geotextile fabric (width ≥ trench width + overlap)
- 3/4 in. washed gravel (depth 6–12 in.)
- Trench slope 1% (1 ft drop per 100 ft)
- Catch basin or inlet (as needed)
Conclusion
After mastering the art of digging holes to hide water, the reader now possesses a French drain and a smug sense of control over lawn theatrics. Ironically, the triumph is quiet: no dramatic waterfalls, only steady, invisible drainage doing its unglamorous work. If the yard seems less like a pond and more like a yard, that’s success—proof that meticulous planning and elbow grease can turn soggy chaos into politely functioning suburban plumbing.