How to Clear Outside Drain Pipe: Simple DIY Steps & Tips
Key Takeaway: To clear a clogged outside drain pipe effectively, follow these steps:
- Inspect the Area: Look for surface grates, cleanouts, and any visible debris.
- Remove Debris: Manually clear leaves and sediment using your hands or a stiff brush.
- Use a Drain Snake: For deeper blockages, employ a drain snake or plumber’s rods.
- Flush the Line: Use a high-pressure hose or jetter to flush the pipe. Always wear gloves and eye protection.
- Seek Professional Help: If issues persist or if sewage is involved, contact a professional.
A prompt response to a clogged drain can prevent pooling, erosion, and potential basement seepage.
What Problem Does a Clogged Outside Drain Cause?
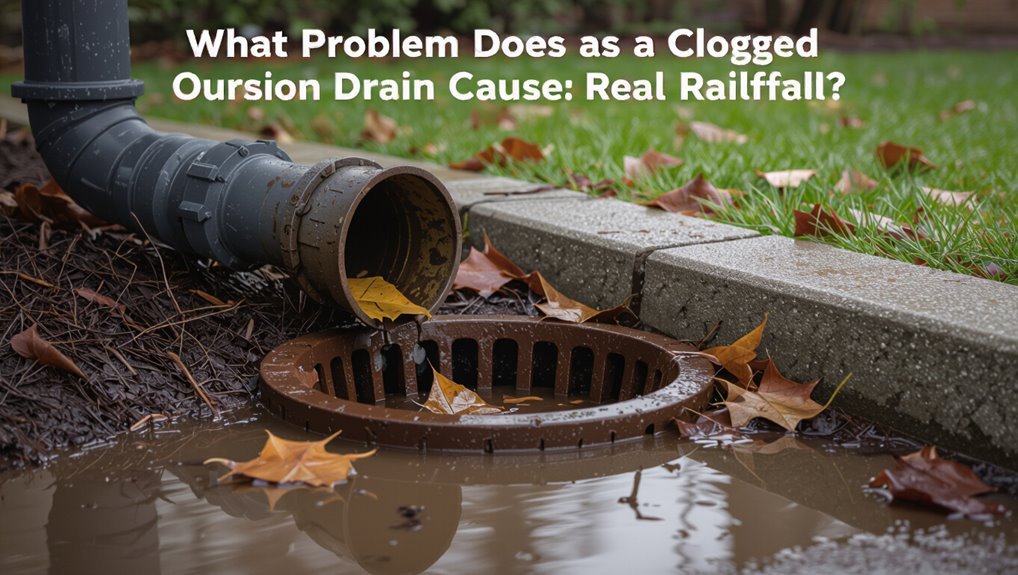
How does a clogged outside drain manifest its harm? Water pools around foundations, walkways, and driveways, accelerating erosion and undermining soil stability.
Persistent standing water invites mosquitoes and promotes algae, mold, and vegetation growth that can damage surfaces.
Overflow during heavy rain floods basements, garages, and landscaping, harming belongings and electrical systems.
Freeze-thaw cycles worsen cracks in concrete and asphalt where water accumulates.
Slow drainage increases hydrostatic pressure against foundations, seeping into cracks and causing damp interiors and structural weakening.
Property value and safety decline as damage spreads, and repair costs rise when blockages remain unaddressed over time.
How to Tell If Your Outside Drain Is Blocked
Visible water pooling near the drain is a primary sign of blockage.
A noticeably slow drainage flow during rain or washing further indicates an obstruction.
Persistent unpleasant odors from the drain suggest trapped organic material that needs attention.
Visible Water Pooling
When water gathers and lingers near gutters, downspouts, or yard drains, it often signals a blockage rather than normal runoff. Visible pooling appears as puddles that persist after rain, soggy areas near drain inlets, or standing water at grate edges. The water may be cloudy, contain debris, or attract insects.
Note exact locations and frequency: recurring pools after light rain indicate impaired flow. Check for displaced soil, overflowing gutters, or wet spots along pipe runs. Photographing pools helps track changes. Prompt clearing prevents erosion, foundation damage, and mosquito breeding; addressing the obstruction restores proper drainage.
Slow Drainage Flow
Why is the drain taking forever to clear? Slow drainage flow indicates partial blockage or restricted pipe slope.
Water retreats slowly after rain, leaving shallow puddles that dissipate over hours rather than minutes.
Check multiple outlets: uniform slowness suggests main-line restriction; isolated slow spots point to localized debris or root intrusion.
Inspect the grating and catch basin for sediment, leaves, or mulch buildup.
Listen for gurgling or bubbling when water moves—signs of trapped air from constriction.
Measure time-to-clear after a controlled pour to quantify flow.
Document findings before attempting mechanical or chemical clearing to target the cause accurately.
Unpleasant Odors
Often a foul, persistent smell near yard drains signals a developing blockage rather than a transient nuisance. The odor often indicates trapped organic matter, stagnant water, or sewer gases rising through compromised traps. Inspection reveals dark residue, insect activity, or slow venting. Remedies include removing debris, flushing with water, and using enzymatic cleaners; severe cases need professional snaking or camera inspection. Regular cleaning prevents recurrence. Monitor smell intensity and correlate with rainfall or use to locate the clog source.
| Sign | Likely cause |
|---|---|
| Rotten smell | Organic decay |
| Sulfur/rotten-egg | Sewer gas |
| Musty | Stagnant water |
| Intermittent odor | Partial blockage |
DIY vs Pro: When to Call a Plumber for an Outside Drain
In deciding whether to tackle an outside drain problem personally or hire a plumber, the homeowner should weigh the scope of the blockage, available tools, and risk of property damage.
Minor clogs from leaves or mud can be handled by a confident DIYer; persistent backups, foul odors suggesting sewer issues, or repeated problems indicate professional assessment.
Complex diagnoses, deep sewer lines, collapsed pipes, or cases involving sewage exposure require licensed plumbers for safety and code compliance.
Cost vs. risk should guide the choice: DIY saves money for simple fixes, while pro service prevents larger repairs.
- Evaluate frequency and severity
- Consider health and safety risks
- Check local repair regulations
Tools and Supplies for Clearing an Outside Drain
Preparing to clear an outside drain requires a concise set of tools and supplies chosen for the job’s scale and hazards.
Essential items include a sturdy drain snake or auger for roots and blockages, a high-pressure garden hose or jetter attachment for flushing, and plumber’s rods for long runs.
Carry a bucket, heavy-duty trash bags, and coarse brushes or pipe-cleaning attachments for manual debris removal.
Stock appropriate chemical drain cleaners only when compatible with pipe material, and have replacement washers, couplings, and basic hand tools (wrenches, pliers, screwdrivers).
A flashlight and inspection mirror aid visual checks.
Safety Gear and Precautions for Outside Drain Work
Before starting work on an outside drain, the technician selects appropriate personal protective equipment and establishes basic safety controls to prevent injury and contamination. Gloves resist chemicals and punctures; eye protection blocks splashes; waterproof boots prevent slips and exposure.
The technician confirms ventilation, marks the work area, and uses barricades or cones to warn others. Electrical tools stay dry and GFCI‑protected. Chemical cleaners are handled per label instructions and stored safely. Hands are washed after work. Hazardous waste is contained for proper disposal. Emergency contact numbers and a first‑aid kit remain accessible throughout the job.
- Gloves, goggles, boots
- Area marking and barriers
- Chemical handling and disposal
Locate the Outside Drain Cleanout or Access Point
To find the outside drain cleanout or access point, the technician first surveys the property perimeter and follows the visible run of the drain line from the building toward street or low‑lying discharge areas.
They look for capped PVC pipes, threaded plugs, or inset concrete/metal boxes near foundations, sidewalks, or lawn contours.
Maps, utility records, and prior inspection notes speed locating obscure access points.
If grass or soil conceals fittings, gentle probing with a screwdriver or soil probe reveals edges without damaging pipes.
Once identified, the access is cleared for inspection tools, photographed for records, and marked for future maintenance.
Clear Surface Debris From Drain Grates and Covers
Clearing surface debris from drain grates and covers begins with a visual sweep to identify leaves, twigs, sediment, and any trash that could impede flow.
The observer removes loose material by hand or with a gloved rake, placing debris in a bag for disposal.
Stubborn sediment is brushed into a dustpan, avoiding force that might dislodge the grate.
Inspect for trapped small objects and note damage or corrosion requiring repair.
After cleaning, run a short hose flow over the grate to confirm unobstructed drainage and to flush remaining fines toward the opening.
- Remove large debris by hand or rake
- Brush sediment into a dustpan
- Rinse and inspect for damage
Unclog a Downspout Before It Reaches the Outside Drain
Before water reaches the outside drain, the downspout should be checked for leaves, twigs, and other debris that can form blockages.
Any obstructions should be removed by hand or with a narrow tool, then the downspout flushed with a strong stream of water to confirm flow.
Finally, connections and joints should be inspected for leaks or misalignment and repaired to guarantee unobstructed drainage.
Remove Debris Blockages
Begin by inspecting the downspout opening for leaves, twigs, and other debris that commonly block flow. The technician uses gloves and a narrow tool (scoop, plumber’s snake tip, or bundled wire) to extract compacted material carefully.
Work from the top, removing visible obstructions, and check joints for trapped sediment. If debris resists, apply gentle tapping to dislodge it before pulling.
After clearing, look into the downspout with a flashlight to confirm a continuous path to the drain connection. Regular debris removal prevents backups and reduces the need for chemical cleaners.
- Use hand tools for controlled removal
- Check seams and bends
- Repeat seasonal inspections
Flush With Water
Flush the downspout with a strong, steady stream of water to assess and push through any remaining sediment before it reaches the exterior drain. A hose with a high-pressure nozzle clears loose grit and reveals persistent clogs by observing flow and backflow.
Start at the top, working downward, pausing to let displaced material wash away. If water pools or reverses, redirect flow or repeat bursts to compact and flush debris.
Collect discharged sediment at the drain opening to prevent re-entry. Continue until water runs freely and visibly exits the drain outlet, indicating the downspout is clear.
Inspect And Repair Connections
After confirming water runs freely, attention shifts to the physical connections along the downspout to locate leaks, misalignments, or crimped sections that trap debris before it reaches the exterior drain.
The inspector checks joints, brackets, and passage points for gaps or corrosion.
Loose straps are tightened; bent sections are straightened or replaced.
Seals receive silicone or appropriate sealant.
If a removable elbow or filter is present, it is detached, cleaned, and reinstalled with proper alignment to guarantee unobstructed flow.
Final testing verifies repairs hold under steady flow without drips or pooling.
- Check joints and brackets for gaps
- Replace or realign crimped sections
- Reseal leaks with appropriate sealant
Use a Garden Hose to Flush the Outside Drain
Using a garden hose to clear an outside drain is an effective first step when clogs are light or caused by loose debris. One person should feed the hose into the pipe as far as possible, apply steady pressure, and gradually withdraw while flushing. Observe water flow and repeat from different angles if needed. Stop if resistance or backing up occurs to avoid damage.
| Step | Action | Tip |
|---|---|---|
| 1 | Insert hose | Use a smooth-tip nozzle |
| 2 | Apply steady flow | Moderate pressure only |
| 3 | Withdraw slowly | Monitor discharge |
| 4 | Repeat | Try different angles |
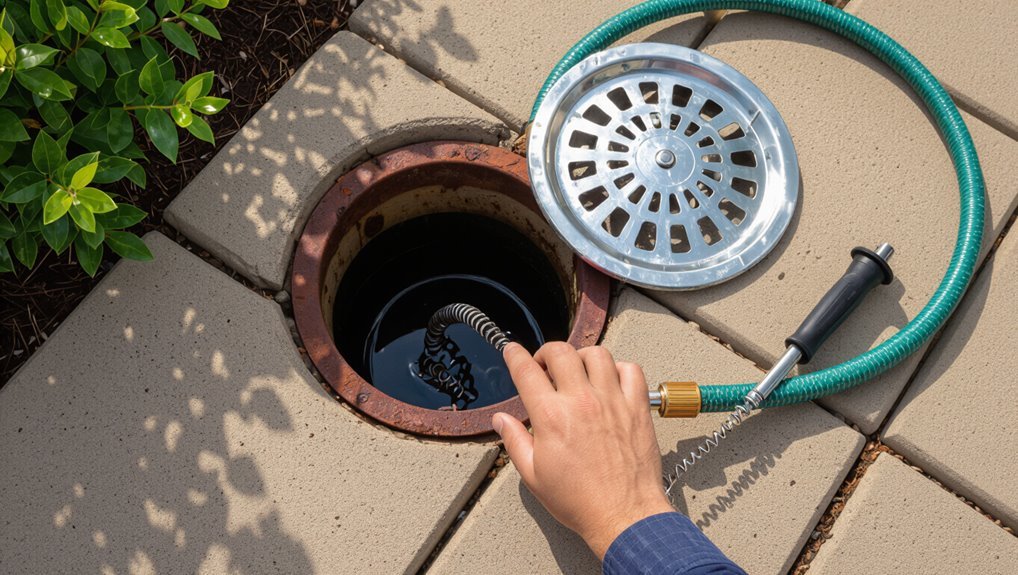
Use a Drain Snake on Outdoor Drain Lines
Next, the article explains how a drain snake can clear stubborn blockages that a hose cannot.
It outlines how to choose the right snake for outdoor lines—length, cable thickness, and tip type—and stresses proper, safe snaking techniques to avoid pipe damage or personal injury.
Practical tips on steady feed, controlled rotation, and protective gear are introduced before a step-by-step demonstration.
Choosing The Right Snake
Which type of snake fits an outdoor drain depends on pipe diameter, length, and the nature of the blockage. The right choice minimizes damage and maximizes clearing power.
For small-diameter yard drains a compact hand auger suffices; long runs require a powered drum or sectional cable; dense obstructions like roots call for a heavy-duty, toothed head or root-cutting attachment. Consider cable thickness (5–10 mm), flexible vs. rigid shafts, and compatibility with existing access points. Rent when occasional use is expected; buy for repeated tasks. Proper selection saves time and reduces risk to pipe integrity.
- Hand auger: small pipes, light clogs
- Drum or sectional cable: long runs
- Root-cutting tool: heavy obstructions
Safe Snaking Techniques
Begin with clear preparation: inspect the access point and surrounding area, don appropriate gloves and eye protection, and guarantee a stable footing before feeding the snake into the outdoor drain line. The operator advances the cable steadily, rotating to dislodge debris while avoiding force that risks pipe damage. Withdraw periodically to clear cuttings and inspect the tip. Use a light and camera if available for guidance. Finish by flushing the line with water to confirm flow and check for leaks. Clean and lubricate the snake before storage.
| Step | Action | Reason |
|---|---|---|
| 1 | Insert slowly | Prevent pipe damage |
| 2 | Rotate cable | Break clogs |
| 3 | Retract often | Remove debris |
| 4 | Flush line | Confirm clearance |
Use a Manual Plumber’s Auger on Yard Drains
A manual plumber’s auger provides a simple, controlled way to break up clogs in yard drain lines without heavy equipment; its flexible cable can reach bends and root intrusions that rigid tools cannot.
The operator feeds the cable into the cleanout or access point, rotating the drum to advance the tip and cut through obstructions. Periodic withdrawal clears debris. Careful probing prevents pipe damage and identifies lodged material. After clearing, flush with water to confirm flow and remove residual grit. Routine use can prevent major blockages.
- Choose appropriate cable length and head type
- Rotate steadily; avoid forcing the cable
- Inspect removed debris and clean tools
Use a Powered Drain Auger Safely Outdoors
Operate a powered drain auger with attention to setup, personal safety, and the outdoor environment: make certain the unit and power source are rated for outdoor use, inspect cable and drum for damage, wear eye and hand protection, and position the machine on stable, level ground away from standing water.
Feed cable slowly, using the foot switch or clutch per manufacturer instructions, and avoid forcing it against resistance. Keep bystanders clear, secure long hair and loose clothing, and use GFCI protection on any extension cords. Withdraw cable while reversing rotation to clear debris gently; clean and lubricate after use.
Use a High-Pressure Nozzle to Remove Blockages
After using a powered auger, a high-pressure nozzle can finish clearing stubborn debris and flush accumulated sediment from an outside drain pipe. The nozzle attaches to a garden hose or pressure washer; water jets cut through grime and push waste downstream. The operator advances the nozzle slowly, maintaining steady pressure and checking for backflow. Inspect fittings and seals beforehand to prevent leaks. Wear eye protection and keep bystanders clear.
- Choose a nozzle rated for drain cleaning and compatible pressure.
- Start with moderate pressure, increasing only if needed.
- Retract slowly while flushing until water runs clear.
Use a Wet/Dry Vacuum to Pull Out Outdoor Clogs
When mechanical pressure fails, a wet/dry vacuum can extract debris from an outside drain.
The operator should select a model with sufficient suction and the correct hose and filter for wet material.
Proper technique — secure the hose, wear protection, and avoid creating seals that risk blower-back — keeps the process effective and safe.
Choose The Right Vacuum
Selecting the right vacuum is crucial for effectively extracting outdoor drain clogs: a sturdy wet/dry shop vacuum with sufficient airflow and a large-capacity tank handles debris, water, and mud better than a household upright.
The model chosen should offer removable filters, a blower function, and durable hoses sized to fit the drain opening. Power rating and CFM indicate suction strength; higher values improve pickup of heavy, wet material.
Portability and nozzle attachments aid access along outdoor runs. Consider corrosion-resistant components for longevity when exposed to grit and moisture.
- Check CFM and motor power.
- Confirm wet/dry capability.
- Match hose diameter to the drain.
Safe Vacuuming Technique
With the wet/dry vacuum positioned on stable ground and its hose fitted securely to the drain opening, the operator should power the unit briefly at low suction to confirm airflow direction and seal integrity before engaging full suction.
The operator wears eye and respiratory protection, checks for electrical safety, and keeps the cord dry.
Gradually increase suction while monitoring hose connection and audible changes.
Use short bursts to dislodge compacted debris, pausing to inspect collected material and clear the filter when necessary.
Avoid prolonged continuous suction to prevent motor overheating.
After clearing, rinse the drain and inspect for remaining obstructions.
Dissolve Organic Clogs With Eco-Friendly Enzymatic Cleaners
Pouring an eco-friendly enzymatic cleaner into a slow or backed-up outside drain targets the bacteria and enzymes that break down leaves, grass clippings, and other organic matter without harming soil or wildlife.
These products work gradually, digesting organic build-up inside pipes and trap areas; they are best applied after removing large debris and ensuring some standing water to activate enzymes.
Use according to label directions, allowing several hours or overnight for results.
Repeat weekly during autumn or after heavy yard work to prevent recurrence.
Choose formulations labeled for outdoor drains and safe for septic systems.
- Apply after preliminary debris removal
- Allow extended contact time
- Repeat as preventive maintenance
Avoid Harsh Chemicals When Clearing Outside Lines
After using eco-friendly enzymatic cleaners, homeowners should steer clear of harsh chemical drain solvents for outside lines. Such products can corrode PVC, metal joints, and aging seals, causing leaks and costly repairs.
They may also harm surrounding vegetation, pollute soil, and enter storm drains or groundwater. Safer alternatives include mechanical clearing tools, root-safe enzymatic treatments, and targeted flushing with water.
If stubborn blockages persist, consult a professional who can assess pipe material and environmental risk before applying aggressive methods. Prioritizing gentler approaches preserves pipe integrity, protects landscapes, and reduces long-term maintenance expenses.
Temporarily Clear Roots From an Outside Drain
Begin by exposing the affected pipe section and confirming the blockage is root-related using a probe or small camera; once identified, a homeowner can temporarily remove intrusive roots by cutting them back with a mechanical auger, root saw, or plumber’s snake equipped with a root-cutting blade.
Care should be taken to avoid further pipe damage; work slowly, withdraw debris frequently, and wear eye and hand protection.
After clearing, flush the line with water to remove loose fragments and retest flow.
Note this is a temporary fix; recurring invasion indicates repair or re-routing is needed.
- Use proper cutting blades and sizes
- Clear and dispose of root material
- Monitor for quick regrowth
Inspect Outside Drain Pipes for Holes and Cracks
A visual surface check should first scan the exterior of the pipe for obvious fractures, rust, or missing joints.
Next, a probe with a rod can be used along accessible sections to feel for soft spots, gaps, or shifted segments.
Finally, a leak-detection soak test — running water while observing for seepage — confirms hidden holes or hairline cracks.
Visual Surface Check
With a steady gaze along the pipe’s length, the inspector scans for visible holes, hairline cracks, softened sections, and loose joints that could allow leaks or infiltration.
The observer notes discoloration, surface pitting, and crushed areas, mapping defects for repair or replacement.
Surface checks prioritize accessibility, documented locations, and photographic evidence to guide next steps.
Immediate small breaches may be temporarily sealed; extensive damage warrants section replacement.
Safety considerations include stable footing and avoiding undue pressure on brittle material.
Findings are recorded succinctly, emphasizing severity, location, and whether further internal probing is required.
- Note discoloration and surface pitting
- Mark loose or misaligned joints
- Photograph and log defects
Probe With A Rod
The inspector inserts a rigid probe or thin metal rod into accessible sections of the outside drain to detect concealed holes, cracks, or soft spots not visible from the surface.
Using controlled, gentle pressure, the probe is advanced while rotating slowly to feel for irregularities, voids, or areas where the lining yields.
Attention focuses on joints, bends, and connections to fittings where deterioration concentrates.
Any give, snag, or unexpected movement indicates potential damage requiring closer assessment or repair.
Findings are noted by location and severity to guide targeted fixes or professional evaluation, minimizing unnecessary excavation and preserving intact sections.
Leak Detection Soak Test
Begin by filling the accessible section of the outside drain with water and observing for steady loss or active seepage: this controlled soak test pressurizes the pipe enough to reveal holes, hairline cracks, and loose joints that visual inspection and probing might miss.
The observer notes water level changes and inspects exposed fittings and surrounding soil for wet spots. If seepage occurs, mark locations and dry the area to confirm.
Small leaks can be sealed; larger breaks need section replacement. Record findings and take photos before repairs or when consulting a professional.
- Mark visible leaks immediately
- Recheck after drying
- Photograph and document
Clear Sediment and Gravel From Perimeter Drains
Before accessing the trench, inspect the perimeter drain visually and with a probing rod to locate build-ups of sediment and pockets of gravel that reduce flow; once identified, remove debris systematically from the cleanout points or exposed sections, working downhill and flushing with controlled water flow to carry loosened material out of the system.
Using a wet-dry vacuum or manual scoops, extract coarse gravel and compacted silt, placing removed material in buckets for disposal. Rinse remaining fines with short, powerful pulses of water to avoid re-deposition.
Re-inspect the drain line for flow improvement and repeat localized clearing until discharge runs freely.
Open and Clean Catch Basins and Storm Drains
With perimeter drains cleared and flow restored, attention shifts to catch basins and storm drains, which collect runoff and can become clogged with leaves, sediment, and debris that impede discharge. Inspect grates for damage, remove surface trash, and lift grates with appropriate tools.
Scoop accumulated sediment and organic matter into buckets or a wheelbarrow, avoiding spills. Flush the basin with a hose or pressure washer to verify flow into the outlet pipe. Check outlet pipes for blockages and use a plumber’s snake or pressure hose if needed. Replace the grate securely and schedule periodic inspections to prevent recurrence.
- Inspect and remove surface debris
- Scoop and dispose sediment
- Flush and test outlet flow
Clear Gutter Outlets That Feed the Outside Drain
The condition of gutter outlets directly affects flow into the outside drain and should be checked before any pipe work begins.
Technicians should inspect downspout connections for gaps or misalignment, remove accumulated leaves and debris that cause blockages, and consider installing gutter guards to reduce future buildup.
Regular attention to these points helps prevent backups and protects the drainage system.
Inspect Downspout Connection
How can one verify that a downspout feeds the outside drain properly? A visual and tactile inspection confirms alignment, secure joints, and unobstructed flow from the gutter outlet to the drain inlet.
Check for gaps, corrosion, or loose straps that allow movement or misalignment. Ensure coupling pieces and adapters are seated and sealed. A brief water test (slow pour) reveals leaks or overflow without resorting to large volumes.
- Examine connections for gaps, corrosion, or loose clamps.
- Run a small, controlled water test and observe outlet-to-drain flow.
- Verify that coupling fittings and straps are secure and sealed.
Remove Debris Blockages
After confirming the downspout aligns and seals to the drain inlet, attention shifts to removing debris that can clog the gutter outlet and block flow. The practitioner uses gloves, a scoop, and a small trowel to extract leaves, seeds, and compacted detritus. Flushing with a hose tests progress; stubborn masses yield to a plumber’s snake pushed gently through the outlet. Collected debris is bagged and disposed. Regular checks after storms prevent reaccumulation. The approach balances safety and effectiveness, avoiding alterations to the system.
| Tool | Purpose | Frequency |
|---|---|---|
| Scoop | Remove bulk debris | As needed |
| Hose | Flush remaining dirt | After clearing |
| Snake | Break compacted blockages | If needed |
Install Gutter Guards
Installing gutter guards protects the outlet that feeds the outside drain by preventing leaves and large debris from entering while allowing water to pass.
A durable guard reduces clogs, lowers maintenance frequency, and directs flow toward the downspout and drain.
Selection should match roof type, gutter profile, and local debris load.
Proper installation secures the guard under shingles or with compatible clips, maintaining pitch for drainage.
Periodic checks remove trapped small debris and make certain fasteners remain tight.
For heavy storm areas, pair guards with a leaf trap at the downspout to further safeguard the outside drain.
- Choose material and fit carefully
- Install per manufacturer guidelines
- Inspect and clear seasonally
Snake Long Runs and Angled Outdoor Drain Pipes
When tackling long underground runs and sharply angled outdoor drain pipes, the choice of snake, entry point, and feeding technique determines whether the obstruction can be reached without damaging the line; longer, flexible cables with appropriate heads and a steady feed while steering through curves reduce the risk of hang-ups and pushback.
A compact drum or sectional cable with a rotating head negotiates bends better than rigid rods.
Start at the nearest cleanout or accessible downstream access to shorten the run.
Advance slowly, retract occasionally to clear debris from the head, and avoid forcing the cable.
If resistance persists, consult a professional to prevent pipe damage.
Diagnose Recurring Clogs: Tests and Likely Causes
A brief visual inspection of access points and cleanouts can reveal visible blockages, pipe misalignment, or damaged sections that promote repeated clogs.
Controlled flow-rate tests at upstream and downstream locations help quantify restriction severity and localize the obstruction.
Persistent backups are most often caused by root intrusion or accumulated debris carried by runoff, each requiring different removal and prevention approaches.
Visual Inspection And Access
How can recurring clogs be diagnosed quickly and accurately through visual inspection and access? A clear, methodical visual check identifies visible blockages, inlet damage, and access limitations.
Inspect grates, downspout connections, and accessible pipe sections for debris, root intrusion scars, or corrosion. Note water stains and sediment lines indicating chronic backups.
Safe access requires proper tools, gloves, and stable ladders; remove covers to peer into pipes with a flashlight or inspection camera when available. Record observations to correlate with clog timing and weather.
Prioritize repairs or targeted cleaning where physical obstructions or structural defects are evident.
- Look for roots, grease, and sediment buildup
- Check seals, clamps, and grate alignment
- Use a mirror or camera for deep views
Flow Rate Testing
Visual inspection findings guide the next step: quantifying flow to pinpoint partial restrictions versus structural defects. The tester measures time to drain a known volume, observes surge behavior, and notes backflow points. Comparing measured rate to expected identifies reduced capacity, collapse, or misalignment. Repeat tests upstream and downstream to localize the problem. Document results and take photos for later comparison after repairs.
| Test | Method | Interpretation |
|---|---|---|
| Volume-timer | Fill bucket, time emptying | Slow = restriction |
| Upstream vs downstream | Repeat at two points | Localized drop indicates segment issue |
| Surge test | Introduce small pulse | Backflow suggests blockage or defect |
Root And Debris Causes
Investigate recurring clogs by testing for root intrusion and trapped debris, since each requires distinct remedies: roots progressively narrow the pipe and produce fibrous obstructions detectable by camera or resistance during augering, while accumulated grit, leaves, or sediment create localized piles that flush intermittently and show as sudden flow improvements after high-velocity surges.
A methodical diagnosis distinguishes causes. Use a camera inspection to locate root masses, note repeat blockage points, and perform flow surges to reveal sediment zones.
Roots often regrow; debris typically accumulates near inlets or bends. Recommended responses differ: cutting and chemical treatments for roots, mechanical flushing for debris.
- Camera inspection to map obstructions
- Augering feedback to detect fibrous resistance
- High-pressure flush to confirm sediment pockets
Locate Underground Blockages With Simple Tests
Before digging, a few simple tests can quickly confirm whether a blockage lies in an underground section of the drain pipe.
First, inspect visible fittings and cleanouts: remove caps and observe flow while an assistant runs water at fixtures. Slow or no flow indicates downstream restriction.
Next, perform a trap and vent check by introducing water upstream and listening for gurgling or air movement at vents; noises suggest trapped air caused by a blockage.
Use a hose test: feed water into the cleanout and watch for backflow or pooling at other access points.
Mark suspected underground areas for targeted excavation.
Use a Camera Inspection to Find the Clog Location
After marking the likely underground section from the hose and cleanout tests, a camera inspection pinpoints the exact clog location without unnecessary digging.
A compact sewer camera feeds real-time video through the cleanout; the operator notes depth, orientation, and obstruction type.
Clear visuals differentiate roots, sediment, collapsed pipe, or foreign objects, guiding next steps and contractor estimates.
Recording the run documents conditions for warranty or future work.
Portable rental units suffice for most homeowners; professional cameras reach longer runs and tougher bends.
Safety: keep electrical connections dry and follow equipment instructions.
- Identify obstruction type and depth
- Record video for reference
- Reduce unnecessary excavation
Repair a Damaged Section of Outside Drain Pipe Yourself
Once a leak is located, the homeowner should confirm its exact position and extent before proceeding.
Next, an appropriate repair method—patching, coupling a new section, or replacing fittings—should be selected based on pipe material and damage.
After repair, the line must be tested under flow and securely anchored or sealed to prevent recurrence.
Identify The Leak
To identify the leak in an outside drain pipe, inspect the ground and the pipe surface for wet spots, pooled water, or visible cracks while the system is running; noting the leak’s location, size, and whether it is a hairline crack, joint failure, or a hole from impact will determine the repair method and materials required.
The inspector checks fittings, exposed runs, and connection points, feeling for moisture and listening for dripping. Dye or food coloring in flowing water can reveal subtle leaks.
Record findings, take photos, and mark the repair spot clearly to speed later work.
- Observe ground and pipe for wetness
- Use dye to trace flow
- Photograph and mark location
Choose Repair Method
Select the repair method based on the leak’s size, pipe material, location, and access: small hairline cracks often suit epoxy or silicone sealants, moderate damage at joints can be fixed with compression couplings or rubber repair sleeves, and sections with large holes or crushed pipe require cutting out and replacing the damaged segment with the appropriate fitting.
Consider pipe material—PVC, ABS, cast iron, or corrugated plastic—to choose compatible adhesives and fittings.
Evaluate access: confined or buried runs may favor external repair sleeves to avoid excavation.
Gather correct-sized replacement pipe, couplings, solvent cement or mechanical clamps, and basic cutting and deburring tools before proceeding.
Test And Secure
After the repair is fitted and any joints or seals have cured, the section should be tested under conditions that replicate normal flow and pressure to confirm there are no leaks and the connection holds.
Water is slowly introduced, observing joints for seepage, then flow increased to typical levels while inspecting downstream and surrounding soil for dampness.
Any minor leaks are retightened or resealed immediately.
Once satisfied, the repaired area is backfilled and supported to prevent future movement.
Final checks guarantee proper gradient and unobstructed flow; documentation and photos record the repair for future reference.
- Observe joints and surrounding soil
- Increase flow gradually
- Backfill and support pipe
Replace a Short Run of PVC Outside Drain Pipe
Replacing a short run of PVC outside drain pipe requires basic tools and attention to alignment, slope, and solvent-weld technique to guarantee a leak-free connection.
First, measure and cut the damaged section squarely, deburr edges, and dry-fit fittings to confirm alignment and consistent fall toward the outlet.
Clean pipe and fittings with PVC primer, apply solvent cement evenly, and assemble quickly while maintaining correct orientation for slope (typically 1/8–1/4 inch per foot).
Support the new run with straps spaced appropriately, allow curing time per cement instructions, then test with water for leaks and adjust if necessary.
Reconnect Downspouts to Outside Drain Lines Correctly
When reconnecting a downspout to an outside drain line, make certain the outlet and mating fitting are clean, unobstructed, and properly aligned to maintain slope and prevent backflow.
The installer confirms fit, uses appropriate couplers or adaptor inserts, and seals joints with exterior-grade sealant or gasketed fittings.
Fasteners and straps secure the downspout to preserve pitch and prevent separation during storms.
Test with a hose to verify free flow and no leaks.
Trim or chamfer PVC edges for smooth entry.
Inspect surrounding soil grade to make certain runoff moves away from foundations, not toward them.
- Verify alignment and slope before sealing
- Use gasketed or glued connections as appropriate
- Test flow and secure with straps
Prevent Root Intrusion After Clearing the Drain
Following a thorough clearing of the drain, homeowners should take targeted steps to prevent root intrusion, since tree and shrub roots readily exploit small gaps and joints in pipes.
Inspect exposed pipe runs and joints for cracks; replace damaged sections with seamless, root-resistant materials such as PVC or corrugated pipe with tight couplings.
Apply a root barrier fabric along vulnerable pipelines and maintain a cleared gravel buffer zone free of planting within several feet.
Regularly treat the line with enzymatic or herbicidal root inhibitors designed for sewer/drain use, and schedule periodic camera inspections to catch regrowth early.
Improve Drainage Grade to Prevent Future Clogs
Attention is turned to improving the drain’s grade to keep water moving away from the pipe. The slope should be adjusted gradually to a consistent pitch that prevents standing water without causing erosion.
Regrading the soil surface and compacting it lightly will help maintain that pitch and reduce future clogs.
Adjust Slope Gradually
To improve long-term flow and reduce recurring blockages, the drain’s slope should be adjusted gradually so water moves steadily without pooling. A gentle, consistent grade prevents scouring, minimizes sediment buildup, and reduces pressure on joints.
Small changes over the pipe run are safer than abrupt drops that create turbulence or traps. Measurements with a level and string help confirm uniform descent.
Where necessary, add compacted bedding material or shims beneath pipe sections to refine angle. Inspect after test flows and fine-tune to maintain a 1–2% grade for typical outdoor drains.
- Check slope with a laser level or water level.
- Adjust bedding incrementally under pipe.
- Re-test flow and correct low spots.
Regrade Soil Surface
When reshaping the yard, regrading the soil surface directs runoff away from the drain and prevents water from pooling where debris can enter the pipe.
The process involves evaluating current grades, marking high and low points, and moving soil to create a consistent slope of at least 1%–2% away from the house and drain openings.
Compact fill lightly and avoid creating depressions beside walkways.
Add a top layer of topsoil and reseed or apply mulch to stabilize the surface.
Inspect after heavy rain to confirm proper flow.
Regular maintenance prevents sediment buildup and reduces the frequency of drain pipe clogs.
Add a Gravel Trench to Protect the Outside Drain Pipe
Adding a gravel trench around the outside drain pipe creates a stable, permeable bed that prevents soil migration and improves drainage longevity.
A shallow trench filled with clean, angular gravel stabilizes pipe bedding, promotes rapid water flow, and reduces sediment buildup.
Properly sized stone and compacted sides discourage collapse while allowing routine visual inspection.
Geotextile fabric can separate soil and stone without clogging drainage, but make certain fabric placement does not impede flow.
Maintenance involves occasional flushing and replenishing displaced gravel.
- Use 3/4-inch clean gravel for peak permeability.
- Line trench with geotextile, overlapping seams.
- Keep trench depth consistent with pipe slope.
Install a Leaf Guard at the Drain Entrance
A sturdy leaf guard fitted at the drain entrance prevents leaves and large debris from entering the pipe and causing clogs.
Choices in material and design—such as stainless mesh, perforated covers, or domed screens—affect durability and flow capacity.
Units should allow easy removal or hinge access for periodic cleaning without disturbing the pipe.
Prevents Debris Entry
Installing a leaf guard at the drain entrance prevents leaves, twigs, and other debris from entering the pipe and reduces the frequency of clogs. The guard creates a barrier that diverts surface debris while allowing water to flow freely, minimizing emergency clear-outs.
Regular visual checks confirm the guard functions and that accumulated material is removed before it blocks flow. Proper placement keeps small animals and large debris out without altering pipe gradients or requiring frequent excavation.
This proactive measure saves time and prevents localized flooding by reducing entry of common clogging materials.
- Quick visual inspection routines
- Simple debris removal techniques
- Expected reduction in clog incidents
Material And Design
With a leaf guard established to keep out surface debris, attention turns to the guard’s material and design to guarantee long-term performance and minimal maintenance.
Durable materials—stainless steel, aluminum, or UV-resistant polymer—resist corrosion, crushing, and sun degradation; selection depends on local climate and expected load.
Perforation size balances flow with filtration: small holes block fine debris but risk clogging, while larger slots shed leaves yet admit grit.
A sloped or domed profile encourages runoff and reduces standing water.
Secure fastening prevents displacement, and smooth edges deter snagging.
Proper material and thoughtful design extend service life and preserve drain capacity.
Easy Maintenance Access
Regularly providing clear, safe access to the drain entrance makes routine checks and cleaning quick and effective.
Installing a leaf guard prevents debris entry while preserving hand access for inspections.
Choose a durable, removable guard sized to the outlet; secure it to resist wind but allow easy removal.
Inspect the guard monthly and after storms, removing trapped material before it decomposes.
Replace damaged guards promptly to maintain flow.
- Select a mesh or hooded guard that fits the pipe diameter.
- Fasten with corrosion-resistant clips or screws for stability.
- Clean or replace the guard at first sign of clogging.
Seasonal Maintenance Checklist for Outside Drains
Seasonally, homeowners should inspect outside drains at the change of each quarter to prevent clogs, erosion, and water intrusion. A concise checklist guides simple tasks: clear debris, test flow, check grates, and note erosion or sediment. Record findings and schedule minor repairs early to avoid larger issues. Emphasis stays on routine inspection, debris removal, and vegetation control; avoid freeze-prevention procedures reserved for winterization. Use simple tools—gloves, a stick, a hose—and document actions. A brief table helps pace the routine:
| Task | Frequency | Notes |
|---|---|---|
| Debris removal | Quarterly | Clear leaves/grit |
| Flow test | Quarterly | Run water |
| Grate check | Quarterly | Secure/replace |
Winterize Outside Drain Pipes to Prevent Freezing
When temperatures drop, outside drain pipes require steps beyond routine quarterly checks to prevent freezing and pipe damage.
The homeowner insulates exposed sections with foam sleeves or heat tape, drains and caps low points, and slopes fittings to avoid standing water.
Small heating cables with thermostat control are applied where freezing risk is highest.
Vents and access points are sealed against drafts while remaining serviceable.
Regular inspections during cold spells detect ice formation early.
Clear gutters and downspouts so water doesn’t pool near drains.
These measures reduce rupture risk and simplify spring reopenings.
- Insulate exposed pipe runs
- Install thermostat-controlled heat tape
- Drain, cap, and slope low points
Monitor Flow and Spot Early Blockages
Routine checks of water flow rate help identify reduced throughput before a clog forms.
Observing visible pipe openings for standing water, debris buildup, or slow drainage provides immediate clues to trouble.
Noting any persistent slow drain signs and their locations enables targeted cleaning or professional intervention.
Check Water Flow Rate
Measure the flow rate at the drain outlet to establish a baseline and detect changes that indicate blockages. The observer times a known volume collected from the outlet, notes steady versus intermittent flow, and repeats after rainfall or cleaning.
Consistent measurements reveal gradual reductions, sudden drops, or surges caused by partial clogs, root intrusion, or displaced fittings. Record readings, weather conditions, and any upstream work to correlate causes. Use simple tools — a bucket and stopwatch — before using powered cleaners.
- Collect a fixed volume and time the discharge precisely.
- Compare readings over days and after maintenance.
- Log anomalies with date and conditions.
Inspect Visible Pipe Openings
Inspect visible pipe openings regularly to monitor flow and detect early blockages. The observer should clear debris, leaves, and sediment from grates and exposed ends, using gloves and a small hand tool to avoid damage.
Visual checks after rain reveal whether water enters freely or pools near the mouth. Note discoloration, odors, or obvious foreign objects that might indicate developing clogs or biological buildup.
Photographing openings over time helps track changes. If standing water persists at the opening despite clear surroundings, further inspection downpipe or professional assessment may be warranted to prevent escalation.
Note Slow Drain Signs
Regularly observing the rate at which water leaves an outside drain provides early warning of developing blockages.
The observer notes slower outflow, pooling near grates, or unusual gurgling; these signals indicate partial obstruction, trapped debris, or venting issues. Prompt identification reduces repair scope and prevents backups.
- Measure flow after a controlled pour to compare normal versus reduced drainage.
- Inspect for surface pooling, foul odors, or irregular sounds during and after runoff.
- Record occurrences and conditions (weather, recent yard work) to detect patterns and guide targeted cleaning or professional inspection.
Typical Cost to Hire a Pro for Outside Drain Clearing
Hiring a professional to clear an outside drain typically costs between $100 and $400, depending on factors like clog severity, access difficulty, and local labor rates.
Average service calls often include a baseline diagnostic fee, with simple snaking toward the lower end and high-pressure jetting or camera inspection increasing totals.
Additional charges may apply for emergency or after-hours work, debris disposal, or repairs discovered during service.
Regional differences affect estimates, as do contractor experience and warranty offerings. Homeowners should expect variation but can budget using the typical range while considering potential add-ons for complex jobs.
How to Choose the Right Pro for Outside Drain Work
After estimating costs and service options, homeowners should focus on selecting a qualified professional who matches the job’s scope and budget. Priority should go to licensed plumbers or drain specialists with verifiable experience in outdoor drainage, appropriate insurance, and good reviews.
Confirming warranties, equipment used (camera inspection, hydrojetting), and clear communication about timelines reduces surprises. References and local reputation indicate reliability; avoid solo bids without written estimates. Trustworthy professionals provide permits and post-service cleanup.
- Verify license, insurance, and local references
- Confirm methods, guarantees, and cleanup standards
- Prefer transparent contracts and written scope
Get a Reliable Estimate for Drain Cleaning Services
Before scheduling work, homeowners should obtain a clear, written estimate that itemizes labor, materials, inspection fees, and any potential contingency costs.
The estimate should specify scope: access points, equipment (snakes, hydro-jet), and whether camera inspection is included.
Request timelines, payment terms, warranty or guarantee details, and any permits or disposal fees.
Compare at least two written estimates to spot outliers and ask for references or licence numbers tied to quoted costs.
Avoid verbal-only promises.
Keeping the estimate on file supports dispute resolution and guarantees the agreed services match invoiced charges, preventing unexpected expenses during drain cleaning.
Prepare Your Yard for a Professional Drain Visit
Before the technician arrives, the homeowner should clear vegetation and any loose debris from around the drain area to allow unobstructed work.
Utility line locations ought to be clearly marked to prevent accidental damage during excavation or probing.
A clear path and available parking near the worksite should be provided so the crew can bring equipment and complete the job efficiently.
Clear Vegetation And Debris
To prepare the yard for a professional drain visit, remove plants, leaves, and other obstructions within a few feet of the drain outlet to give technicians clear access and prevent debris from falling back into the pipe.
A focused clearing reduces job time and limits contamination.
Cut back low branches, rake accumulated leaf litter, and pull invasive weeds that could obstruct tools or hide damage.
Dispose of removed material away from the work area to avoid recontamination.
Keep a clear perimeter so technicians can position equipment and inspect the outlet.
- Cut low branches and shrubs
- Rake and bag leaf litter
- Pull weeds and visible roots
Mark Utility Line Locations
When preparing the yard for a professional drain visit, homeowners should identify and mark underground utilities so technicians can avoid cables, pipes, and conduits during inspection and work.
Contact local utility locating services before digging; request paint or flagging to show gas, electric, water, sewer, and telecom lines.
Use durable, visible markers placed at property boundaries and near the work area.
Record locations and provide a simple sketch for the crew.
Avoid moving or covering marks.
If private lines exist, notify the utility owner.
Clear communication and accurate markings reduce damage risk, speed assessment, and protect safety during drain clearing.
Provide Access And Parking
Although the crew will bring necessary tools, homeowners should make sure clear access and convenient parking so technicians can arrive, unload, and work without delay.
A clear path from driveway to work area prevents time lost moving equipment. Move vehicles, toys, and garden furniture away from gates and sidewalks. Identify the preferred parking spot and tell the dispatcher; note gate codes or lockbox locations.
Trim low branches and remove obstacles that could impede hoses or reels.
Provide outdoor lighting for early or late visits.
Secure pets and post a visible contact number in case staff need quick directions.
- Designate a close, level parking space
- Clear pathways and gate access
- Note gate codes, lighting, and pet arrangements
Document Drain Problems for Future Reference
For future troubleshooting and maintenance, homeowners should record drain issues with clear, dated notes and photographs that show the problem location, symptoms, and any temporary fixes applied.
Entries should include weather conditions, water flow observations, odors, and timing of backups.
Note tools and methods used, cable lengths, pressure settings, and any visible pipe damage or root intrusion.
Store images with filenames matching dates and brief captions.
Keep receipts, warranty details, and contractor contact information with the log.
Regularly review entries to detect patterns and inform repair decisions.
A concise, organized record reduces diagnostic time and supports warranty or insurance claims.
Safely Dispose of Debris Removed From Outside Drains
Collect and bag removed debris immediately to prevent recontamination and odor spread; use heavy-duty, puncture-resistant bags for sharp or fibrous material and seal them before transport. The worker should wear gloves and a mask, label bags if contaminated, and avoid overfilling.
Transport to the appropriate disposal site or put out with scheduled yard waste only when allowed. Do not dump debris into street gutters or storm drains. Rinse tools and contain washwater; filter solids and dispose of them with the bags. Record disposal method and location for future reference and local regulation compliance.
- Wear PPE and handle bags carefully
- Follow local disposal rules
- Clean and contain washwater
Use Preventive Landscaping to Protect Drain Lines
By placing plantings, hardscaping, and mulch strategically, preventive landscaping reduces the amount of debris and excess water reaching outside drain lines and lowers the frequency of clogs and repairs. The homeowner selects deep-rooted, low-shedding plants, positions beds to divert surface flow, and uses permeable paving near drains. Mulch is kept away from inlets and replaced to prevent migration. Regular inspection of plant placement and soil erosion controls minimizes organic buildup. Installed grates and edging block sediment while allowing runoff. Simple design choices extend drain life and cut maintenance needs.
| Element | Purpose | Maintenance |
|---|---|---|
| Plants | Reduce erosion | Prune |
| Hardscape | Channel flow | Inspect |
| Mulch | Retain soil | Replace |
Manage Stormwater Around Your Home to Reduce Drain Load
When directing rainfall and runoff away from foundations and drain inlets, homeowners can greatly reduce the volume and velocity of water entering outside drain pipes; simple measures—grading soil away from the house, installing gutters and downspouts with splash blocks or extensions, and creating rain gardens or swales—lower strain on the drainage system and decrease sediment and debris transport.
Strategic planting and permeable hardscaping increase infiltration, reduce peak flows, and filter pollutants before water reaches drains. Regular gutter maintenance prevents clogs. Consider diverting downspouts to soakaways or dry wells to minimize concentrated flow to pipes.
- Grade and plant for infiltration
- Extend downspouts
- Install permeable paving
Signs Your Outside Drain Pipe Needs Full Replacement
Several clear indicators show an outside drain pipe needs full replacement rather than repair. Persistent leaks at multiple joints, widespread corrosion or rust, sagging or collapsed sections, and repeated clogs despite professional clearing signal structural failure.
Sewage odors, wet spots or sinkholes in the yard, and visible root intrusion that reoccurs after cutting indicate compromised integrity. If pipe material is brittle, crumbling, or was installed decades ago using outdated materials, replacement is safer.
Extensive damage found on camera inspection or frequent emergency repairs that exceed reasonable cost justify complete replacement to restore reliable drainage and prevent property damage.
Extend Outside Drain Pipe Life With Simple Habits
Regularly adopting a few simple habits can greatly extend the life of an outside drain pipe. Routine, focused maintenance prevents clogging, corrosion, and minor damage from becoming costly failures. Inspect covers and visible joints seasonally, clear debris promptly, and avoid pouring fats or chemicals down connected drains.
Encourage proper surface drainage to reduce standing water around pipe inlets. Small, consistent actions cut repair frequency and prolong service life without major interventions.
- Clean grates and remove leaves after storms.
- Flush the line with water monthly to dislodge sediment.
- Check and tighten exposed fittings every six months.
Prioritize Fixes When Multiple Outside Drains Are Failing
Faced with multiple failing outside drains, a prioritization framework helps allocate limited time and budget to the highest-risk problems first. The homeowner assesses safety hazards (backup into living spaces, erosion near foundations) and ranks those highest.
Next, frequency and severity of failures guide choices: drains that clog weekly outrank occasional issues. Cost-to-fix and chance of temporary measures lowering risk are weighed; inexpensive fixes or temporary diversions can defer low-risk items.
Accessibility and seasonal weather impacts factor in scheduling. A simple list with rank, estimated cost, and assigned action guarantees work proceeds efficiently and prevents urgent damage.
Conclusion
They started with a trickle, then a slow, stubborn backup—each sign hinting at something worse hidden below. After clearing leaves, flushing with a hose, and weighing whether to call a pro, the problem still felt unresolved. Now, armed with new habits and a plan for replacement if needed, the homeowner waits and watches the next storm. If the water returns, a different decision will be unavoidable—and the quiet patience turns into decisive action.