How to Unclog a Vent Pipe Fast: DIY Tips & Tools That Work
Quick Guide to Unclogging a Vent Pipe
If you’re dealing with a clogged vent pipe, you can often clear it swiftly by following these simple steps and using basic tools.
Key Takeaways:
- Safety First: Secure a stable ladder and wear personal protective equipment (PPE).
- Inspect the Vent Cap: Check for debris or nests that may be blocking the vent.
- Use Effective Tools: Clear the blockage with a long-handled brush, a flexible snake, or a shop vac.
- Flush the Pipe: After removing the obstruction, flush the vent pipe with water or an enzyme solution.
- Avoid Harsh Chemicals: Steer clear of aggressive chemicals and excessive force to prevent damage.
For additional practical tips, tool lists, and preventive strategies, continue reading.
Quick 3-Step Fix for a Clogged Roof Vent

A simple three-step approach restores airflow through a clogged roof vent quickly: assess the blockage from the roofline, clear debris using a gloved hand or plumber’s snake, then flush the vent with water to confirm unobstructed flow.
The person inspects visually for leaves, bird nests, or ice, noting vent cap condition and flashing. Safety precautions include stable ladder placement and a helper.
When reachable, hand removal suffices; deeper obstructions require a flexible snake or compressed air from above.
After clearing, a water test verifies drainage. If flow remains poor, professional evaluation for vent or stack damage is advised.
What People Mean by a “Vent Pipe” and Why It Clogs
A vent pipe is a vertical conduit that equalizes air pressure in the drainage system and allows sewer gases to escape safely.
It commonly clogs from debris buildup, bird nests, ice, or storm-borne material that blocks the opening.
When obstructed, traps can siphon or drain slowly, causing gurgling, odors, and reduced fixture performance.
What A Vent Pipe Does
Plumbing vents, often called vent pipes or stack vents, equalize pressure in a drainage system and let sewer gases escape safely above the roofline.
They maintain airflow so traps retain water seals, preventing sewer odors from entering living spaces. Vents facilitate fixtures to drain smoothly by preventing siphonage and backpressure, which can slow flow or cause gurgling.
Roof-mounted terminations guarantee exhausted gases disperse harmlessly. Proper venting supports system balance during simultaneous fixture use and reduces stress on drain lines.
When functioning, vents protect health and plumbing performance; compromised vents undermine drainage efficiency and can cause operational issues.
Common Causes Of Clogs
Vents terminate above the roofline, but their exposed position and function make them vulnerable to blockages. A “vent pipe” refers to the plumbing stack that equalizes pressure and exhausts sewer gases; common clogs arise from leaves, bird nests, debris, ice, and slow organic buildup. Roof penetrations invite wildlife and wind-blown material; occasional corrosion or displaced flashing can trap detritus. The table sketches typical culprits and characteristics:
| Culprit | Characteristic |
|---|---|
| Leaves & twigs | Seasonal, loose obstruction |
| Bird or rodent nests | Dense, persistent blockage |
| Ice & snow | Weather-dependent, compacting obstruction |
Regular inspection and simple clearing prevent escalation.
How Clogs Affect Plumbing
Clogs in a roof vent pipe disrupt the air balance that allows drains to flow freely, causing slow drains, gurgling noises, and occasional sewer gas odors.
A vent pipe, part of the plumbing venting system, equalizes pressure and vents sewer gases to the outside. When blocked by debris, nests, ice, or buildup, traps can lose their water seal, leading to siphoning, backups, and malodors entering living spaces.
Fixtures drain poorly or unevenly as negative pressure forms. Persistent blockages increase stress on waste lines, risk sewer backups, and can accelerate corrosion.
Timely inspection and clearing restore proper airflow and system performance.
How to Tell if Your Roof Vent Is Clogged
How can a homeowner recognize that a roof vent is clogged? Indicators are often subtle but observable: persistent sewer odors, slow drains despite no visible blockages, and gurgling sounds from fixtures.
Visual inspection from ground level may reveal debris or animal activity at the vent cap. Interior signs combine with exterior cues to confirm restricted airflow.
- Persistent foul odors indoors after flushing or running water.
- Fixtures drain slowly or emit gurgling noises indicating trapped air.
- Visible debris, nesting material, or damage at the roof vent cap.
- Sudden recurring backups or siphoning of traps in multiple fixtures.
Safety Checklist: PPE, Ladder Setup, and Fall Prevention
Before attempting roof work, a concise safety checklist should be reviewed covering personal protective equipment, secure ladder placement, and fall prevention measures.
The checklist recommends gloves, eye protection, and a harness where appropriate.
It also emphasizes stable ladder footing, correct angle, and using a spotter or tie-off to minimize fall risk.
Personal Protective Equipment
Because working on a roof or around vent pipes involves sharp edges, biohazards, and fall risk, proper personal protective equipment (PPE) and careful ladder setup are essential to prevent injury.
The practitioner chooses durable gloves, eye protection, and a respirator when clearing debris or handling animal nests. Non-slip footwear and a fitted harness reduce slip and fall consequences. Inspect PPE for damage before use.
Keep a first-aid kit accessible and a partner informed of work plans. Follow manufacturer guidance for respirators and gloves to match expected contaminants and tasks.
- Gloves
- Eye protection
- Respirator
- Non-slip footwear
Secure Ladder Placement
With PPE in place, attention turns to securing the ladder and preventing falls. The worker inspects ground firmness, clears debris, and positions feet on level soil. Ladder angle follows the 4:1 rule; locks and feet are confirmed. Tie-off points and stabilizers are used when available. A spotter remains nearby for setup and retrieval. Tools are staged in a belt to avoid overreaching; hands-off adjustments require descent. Weather and overhead hazards are checked before ascent. The aim is predictable, stable access to the vent without improvisation or risk.
| Check | Action | Frequency |
|---|---|---|
| Base | Level ground, pad | Each setup |
| Angle | 4:1 rule | Every time |
| Secure | Locks, tie-off | Before climb |
| Tools | Belt, hoist | Pre-ascent |
Fall Prevention Measures
Although vent work is often brief, strict fall-prevention protocols must be observed to keep workers safe and compliant.
The checklist emphasizes personal protective equipment, secure ladder setup, and worksite controls. Inspect harnesses, lanyards, and anchor points for wear; use non-slip footwear and helmets.
Position ladders on stable ground, lock spreaders, and maintain three points of contact. Implement edge protection, guardrails, or temporary tie-offs when working near openings.
Communicate hazards and rescue plans before starting. Verify weather conditions and lighting. Record inspections and operator names for accountability.
Regularly review procedures to guarantee ongoing compliance and risk reduction.
- PPE inspection
- Ladder anchoring
- Edge protection
- Emergency plan
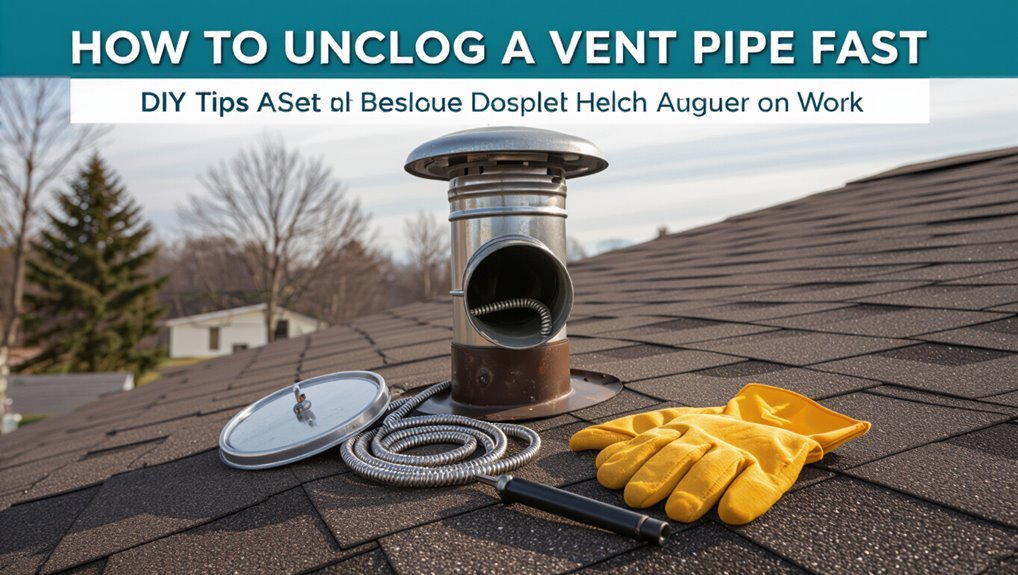
Tools to Grab for a Fast Vent-Unclog Job
Before starting, gather a compact set of reliable tools that make clearing a vent pipe quick and safe: a plumber’s snake (or auger) sized for the vent diameter, a stiff-bristled brush or chimney brush, a hand-held shop vacuum with a narrow crevice nozzle, a screwdriver or nut driver for access panels, and a pair of work gloves and safety glasses.
Also include a flexible extension rod set, a flashlight or headlamp, replacement fasteners, and a disposable drop cloth. Choose rust-resistant tools and a snake with an appropriate head (coil or corkscrew) to dislodge debris.
Keep tools organized for efficient, controlled work.
When to Call a Plumber vs. DIY
When should a homeowner attempt vent pipe clearing and when is professional help required? Homeowners may handle minor blockages if comfortable with basic tools and ladder-free access, but certain signs indicate a plumber is necessary.
Consider safety, complexity, and potential for hidden damage.
- Persistent odors or slow drains after DIY attempts.
- Recurrent clogs suggesting deeper vent or sewer issues.
- Visible roof or vent flashing damage, or inaccessible vents.
- Lack of appropriate tools, confidence, or time to complete troubleshooting safely.
A plumber can diagnose internal faults, use specialized equipment, and prevent costly mistakes.
How to Access the Rooftop Vent Safely
Before attempting rooftop work, the person should gather proper safety gear such as a harness, non-slip shoes, and gloves.
They must establish stable access with a secure ladder and, if possible, roof anchors or a rope line.
A quick inspection of weather and roof conditions — dry surface, low wind, and no loose shingles — determines whether it is safe to proceed.
Choose Proper Safety Gear
A hard hat, non-slip boots, gloves, and a harness are essential for anyone accessing a rooftop vent; these items protect against falls, sharp edges, and sudden weather changes.
The individual selects certified PPE: a helmet meeting impact standards, footwear with good traction, weatherproof work gloves, and a fall-rated harness with compatible lanyard.
Eye protection and a dust mask reduce inhalation and debris risk.
Inspect gear before use for wear, proper fit, and secure connections.
Store equipment dry and replace damaged components.
Emergency communication and a spotter remain recommended.
- Helmet
- Boots
- Gloves
- Harness
Secure Stable Roof Access
Safe rooftop access begins with a planned approach that prioritizes stable footing and clear egress.
The person positions a ladder on firm, level ground, secures its base, and extends it three rungs above the roofline for a safe handhold. A second person stabilizes the ladder during ascent and descent.
Footwear with good traction is worn; hands remain free of tools by using a tool belt or hoist line.
When reaching the roof edge, three points of contact are maintained. Portable roof brackets or a short plank may be used to create a stable work platform while avoiding fragile roofing materials.
Inspect Weather And Roof Conditions
With ladder placement and roof access secured, the next step is to assess weather and roof conditions to determine if proceeding is advisable.
The inspector evaluates wind, precipitation, temperature, and daylight. Strong gusts, rain, ice, or low light increase risk and warrant postponement.
Roof surface must be dry and free of debris; brittle shingles, missing tiles, or sagging areas indicate unsafe footing. Appropriate footwear and a safety harness remain mandatory when conditions are marginal.
Decision-making should favor retreat and rescheduling rather than risking a fall.
- Check wind speed and direction
- Confirm no precipitation or frost
- Inspect surface integrity
- Guarantee adequate daylight
Removing Bird Nests and Debris From the Vent Opening
Begin by inspecting the vent opening from ground level using binoculars or a ladder-mounted flashlight to confirm the presence and extent of nesting material or other debris.
If reachable, don protective gloves and eye protection. Use a long-handled brush or a flexible grabber to gently remove loose twigs, leaves, and nesting strands.
For tightly packed material, employ a small hand scoop or pruning shears to cut and extract massed debris, placing removed items into a bag.
After clearing, run water briefly through the vent to flush fine particles, then install a vent cap or bird guard to prevent recurrence.
Use a Plumber’s Snake to Break Up Vent Clogs
A plumber’s snake (auger) is fed down the vent pipe to reach and mechanically break up obstructions that water or brushes cannot clear. The operator advances the cable while turning the handle to engage clogs, then retracts debris slowly to avoid packing.
Stiffness, length, and head type are chosen for PVC or metal vents; care prevents scratching or dislodging joints. If resistance persists, probing in short bursts locates dense blockages. Safety gear and stable ladder use are essential when accessing rooftop vents.
- Select appropriate cable length and head
- Feed slowly while rotating
- Withdraw broken debris carefully
- Inspect for remaining obstructions
Flush the Vent With a High-Pressure Garden Hose
Flush the vent with a high-pressure garden hose to dislodge loosened debris and wash it down the drain stack. A rigid nozzle or adjustable spray setting concentrates flow; insert hose carefully and maintain firm control to avoid bending or scraping the vent liner.
Work in short bursts, sweeping the nozzle while withdrawing slowly so water carries particles downward. Monitor water exiting fixtures inside to confirm flow. Wear eye protection and prevent overpressurizing older pipes.
Stop if resistance or backflow occurs. After flushing, allow time for drainage, then inspect from the roof for remaining obstructions or damage.
Use a Wet/Dry Shop Vac to Extract Vent Blockages
Use a wet/dry shop vac to pull loosened debris from the vent pipe after initial loosening or when water flushing isn’t practical.
The vac’s strong suction removes leaves, nests, and sediment from accessible sections. Attach a narrow nozzle or hose extension to reach deeper; seal the roof opening with duct tape or a rag to improve vacuuming.
Work in short bursts, checking the collection canister and clearing filters as needed. Wear eye protection and gloves; avoid attempting vacuuming during storms.
If resistance persists, stop and inspect further to prevent damage or incomplete clearing.
- Choose narrow nozzle
- Seal opening
- Pulse vacuuming
- Inspect frequently
Is Compressed Air Safe for Vent Clearing?
Can compressed air safely clear a vent pipe without causing damage or creating new blockages?
Compressed air can dislodge loose debris like dust, leaves, or nests when applied carefully at moderate pressure. It is unsuitable for packed material, grease, or rigid obstructions because high pressure can compact debris further, push it deeper, or damage thin metal or plastic pipes.
Use regulated, low-pressure settings and short bursts, and direct airflow away from sensitive components and occupants.
Combine with inspection (camera or flashlight) and collection methods (shop vac) to capture expelled debris.
Protective eyewear and hearing protection are recommended.
Chemical Cleaners: When They Help and When They Harm
Although chemical cleaners may break down organic buildup such as hair, soap scum, and some grease, their effectiveness depends on the formulation and the type of blockage.
The piece evaluates strengths and risks: caustic drain cleaners dissolve organic matter quickly but can corrode metal, damage seals, and harm nearby plants; oxidizing cleaners are safer for some materials but slower; solvents may dissolve greasy residues yet introduce toxic fumes; and many formulations react poorly with other chemicals.
- Match cleaner chemistry to pipe material.
- Avoid mixing products.
- Use personal protective equipment.
- Prefer mechanical removal for unknown obstructions.
Make a Safe Enzyme Cleaner for Plumbing Vents
The article outlines key ingredients and safety precautions for an enzyme-based vent cleaner, emphasizing non-corrosive enzymes, biodegradable solvents, and proper protective gear.
It then explains correct mixing and activation steps to guarantee enzymatic activity without generating hazardous fumes.
Finally, it covers targeted application techniques and routine maintenance to keep plumbing vents clear and functioning.
Ingredients And Safety
Several simple, noncorrosive ingredients can be combined to make an effective enzyme-based cleaner for plumbing vents: a commercial enzyme or bacterial drain product, warm water, and a mild biodegradable surfactant to help penetrate grime.
Protective gear—gloves and eye protection—should be standard. Read labels for concentration, temperature range, and compatible materials to avoid damage to seals or pipes.
Store components where children and pets cannot reach. Do not mix with bleach, acids, or caustics; such combinations inactivate enzymes and create hazardous fumes.
Dispose of leftover solution per local guidelines to prevent environmental harm.
- Enzyme product
- Warm water
- Mild surfactant
- PPE and storage
Mixing And Activation
To activate the enzyme cleaner, combine the measured enzyme product with warm water at the manufacturer-recommended ratio, then add a small amount of mild biodegradable surfactant to improve wetting; mix gently to avoid foaming.
The solution should be prepared in a clean, labeled container resistant to corrosion. Allow the mixture to rest for the time specified so enzymes reach full activity—typically 15–30 minutes.
Avoid heat above recommended temperatures and do not add bleach, ammonia, or strong acids, which denature enzymes.
Wear gloves and eye protection while mixing. Dispose of unused diluted solution per local regulations and product instructions.
Application And Maintenance
Having allowed the enzyme mixture to reach full activity, application to plumbing vents proceeds with measured, safety-minded steps.
The cleaner is poured slowly into the vent opening or applied via a funnel to avoid splashing; PPE is used and nearby occupants informed.
Allow dwell time per label, then flush with warm water to carry residues into the drain.
Routine maintenance prevents recurrence: schedule monthly treatments in high-use systems and after heavy organic buildup.
Monitor vent airflow and odor; repeat sooner if performance declines.
Store remaining enzyme solution cool, sealed, away from children and pets, discarding per local regulations.
- Prepare PPE and tools.
- Apply slowly.
- Dwell and flush.
- Schedule routine treatments.
Clearing Ice and Snow From Winter Roof Vents
When winter brings heavy snow and freezing rain, roof vents can become blocked by ice dams and packed snow, restricting airflow and risking sewer-gas buildup or slow drains.
Inspect from ground with binoculars; avoid stepping on icy roofs. Use a roof rake with an extendable handle to clear snow around vent stacks, pulling snow down slope.
For ice, gently apply warm water from a garden hose or use calcium chloride tablets in a breathable bag placed near the vent to melt ice without damaging shingles.
After clearing, check vents for remaining obstructions and guarantee proper flashing and insulation to prevent recurrence.
Removing Animal Carcasses or Pest Obstructions Safely
Locate and assess the obstruction before attempting removal, prioritizing safety and contamination control.
The person should wear gloves, respirator, and eye protection; seal the area to limit odours and pathogens; and plan disposal and sanitization.
If the carcass is out of reach, use a grabber or extendable tool rather than entering confined spaces. Avoid forcing debris deeper into the vent.
- Don protective gear and ventilate the workspace.
- Use long tools to extract remains and nesting materials.
- Bag and double-seal waste; follow local disposal rules.
- Disinfect the vent interior and surrounding surfaces.
Inspecting and Fixing Cracked or Collapsed Vent Pipes
The inspector checks the vent line for visible cracks, sagging sections, and moisture stains that indicate compromised integrity.
If minor splits or loose joints are found, a prompt patch or seal can restore function temporarily.
Severely damaged or collapsed segments require replacement to guarantee proper airflow and prevent recurring clogs.
Locate Damage Signs
Inspecting a vent pipe for cracks, splits, or collapse begins with a systematic visual and tactile survey from roofline to attic access points.
The inspector notes discoloration, hairline fractures, crushed sections, and loose fittings.
Moisture stains, mold growth, or drafts indicate compromised seals.
Sound tests—tapping along the pipe—reveal hollow versus dense areas suggesting internal collapse.
Record each finding, photograph damage, and mark locations for targeted intervention.
Prioritize safety when accessing high or confined spaces and avoid DIY attempts beyond observation.
- Visible fractures, splits, or missing flashing
- Soft spots or flattened pipe sections
- Water stains, mold, or damp insulation
- Unusual airflow or rattling sounds
Repair Or Replace
Having documented damage locations and severity, the next step is to determine whether sections of the vent pipe can be repaired on site or require full replacement. Inspection focuses on crack length, collapse extent, material, and accessibility. Small hairline cracks and localized dents often accept patching, epoxy, or coupling sections. Severe collapse, corrosion, or multiple joints failing mandates replacement. Safety, code compliance, and slope must guide decisions. Costs, downtime, and recurrence risk are weighed. Recommended actions summarized:
| Condition | Repair Option | Replacement Trigger |
|---|---|---|
| Hairline crack | Epoxy/patch | No |
| Local dent | Clamp/patch | No |
| Corrosion | Sleeve | Yes |
| Collapse | – | Yes |
Re-Seal Flashing and Rooftop Vent Connections
Because rooftop flashing and vent collars are the primary barrier against water intrusion, proper resealing is crucial to maintain a watertight roof penetration.
A thorough inspection identifies cracked sealant, lifted flashing edges, and corroded collars. Remove old caulk, clean surfaces, and apply a compatible roofing-grade sealant around the base and under the collar flange.
Confirm flashing sits flush; replace fasteners and use butyl tape for added adhesion where metal meets pipe. Verify roof slope channels water away from the seal.
Final checks include interior attic for leaks after the next rain and periodic reseal every few years.
- Inspect
- Clean
- Reseal
- Verify
Quick Temporary Fixes to Restore Ventilation Now
After resealing flashing and confirming a watertight roof penetration, attention can shift to restoring airflow quickly when a vent pipe is blocked or compromised.
A temporary fix uses a garden hose or flexible tubing to punch through soft obstructions; insert gently, avoid force that damages the pipe.
For partial clogs, a plumber’s snake pushed a short distance can dislodge debris.
If access is rooftop-limited, install a temporary vent cap with a screened opening to keep out animals and large debris while allowing air exchange.
Seal joints with high-temp tape or silicone for short-term reliability until permanent repair occurs.
How to Verify Airflow After Unclogging the Vent
Confirming restored airflow is essential to guarantee the vent functions properly and prevents sewer gases, slow drains, or pressure imbalances.
Verify by simple tests and objective checks. Use a smoke stick or incense near fixtures to observe steady upward draft; stagnant or erratic movement indicates issues.
Measure with a handheld anemometer at accessible cleanouts for quantitative confirmation.
Listen at fixtures for gurgling or pressure changes when water flows; absence of noise suggests clearance.
Finally, inspect the roof termination visually for unobstructed discharge during a water test.
Record results and repeat if any sign of restriction appears.
- Smoke or incense draft test
- Handheld anemometer reading
- Fixture noise check during flow
- Visual roof termination inspection
Preventive Maintenance Schedule for Roof Vents
A clear preventive maintenance schedule helps keep roof vents functioning and prevents future clogs.
It should include a seasonal inspection checklist that notes cap condition, seal integrity, and signs of debris or animal entry.
Routine cleaning intervals—at least biannually, with additional checks after storms—ensure vents remain clear and operational.
Seasonal Inspection Checklist
Seasonal inspections of roof vents should occur at least twice a year—ideally in spring and fall—to catch wear, blockages, and flashing issues before extreme weather.
A concise checklist guides assessments, documents findings, and prioritizes repairs to prevent vent failures and related water damage.
- Inspect vent caps and screens for corrosion, cracks, or displaced fasteners.
- Check flashing seals and roof integration for gaps, sealant degradation, or lift.
- Observe surrounding shingles and underlayment for staining, rot, or exposed nails.
- Verify vent alignment and secure mounting; note any movement or gaps for prompt correction.
Routine Cleaning Intervals
Following the seasonal inspection checklist, establishing routine cleaning intervals helps keep vents clear and functioning between formal checks.
A preventive schedule assigns tasks by frequency: monthly visual checks for debris, quarterly light cleanings with a brush or compressed air, and annual thorough cleanings involving rooftop access and cap removal.
Frequency adjusts for roof type, surrounding foliage, local weather, and bird activity. Document dates, findings, and actions in a log to spot trends and trigger earlier intervention if blockages recur.
Professional inspection is advised after severe storms or persistent issues. Consistent intervals reduce urgent clogs and extend vent lifespan.
Best Vent Caps and Screens for Long-Term Protection
Durable vent caps and fine-mesh screens provide the most reliable long-term defense against pests, debris, and moisture entry while maintaining airflow.
Selection emphasizes corrosion-resistant materials, tight but breathable screening, and designs that shed water. Proper sizing and secure mounting prevent gaps that invite blockages.
Maintenance involves periodic inspection and gentle cleaning to preserve effectiveness without altering fit.
- Stainless steel mushroom cap with 1/8″ mesh — durable, low-corrosion, good rain deflection.
- Aluminum louvered cap with insect screen — lightweight, ventilated, rust-resistant.
- Copper domed cap with wreath mesh — long lifespan, natural patina.
- Galvanized wrap-around screen — retrofit-friendly, economical.
Tools Checklist: What to Buy for Ongoing Vent Care
After selecting the right caps and screens, a compact set of tools makes routine vent maintenance faster and safer.
Recommended items include a telescoping inspection mirror, flexible plumbing snake or small drain auger, hand brush set for scrubbing interiors, extendable pole with brush attachment, nitrile gloves, safety goggles, and a dust mask.
Add a cordless handheld vac for removing debris, silicone lubricant for moving parts, stainless-steel zip ties for securing screens, and a basic multi-tool.
Store supplies in a sturdy tote with labeled compartments and a simple checklist to track replacements and inspection dates for dependable ongoing vent care.
Common Mistakes That Make Vent Clogs Worse
Common errors often turn a manageable vent blockage into a more serious problem: forcing tools or water in the wrong direction, using chemical drain cleaners on vent lines, and neglecting to secure screens before cleaning can all push debris deeper, damage fittings, or create hazardous fumes.
A detached overview highlights mistakes to avoid for safer, faster results.
- Prying blindly — applying excessive force with pry bars or stiff rods can deform pipes or dislodge seals.
- Backflushing — directing water toward the roof can compact obstructions.
- Solvents misuse — corrosive cleaners harm metal and rubber components.
- Skipping inspections — ignoring joint leaks or animal entry points invites recurrence.
When to Schedule Professional Vent Inspection and Maintenance
Mistakes that worsen vent clogs often signal when a professional inspection is warranted: persistent backup after attempted DIY fixes, recurring animal entry, visible joint damage, or lingering odors indicate problems beyond routine maintenance. A technician evaluates airflow, structural integrity, and code compliance, recommending repairs, screen replacement, or rerouting when needed. Schedule inspection annually for older systems, after storms, or when DIY methods fail twice. Documentation of findings aids warranty and insurance claims. Professionals use cameras, pressure tests, and safe roof access to resolve hidden issues before they become costly.
| Scene | Action |
|---|---|
| Rooftop access | Camera feed |
| Damaged joint | Seal repair |
| Animal nest | Removal |
| Clogged stack | Cleaning |
Conclusion
A quick DIY vent unclog can save time and prevent odors, but some will worry it’s risky or ineffective. With basic PPE, a stable ladder, and a few simple tools—brush, plumber’s snake, or garden hose—one can clear most roof vent blockages safely. Imagine standing on a secure ladder at sunrise, the vent cap off, debris swept away and fresh air finally untrapped; if debris is stubborn, call a pro to finish the job.