Fix a Copper Pipe Leak Fast: DIY Steps & Pro Tips for Homeowners
If you’re dealing with a copper pipe leak, the first step is to shut off the water supply, relieve the pressure in the line, and dry the affected area. For small leaks, you can use epoxy putty, self-fusing silicone tape, or a rubber patch secured with a clamp for a quick fix. If the leak is at an accessible joint, consider using a no-heat push-fit or compression coupling for a more lasting solution. However, for major cracks, hidden leaks, or persistent issues, it’s best to call a licensed plumber.
Key Takeaway:
- Turn off the water and dry the area.
- Use temporary fixes like epoxy putty or silicone tape for small leaks.
- For joints, use push-fit or compression couplings.
- Consult a plumber for serious or recurring leaks.
Continue reading for detailed steps, essential tools, testing methods, and safety precautions.
What a “Copper Pipe Leak” Means: Pinhole, Joint, or Crack
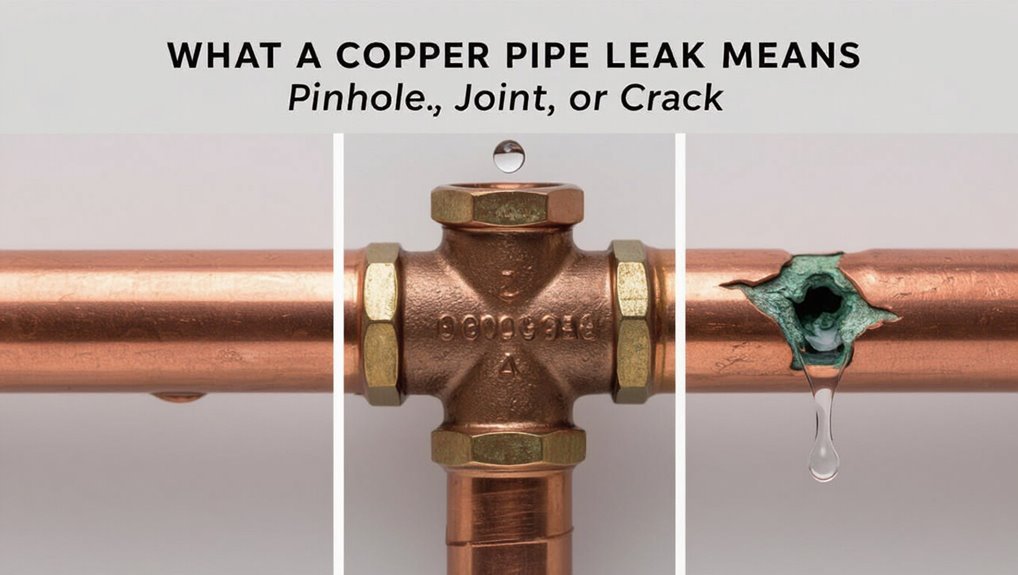
A copper pipe leak can take several forms—tiny pinholes that weep slowly, failing joints that drip at connections, or visible cracks that spray or stream water—and each type signals different causes and repair approaches.
Pinholes often result from corrosion, water chemistry, or erosion and present as localized slow seepage along straight runs.
Joint leaks commonly stem from poor soldering, thermal movement, or mechanical stress causing gaps at fittings.
Cracks indicate physical damage, freezing, or prolonged fatigue and produce more rapid loss.
Detecting the form guides diagnosis: assess inlet water quality, inspect fittings, and examine exposed runs for dents, greenish corrosion, or fracture lines.
How to Stop a Copper Pipe Leak Now (Fast Temporary Options)
Having identified the leak type—pinhole, joint, or crack—the next step is to stop the flow quickly to prevent damage while a permanent repair is arranged.
Temporary measures buy time: shut the supply, dry the area, and apply a short-term patch suited to the leak. Common quick fixes are simple, require minimal tools, and prioritize safety. Choose a solution that matches pipe condition and water pressure; monitor the patch until a durable repair is completed.
- Wrap epoxy putty firmly around the wet, cleaned spot.
- Use self-fusing silicone tape stretched tightly over the leak.
- Clamp a rubber patch beneath a hose clamp.
- Install a compression sleeve for small joints.
- Apply pipe repair tape as a last resort for tiny pinholes.
When to Call a Plumber Versus DIY
When should a homeowner attempt a DIY copper pipe repair and when is it necessary to call a licensed plumber?
Simple, small leaks from accessible joints, pinholes, or sweat fittings can be handled by a competent DIYer familiar with basic plumbing and safety.
Call a licensed plumber for major ruptures, leaks behind walls or ceilings, persistent or recurrent leaks, frozen-burst pipes, or when changes affect water pressure or municipal connections.
If soldering or cutting near gas lines, structural elements, or complex valve assemblies is required, professional assessment avoids code violations and hidden damage.
Insurance claims and permits also warrant a plumber.
Gather Tools and Supplies for a Copper Pipe Repair
Before beginning a copper pipe repair, the homeowner should assemble an essential tools checklist including a pipe cutter, emery cloth, flux brush, and adjustable wrench.
Necessary materials such as solder, flux, and appropriate sealants should be laid out and verified for compatibility with copper.
Safety gear—gloves, eye protection, and a fire-resistant pad—plus basic prep items like a bucket and rags, complete the supplies.
Essential Tools Checklist
For a swift and reliable copper pipe repair, assemble a compact kit of essential tools and supplies: a tube cutter, adjustable wrench, emery cloth or sandpaper, flux, lead-free solder or a repair coupling, a propane or MAP gas torch (if soldering), a torch-safe heat shield, pipe-cleaning brush, cloths, and appropriate safety gear (gloves and eye protection).
A focused checklist prevents delays and guarantees safe, efficient work. Verify tool condition and compatibility with pipe size before beginning. Keep replacements and small extras on hand to avoid interruptions.
- Tube cutter
- Adjustable wrench
- Emery cloth/sandpaper and brush
- Torch and heat shield
- Safety gloves and goggles
Sealants And Solder
In selecting sealants and solder for a copper pipe repair, prioritize compatibility with potable water systems and the joint method being used. The homeowner should choose lead-free solder for potable lines, flux rated for copper, and silicone or epoxy sealants only where soldering is impossible. Match solder type to torch and joint size; use water-safe epoxies for temporary stops. Clean surfaces thoroughly; apply flux sparingly. Allow full cure per manufacturer instructions before restoring water pressure.
| Material | Use case | Notes |
|---|---|---|
| Lead-free solder | Permanent joints | Required for potable water |
| Flux | Solder prep | Copper-rated only |
| Epoxy | Temporary leak stop | Check water compatibility |
| Silicone | Non-pressurized seals | Not for soldered joints |
Safety Gear And Prep
Gathering safety gear and prepping the work area guarantees the copper pipe repair proceeds efficiently and without unnecessary risk.
The homeowner should inspect tools, isolate water, and make certain proper ventilation.
Protective equipment reduces injury, while organized supplies speed the job.
A clean, dry surface and clear workspace prevent contamination and accidents.
- Safety glasses and gloves to protect eyes and hands
- Respirator or mask when soldering near flux or in confined spaces
- Fire extinguisher and heat-resistant mat for soldering jobs
- Bucket, rags, and absorbent pads to manage water spills
- Flashlight and adjustable wrench for tight, dim areas
Shut Off Water and Drain the Copper Line Safely
Before making repairs, the water supply to the affected copper line must be shut off and the pipe drained to prevent flooding and reduce pressure in the system. The homeowner locates the relevant shutoff—house main, zone valve, or fixture valve—then closes it firmly. Next, vents and faucets downstream are opened to drain residual water; a bucket catches drips and towels protect floors. If present, a drain or hose attachment speeds emptying. Once empty, the line is inspected for pressure by observing slow seepage; if present, recheck valves. Proper drainage minimizes mess and improves repair success.
| Step | Action |
|---|---|
| 1 | Close shutoff |
| 2 | Open drains |
| 3 | Collect water |
Locate the Exact Copper Leak Quickly
With the line shut off and drained, the next task is pinpointing the leak’s exact location so repairs target the correct spot. A careful inspection reduces wasted work and missed damage. Use visual clues, feel for dampness, and listen for hissing.
If accessible, follow the pipe from fittings toward wet areas; corrosion, green-blue staining, or mineral deposits often mark small failures. Pressure or dye tests help when origin is unclear.
- Look for discoloration and crystalline buildup.
- Run a dry cloth along joints and seams.
- Use a flashlight at low angles.
- Tap sections to reveal hollow sounds.
- Note nearby damp insulation or wood.
Stop a Copper Pinhole Leak Immediately (Wraps, Epoxy)
Act quickly to stop a copper pinhole leak using a temporary wrap or epoxy patch that secures time until a permanent repair can be made.
Clean and dry the pipe area; remove corrosion and dirt with a wire brush and cloth to secure adhesion. For wraps, soak a fiberglass or rubber repair wrap per instructions, stretch tightly around the leak, and smooth to eliminate gaps.
For epoxy, mix a fast-setting compound, apply over and slightly beyond the pinhole, and shape into a smooth patch. Allow full cure under recommended conditions, then test under low pressure before restoring normal flow.
Make a Temporary Clamp or Tape Repair That Holds
Before applying any temporary clamp or tape, the area around the leak must be cleaned and thoroughly dried to guarantee adhesion.
A simple clamp can be fashioned from a rubber patch or hose and secured with hose clamps or stainless steel straps to compress the leak.
For flexible, conforming coverage, self-fusing silicone tape can be stretched and wrapped tightly over the wet spot to form a pressure-resistant seal.
Clean And Dry Surface
On copper, a temporary clamp or tape repair will only hold if the pipe is clean and dry; remove oxidation, solder residue, and any loose debris with a wire brush or fine-grit sandpaper, then wipe the area with a rag dampened with isopropyl alcohol or acetone to remove oils and flux.
After draining and drying, inspect the metal for pitting or cracks that compromise adhesion. Prepare a tidy workspace and keep materials within reach.
Recommended quick steps:
- Brush lightly until bright metal shows
- Sand edges of corrosion for smooth progression
- Wipe thoroughly with solvent
- Allow full evaporation time
- Reinspect before applying repair
Make A Temporary Clamp
Using simple materials and a steady hand, a temporary clamp or tape repair can hold long enough to stop most small copper leaks until a permanent fix is made.
The pipe is first cleaned and dried; a rubber pad or piece of inner tube is placed over the hole. A metal or stainless clamp is tightened evenly to compress the pad against the leak, avoiding over-torquing that could further damage the pipe. If clamps aren’t available, layered waterproof tape applied with firm overlapping turns can provide pressure and sealing.
These measures are temporary; schedule a professional soldered or replaced joint promptly.
Use Self-Fusing Tape
How can self-fusing silicone tape be employed to stop a small copper pipe leak quickly and reliably? It wraps, fuses, and seals under tension, creating a temporary waterproof clamp until a permanent fix is made. Preparation and correct layering determine success; make certain the pipe is clean and dry, then stretch and overlap neatly for pressure resistance.
- Clean and dry the leak area thoroughly.
- Stretch tape 50–100% while wrapping to activate fusion.
- Overlap each pass by half the tape width.
- Extend wraps several inches beyond the leak.
- Press and hold the end to secure the bond.
Solder a Small Pinhole on Copper: Step‑by‑Step
When a small pinhole appears in a copper pipe, a quick, controlled solder repair can stop the leak and restore integrity without replacing the section.
First, shut off water and drain the pipe.
Clean the area with emery cloth to bright copper, removing corrosion and paint.
Apply flux sparingly to the cleaned spot.
Heat evenly with a propane torch until flux sizzles, then touch solder to the pinhole; capillary action will draw solder into the hole.
Allow cool naturally, then wipe excess flux.
Repressurize slowly and inspect for seepage.
If leakage persists, consider cutting out the damaged segment.
Make Leak‑Free Solder Joints: Flux, Heat, and Inspection
Successful soldering begins with a clean, well‑fitted joint and an even application of flux to promote wetting.
Controlled, consistent heat applied around the joint—not directly to the solder—ensures the filler flows properly.
A careful visual and pressure inspection after cooling confirms a leak‑free connection.
Prepare Joint And Flux
Before assembling the joint, the copper surfaces must be clean, fit tightly, and coated with a thin, even layer of flux to promote proper solder flow and prevent oxidation.
The technician scrapes and brushes inside the fitting and on the pipe until bright metal appears, then deburrs edges for full contact.
Flux is applied sparingly to avoid pooling; excess is wiped.
Proper preparation guarantees capillary action draws solder throughout the seam.
Final checks confirm snug fit and full flux coverage before heating.
- Clean both pipe and fitting
- Remove burrs and imperfections
- Apply thin, even flux
- Align for full contact
- Wipe excess flux
Controlled Heat And Inspect
With the joint cleaned, fluxed, and fitted, controlled application of heat brings the solder into the seam and must be monitored closely.
The torch is moved evenly around the joint, heating the pipe body rather than the fitting to draw solder by capillary action.
When the flux sizzles and the solder beads on contact, feed a thin, continuous fillet; avoid overheating which burns flux and weakens the joint.
Allow solder to flow fully around circumference, then remove heat and let cool undisturbed.
Wipe residual flux.
Inspect visually for complete fillet, smooth wetting, and absence of gaps or cold joints; pressure‑test before concealment.
Solder Safely Near Plastic or in Tight Spaces
When soldering copper near plastic components or inside cramped cavities, maintain strict control of flame, heat transfer, and ventilation to prevent melting, deformation, or toxic fume exposure.
Maintain distance between torch and plastic, use heat shields or wet cloths, and clamp parts to limit movement. Work methodically to avoid accidental contact and cool joints promptly. Make sure adequate airflow or a mask rated for fumes. If access is severely limited, consider alternative joining methods.
- Use a small, controllable torch tip
- Wrap nearby plastic with heat-resistant tape
- Apply heat-sink pliers on fittings
- Ventilate the area well
- Have a fire extinguisher ready
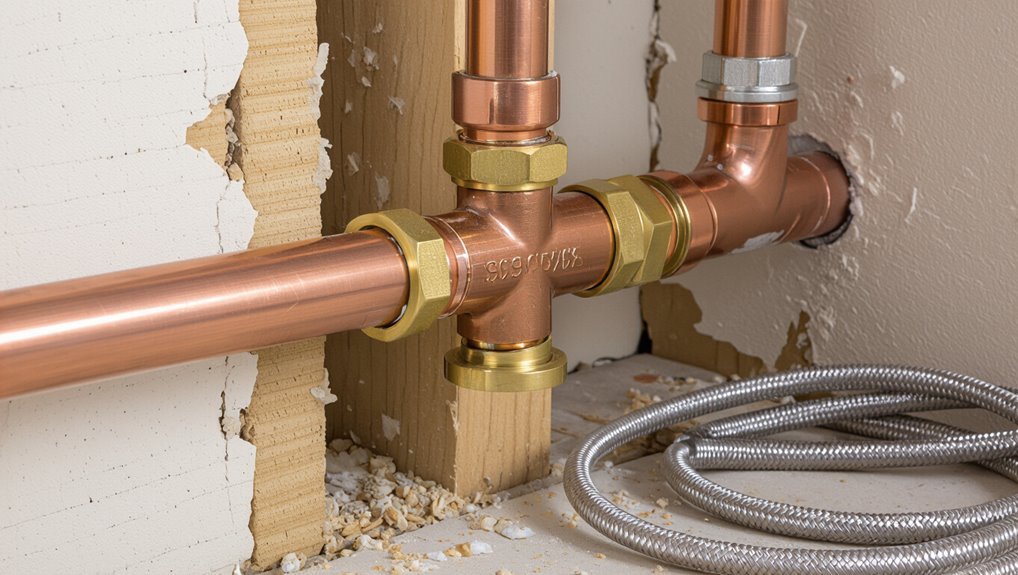
Replace a Short Copper Section With a Compression Coupling
Cut out the damaged section of pipe and fit a compression coupling to restore service without soldering. The procedure uses a clean cut, deburring, slide-on nut and ferrule, and tightened connection. It suits small repairs, requires minimal tools, and avoids heat. Make sure pipe is dry, measure twice, and choose correct coupling size. Tighten nuts evenly; do not overtighten. Test by slowly restoring water and inspect for leaks. If seepage occurs, re-tighten or replace ferrule.
| Step | Tool/Part | Tip |
|---|---|---|
| Cut | Tube cutter | Square cut |
| Deburr | Reamer | Smooth edges |
| Fit | Ferrule/nut | Correct size |
| Tighten | Wrench | Even turns |
| Test | Water on | Inspect joints |
Replace a Section Using Sweat (Soldered) Joints
For repairs requiring a permanent, watertight bond, sweat (soldered) joints fuse a new copper section into the system by cleaning, fluxing, heating, and applying solder to the joint.
The method removes a damaged segment, prepares pipe ends, and forms metallurgical bonds that resist pressure and corrosion.
Safety and proper tools matter: a torch, flux, lead‑free solder, emery cloth, and heat sink if near fittings.
Steps proceed systematically to guarantee even heat and full capillary action.
Consider professional help for gas lines or complex layouts.
- Clean pipe ends thoroughly
- Apply flux evenly
- Heat joint, not solder
- Feed solder until filled
- Cool and test
Use Push‑Fit (SharkBite) Fittings for Fast Copper Repairs
After soldering has been ruled out or deemed too slow for an urgent fix, push-fit (SharkBite) fittings offer a rapid alternative that requires no torch, flux, or solder. They connect clean, deburred copper quickly; the O‑ring seal holds under normal household pressure and can be removed for repositioning. They suit tight spaces and temporary or permanent repairs, though verification for local code compliance is recommended. The installer must cut square, remove burrs, and mark insertion depth. Use only rated fittings for potable lines and test under pressure after installation.
| Advantage | Note |
|---|---|
| Speed | Minutes to install |
| No heat | Safe near combustibles |
| Reusable | Pull‑out capable |
| Code? | Check local rules |
Install a Clamp‑Style Repair Sleeve for Larger Cracks
When a hairline crack or split is too large for epoxy or a slip-on sleeve, a clamp‑style repair sleeve provides a sturdy, mechanical fix that restores pressure integrity quickly.
The area is shut off and dried; corrosion and burrs are removed.
The sleeve is centered over the defect and the clamp tightened evenly to compress a rubber gasket against the pipe.
After pressurizing slowly, the repair is inspected for seepage.
Properly sized sleeves handle higher pressures and longer runs than temporary wraps.
- Select correct diameter and material
- Clean and deburr pipe thoroughly
- Position gasket squarely over crack
- Tighten bolts incrementally and evenly
- Test under normal pressure
Apply Epoxy or Pipe Putty for Slow Leaks: When and How
In cases of slow, weeping leaks where cut-and-clamp repairs are unnecessary, epoxy putty or pipe putty offers a quick, low-cost sealing option that bonds to metal and plastic surfaces.
The surface must be clean, dry, and free of corrosion; sand lightly and wipe with a solvent. Knead the putty to a uniform color, press firmly over the leak, and shape a smooth seal extending at least 1/2 inch beyond damage.
Allow full cure per manufacturer directions before restoring water. Use putty for small pinholes or hairline cracks as a temporary or semi-permanent fix; inspect periodically and replace if deterioration appears.
Cut and Remove Damaged Copper Without Widening the Hole
The technician uses a precise cutting technique to score and rotate the cutter for a clean, controlled cut.
Surrounding copper is protected with shielding or tape to prevent accidental gouges.
The damaged tube segment is removed cleanly so the remaining pipe retains its original diameter for a proper repair.
Precise Cutting Technique
Begin by stabilizing the pipe and marking the cut edges precisely to avoid enlarging the hole; a steady clamp and a fine-tip marker guarantee the repair area is confined.
The technician selects a tubing cutter or fine hacksaw, aligning the tool perpendicular to the mark. Rotation with steady pressure prevents ovaling; short, controlled strokes limit vibration.
After loosening the burrs with a deburring tool, the cut end is tested for fit with the replacement sleeve.
Cleanliness and measured movements protect adjacent metal without extra disturbance.
- Choose the right cutter size
- Clamp firmly but gently
- Rotate smoothly, avoid rocking
- Deburr immediately
- Verify fit before soldering
Protect Surrounding Copper
After cutting and deburring the damaged section, attention shifts to protecting the surrounding copper while removing the remainder of the compromised area; this requires controlled, inward cuts and surface shielding to prevent enlarging the hole.
The technician scores inward from the damaged edge with a fine rotary bit or needle file, taking shallow passes to avoid radial expansion.
A thin metal shim or folded stainless foil clamps around the pipe to shield adjacent surfaces from tool slips and heat.
Intermittent cooling and inspection prevent burrs.
Work proceeds until only the focused damaged metal is freed, preserving original tube diameter and wall integrity.
Remove Tube Cleanly
Using steady, controlled cuts, the technician removes the damaged copper without enlarging the hole by cutting tangentially and working from the outside edge toward the compromised area.
The process focuses on restraint and accuracy to preserve surrounding material and simplify replacement.
Clean removal prevents jagged edges that hinder fittings and seals.
Recommended steps include:
- Score gently with a tubing cutter, rotating for even depth.
- Use fine hacksaw or rotary tool for tight spots.
- File burrs and deformations with a small round file.
- Support the pipe to avoid twisting the remaining installation.
- Inspect the hole for cracks before proceeding with the repair.
Prep and Install Fittings on Old Corroded Copper Pipe
When working on old, corroded copper, the preparatory steps determine whether a fitting will seal reliably or fail prematurely. The surface is cleaned to bright copper with a wire brush and emery cloth; corrosion pits are assessed and cut out if necessary. Ends are deburred, flux applied sparingly, and fittings trial‑fit for alignment. For soldered joints, use lead‑free solder and heat evenly; for compression or push‑fit, make certain straight, clean insertion and replace damaged nuts or olives. Test under low pressure first, inspect for seepage, then restore full service.
| Task | Tool | Checkpoint |
|---|---|---|
| Clean | Wire brush | Bright copper |
| Deburr | File | Smooth edge |
| Fit | Flux/solder | No gaps |
Fix a Leaking Joint vs a Through‑Wall Copper Pipe Leak
Repairing a leaking joint and repairing a through‑wall copper pipe breach require different assessments and techniques. One evaluates solder, fittings, and accessibility; the other treats full‑thickness damage and water pressure. Choices hinge on location, flow, and whether the pipe can be isolated.
- Leaking joint: often fixed by re‑soldering, tightening compression, or replacing a fitting.
- Through‑wall breach: demands cut‑out of damaged section or clamp/repair sleeve rated for pressure.
- Accessibility: joints are usually reachable; through‑wall leaks may require drywall or cabinet removal.
- Temporary fixes: use shutoff and captive clamp; avoid long‑term bandages.
- Safety: isolate supply and depressurize before work.
Deal With Pinhole Leaks Caused by Corrosion
Pinhole leaks from corrosion commonly appear as tiny, fast‑weeping holes in older copper lines and require a different approach than joint or traumatic breaches.
Assess extent by drying the area, marking each hole, and inspecting adjacent pipe for thinning or greenish deposits.
For single small pinholes, clamp a rubber patch and hose clamp or wrap with epoxy putty designed for potable water; allow cure time before restoring pressure.
For multiple holes or widespread pitting, section replacement with new copper or compatible piping is recommended.
After repair, test at normal pressure, flush the system, and consider addressing water chemistry to slow recurrence.
Avoid Common Soldering Mistakes That Cause Repeat Leaks
Failing to master proper soldering technique is a common reason patched copper joints leak again. Attention to preparation, heat control, and solder application prevents repeat failures.
Common mistakes include insufficient cleaning, overheating, cold joints, inadequate flux, and using wrong solder. Remedies focus on methodical steps and inspection.
- Clean and sand pipe and fitting until bright copper shows.
- Apply appropriate flux sparingly to avoid contamination.
- Heat the joint evenly, not the solder directly.
- Feed solder to the heated joint so it is drawn in by capillary action.
- Inspect the bead for continuity and smoothness before cooling.
Pressure‑Test the Repaired Copper Pipe Before Restoring Water
Before restoring water to the system, pressure-testing the repaired copper section confirms the joint holds under operating conditions and prevents a second leak from causing damage.
A pressure test isolates the repaired segment with test plugs or a capped hose, then introduces compressed air or water at the household working pressure or slightly above (typically 50–80 psi for residential systems).
Monitor gauges and visually inspect joints for at least 10–15 minutes; listen for hissing and use soapy water to reveal small bubbles.
If pressure drops or bubbles appear, depressurize, reopen the joint, and re-solder or replace fittings before returning the line to service.
Inspect Nearby Pipes, Valves, and Fittings After Repair
Once the repaired section holds pressure, attention should shift to the surrounding plumbing: nearby pipes, shutoff valves, and fittings often bear extra stress or show early signs of corrosion that a single repair can mask.
The homeowner or technician examines adjacent joints, checks for pinhole leaks, and verifies valve operation. Look for discoloration, mineral buildup, soft spots, and damp insulation. Tighten loose fittings and replace compromised components promptly to prevent cascading failures.
- Check soldered and compression joints for seepage
- Cycle shutoff valves to confirm function
- Inspect brackets and pipe support integrity
- Scan for corrosion or green staining
- Note temperature-related expansion points
Restore Insulation and Wall Surfaces After a Copper Repair
After confirming the repair holds, restore any removed insulation and wall surfaces to protect the pipe and return the area to its original condition. Reinstall insulation snugly around the pipe, replacing damp or compressed material. Seal vapor barriers and tape seams. Patch drywall or access panels, using appropriate fasteners and joint compound; sand and prime before painting. Reattach trim or baseboards removed for access. Verify no gaps remain that could allow heat loss, condensation, or pests. Document the repair location for future reference.
| Item | Action |
|---|---|
| Insulation | Replace/snap in place |
| Vapor barrier | Tape/seal seams |
| Drywall | Patch & compound |
| Finish | Sand, prime, paint |
| Trim | Reattach securely |
Safety Checklist: Fire, Fumes, and Lead When Working on Copper
With insulation and finishes restored, attention turns to the hazards that accompany copper work: open flame, toxic fumes, and lead contamination.
A concise safety checklist reduces risk and guarantees compliance. Key actions include controlling ignition sources, ventilating soldering areas, and testing for lead in older fittings. Personal protective equipment and fire suppression measures are nonnegotiable. Routine disposal of contaminated debris prevents secondary exposure.
- Shut off gas and remove flammables before soldering.
- Use a respirator or local exhaust when heating flux or leaded alloys.
- Test suspect fittings for lead; replace if positive.
- Keep a fire extinguisher within reach.
- Bag and label hazardous waste.
When to Replace Copper With PEX or CPVC Instead
The decision to replace copper with PEX or CPVC hinges on factors such as the age and condition of existing piping, budget constraints, and the specific demands of the plumbing layout.
Consideration should be given to upfront material and labor costs versus long-term savings from corrosion resistance and reduced maintenance.
Compatibility with fittings, temperature/pressure limits, and local code or installation restrictions will determine whether PEX or CPVC is the appropriate alternative.
When To Switch Materials
When frequent corrosion, repeated solder joint failures, or ongoing pinhole leaks make repairs impractical, homeowners should consider replacing copper with PEX or CPVC; these plastics resist corrosion, simplify installation, and often cost less in labor and materials over time.
A decision to switch should weigh pipe condition, water quality, local code, and long-term reliability. Consider professional inspection before major replacement.
Typical triggers and practical considerations include:
- Multiple leak sites along a run indicating systemic failure
- Hard water causing accelerated copper degradation
- Limited access making repeated repairs invasive
- Need for flexible routing in remodels
- Corrosion from nearby stray electrical currents
Cost And Long-Term Savings
Evaluate lifetime costs rather than upfront price alone: replacing copper with PEX or CPVC often reduces material and labor expenses, lowers repair frequency, and can cut energy losses from heat conduction differences, but savings depend on local labor rates, fixture count, and anticipated service life.
A homeowner should compare projected replacement intervals, expected failure modes, and warranty periods. Estimate total installed cost per linear foot, include fittings and connectors, and factor potential downtime or water damage mitigation costs.
Over decades, lower labor intensity and corrosion resistance of alternative materials frequently produce net savings, especially in retrofit scenarios with extensive runs.
Compatibility And Installation Limits
In evaluating whether to replace copper with PEX or CPVC, homeowners should weigh material compatibility, building code restrictions, and the practical limits of each system’s installation. PEX offers flexibility and fewer fittings, CPVC resists chlorinated water and heat, while copper remains durable and recyclable. Choice depends on water chemistry, exposure to sunlight, and required pressure ratings. Consider local code, insurance, and appliance manufacturer mandates before switching. Typical constraints include vertical runs, buried sections, and high-temperature fixtures.
- PEX: flexible, freeze-resistant, limited UV tolerance
- CPVC: rigid, better chemical resistance
- Copper: proven longevity
- Code: local approvals required
- Joints: skill affects reliability
Prevent Copper Leaks by Adjusting Water Chemistry and Filters
By monitoring and adjusting water chemistry and installing appropriate filtration, homeowners can greatly reduce the corrosive processes that cause copper pinhole leaks.
Testing for pH, alkalinity, hardness, and dissolved oxygen identifies aggressive water; pH below 7.0 and low alkalinity accelerate corrosion.
Installing neutralizing filters, calibrated acid-neutralizing media, or phosphate dosing systems stabilizes pH and forms protective films.
Sediment and chloride-reducing filters limit abrasive and chemical attack.
Maintain filter replacement schedules and monitor output water parameters to guarantee continued protection.
When water chemistry adjustments are complex, consult a water treatment professional to select and size systems appropriate for local supply conditions.
Routine Maintenance Checklist to Extend Copper Pipe Life
After stabilizing water chemistry and installing appropriate filters, homeowners should adopt a simple routine maintenance checklist to detect early signs of wear and prevent leaks.
The checklist focuses on visual inspections, fastener tightness, insulation, and documenting conditions so small issues are caught before they escalate.
Seasonal checks reduce corrosion and stress from temperature swings.
Professional inspection intervals are recommended when anomalies appear.
- Inspect for greenish discoloration, pinholes, and damp spots
- Check and tighten fittings, supports, and hangers
- Replace worn insulation and add pipe wrap in cold areas
- Flush low-use lines quarterly
- Record findings and dates for trend monitoring
Estimate Costs: DIY Parts vs Hiring a Plumber
How much will repairing a small copper pipe leak actually cost?
A homeowner can expect basic DIY materials—repair coupling, epoxy putty, solder, flux, and a few fittings—to total $20–$75, depending on quality and tools already owned.
Time investment and skill level matter; mistakes can raise costs.
Hiring a licensed plumber typically ranges $150–$500 for a straightforward repair, reflecting labor, service call fees, and liability coverage.
Complex issues (hidden damage, joint replacement) increase both estimates.
Compare hourly rates, warranty terms, permit needs, and personal confidence when choosing DIY versus professional repair to balance savings and risk.
Document Your Copper Pipe Repairs for Insurance or Resale
When documenting copper pipe repairs for insurance or resale, the homeowner should create a clear, dated record that demonstrates what was fixed, who performed the work, and why it was necessary. Include concise descriptions, photos, receipts, and any permits to support claims and buyer confidence. Keep records organized and backed up.
- Date-stamped before-and-after photos showing affected areas
- Itemized receipts for parts and labor with vendor contact
- Contractor license numbers and warranties, if applicable
- Brief notes on cause, method, and materials used
- Copies of permits or inspection reports retained digitally and physically
Recycle or Dispose of Old Copper Responsibly
Once repair documentation is complete, attention should shift to handling removed copper responsibly to protect the environment and recover value.
Old copper should be sorted, cleaned of nonmetal attachments, and stored safely to prevent theft or injury. Homeowners are advised to contact local recycling centers for accepted forms, minimum quantities, and any prep requirements.
For small amounts, municipal bulky-waste or hazardous-waste programs may provide guidance; larger volumes often fetch scrap value at specialized yards. If disposal is necessary, verify landfill rules to avoid contamination.
Proper paperwork, receipts, and weight tickets are useful for records and potential reimbursement.
Quick Troubleshooting: Why a Repaired Copper Leak Might Return
A repaired copper leak can reappear when the repair surface was not properly cleaned and prepared, preventing a secure bond.
Temporary patch materials may hold only briefly and fail under pressure or temperature changes.
Hidden corrosion in the pipe wall can continue to eat away metal and cause new leaks despite surface repairs.
Poor Surface Preparation
Inadequate cleaning and surface prep leave solder, flux, and oxidation that prevent a reliable bond, so a repaired copper joint can leak again despite proper soldering technique. The surface must be bright copper, flux evenly applied, and fittings dry before heat. Contaminants and rough edges cause gaps and cold joints. Common oversights are easy to miss but predictable.
- Failing to sand to shiny metal
- Leaving old solder beads in the joint
- Excessive or insufficient flux
- Residual oil, paint, or corrosion on pipe
- Not drying after cleaning
Correct prep prevents immediate and delayed failures of the repair.
Temporary Patch Material
After poor surface prep, many choose temporary patch materials to stop a leak quickly, but those fixes often fail when the patch material is incompatible with copper, water pressure, or temperature.
Epoxy putties, rubber tape, and silicone patches can seal briefly but may not bond to slightly wet or oxidized copper.
Adhesive selection matters: some soften with heat or degrade under chlorinated water.
Mechanical clamps offer better short-term reliability but can shift if tubing flexes.
Temporary repairs should be monitored and treated as stopgaps; otherwise pressure cycles and thermal expansion will reopen joints.
Plan a permanent soldered or replaced section promptly.
Underlying Pipe Corrosion
Detecting hidden corrosion explains why a well-executed repair can leak again: corrosion under the solder joint or pinhole corrosion along the pipe wall weakens metal beyond the visible damage, so a patched area or clamp only addresses the symptom.
Inspection should include probing, sanding, and pressure testing to reveal thin spots. If corrosion is extensive, sectional replacement is safer than repeated patches. Homeowners are advised to check water chemistry and insulation to prevent recurrence.
- Look for greenish or white deposits near joints
- Sand suspect areas to expose pitting
- Pressure-test after any repair
- Replace, don’t patch, when metal is thin
- Correct water quality issues
Conclusion
Homeowners learn that copper pipe leaks range from pinholes to cracked joints, and quick, temporary fixes buy time until proper repairs are made. For example, a renter used epoxy putty and a compression sleeve to stop a basement pinhole overnight, then scheduled a plumber to replace the corroded section. Documenting repairs, recycling removed copper, and weighing DIY savings against professional guarantees helps guarantee a durable, responsible fix and avoids repeat leaks.