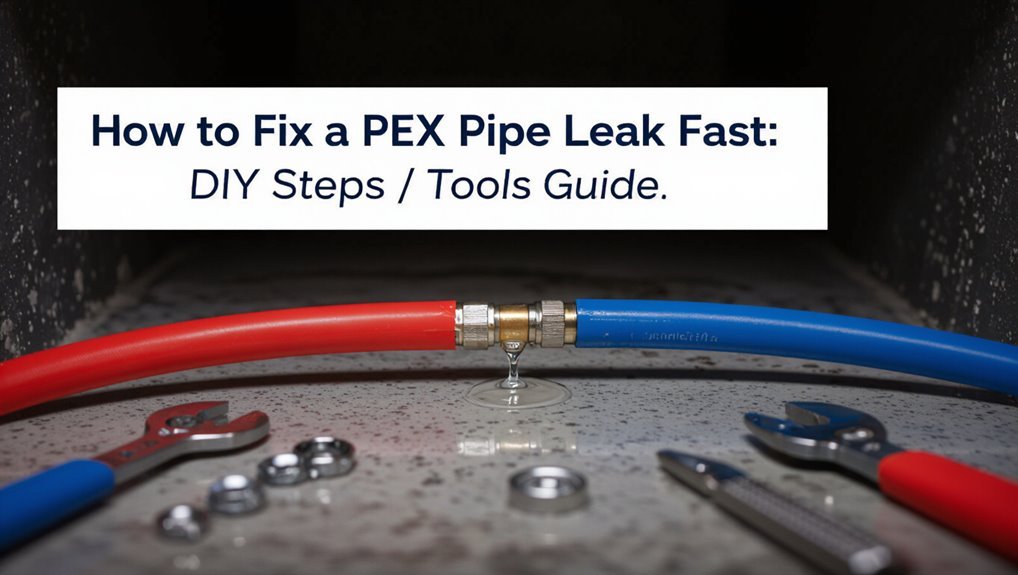
How to Fix a PEX Pipe Leak Fast: DIY Steps & Tools Guide
To quickly fix a PEX pipe leak, follow these steps:
1. Shut Off Water: Immediately turn off the main or zone valve and relieve pressure by opening a nearby faucet.
2. Prepare the Area: Contain any leaking water, move valuable items out of the way, and cut power to the area if necessary.
3. Choose a Repair Method:
- For small punctures, use a rubber repair sleeve or self-fusing silicone tape.
- For a more permanent solution, opt for a push-to-connect fitting (like SharkBite) or a slip-sleeve with a stainless clamp after cutting the pipe square and ensuring it’s dry.
4. Test the Repair: Perform a pressure test to ensure the repair is successful.
5. Call a Professional: If the leak persists or if there are multiple failures, contact a plumber for further assistance.
Key Takeaway: Act quickly to shut off water and contain the leak, then choose an appropriate repair method based on the severity of the damage.
Emergency: Stop a PEX Leak Fast (Under 5 Minutes)
Facing a sudden PEX pipe leak, a homeowner must act immediately to limit water damage: locate the nearest shutoff valve, turn off the main water supply, and open a nearby faucet to relieve pressure.
Next, assess the leak source quickly—pinpoint a fitting, puncture, or split.
Contain escaping water with towels or a bucket and elevate belongings away from the area.
If available, apply a temporary clamp or rubber patch with hose clamps; otherwise, wrap plumber’s tape tightly around the damaged section to reduce seepage.
Call a professional if the leak persists, fittings are damaged, or uncertainty exists about safe repair steps.
Quick Emergency Checklist to Stop the Leak and Stay Safe
Act quickly: shut off the nearest water valve, open a nearby faucet to relieve pressure, and isolate the affected area by moving electronics and valuables away from the floor.
Next, assess safety: cut power if water nears electrical outlets, wear gloves and eye protection, and keep children and pets away.
Contain water with buckets, towels, or a wet/dry vacuum.
Temporarily plug small pinhole leaks with self-fusing silicone tape or a rubber patch and hose clamp.
Note leak location, take photos, and label affected fixtures.
Call a qualified plumber if unsure, if the leak is large, or if structural damage or contamination is suspected.
Diagnose: Leak vs. Condensation on PEX
How can one tell whether moisture on a PEX pipe is a true leak or simple condensation? Inspection focuses on source, pattern, and conditions. A leak produces steady drips, pooling, or wet fittings; water follows seams, crimps, or damaged sections.
Condensation appears as uniform beading across colder pipe surfaces, often when ambient humidity is high and temperature differentials exist. Touch testing distinguishes: leaks feel persistent and may wet fingertips quickly; condensation often evaporates between touches.
Use a tissue to blot suspected spots repeatedly—reappearing wetness indicates a leak. Document timing and weather; repeated wetness independent of system use points to a leak.
Shut Off Water and Relieve Pressure
Before any repair work begins, the main water supply to the affected fixture or zone must be shut off and system pressure relieved to prevent further leakage and guarantee safety.
Locate the nearest shutoff valve—under sinks, behind toilets, or at the house main—and turn it clockwise until fully closed.
Open the fixture taps and a nearby high point to drain remaining water and release trapped pressure.
For multi-zone systems, isolate the specific zone if possible.
Verify pressure is relieved by watching for steady drip cessation and testing with a pressure gauge if available.
Wear gloves and eye protection during the procedure.
Temporary Fixes and How Long They Hold
Temporary fixes for PEX leaks include quick clamp kits for pinhole repairs, and epoxy putty or specialized sealing tape for larger or irregular breaks.
Each method offers different ease of application and reliability: clamps often hold until a permanent repair is made, while epoxy or tape can provide a seal that lasts from days to several months depending on pressure and surface preparation.
The expected temporary lifespan should guide whether a homeowner can wait for professional service or must arrange immediate permanent repair.
Quick Clamp Solutions
Many homeowners reach for quick clamp solutions when a PEX pipe begins to leak, since these devices offer an immediate, simple stopgap.
Quick clamps — rubber-lined metal bands or C-clamps with gasket pads — compress the damaged area to slow or stop flow. They require dry, clean surfaces and proper tightness to avoid worsening the tear.
Effective as temporary measures, clamps typically hold from a few hours to several days, depending on pressure and damage size. They buy time for shutoff, drying, and planning a permanent repair. Regular inspection is necessary; replace clamps if slipping or leakage resumes.
Epoxy And Tape Options
When clamps fail to hold or the leak is in a spot unsuitable for banding, epoxy and specialized repair tapes offer alternative short-term options for PEX repairs.
Two-part epoxy putties can be kneaded, pressed over small pinholes, and cure to a rigid patch; surfaces must be clean and dry.
Self-fusing silicone tape stretches and bonds to create a pressure-resistant wrap; overlap layers tightly.
But neither is a permanent solution: both depend on correct application, pressure level, and pipe condition.
Users should monitor repaired sections and prepare for a permanent fix by a proper coupling or replacement when feasible.
Expected Temporary Lifespan
In practice, short-term PEX repairs using clamps, epoxy putties, or self-fusing tape typically last from a few days to several months depending on pressure, water chemistry, application quality, and the pipe’s condition.
Typical expectations: tape wraps often hold days to weeks under moderate pressure; epoxy putties can endure weeks to several months if cured properly and kept dry during application; clamp repairs generally persist longer, sometimes several months, but hinge on seal alignment and clamp quality.
These fixes are provisional; monitoring for seepage is essential. Permanent repair or professional replacement should follow promptly to avoid water damage and failure.
Tools & Materials for a Fast PEX Repair
For a fast PEX repair, a small set of reliable tools and a few quality materials make the difference between a temporary patch and a lasting fix.
Essential tools include slip-joint pliers, a PEX crimp or cinch tool matched to the fitting type, and a tubing cutter (not a hacksaw) to guarantee clean ends.
Materials: properly sized PEX fittings (crimp, push-fit, or expansion), compatible rings or clamps, and short replacement tubing.
Additional items: pipe cleaner/degreaser, marker, and a flashlight.
Optional but useful: a heat gun for tight spaces and silicone tape for temporary sealing during preparation.
How to Cut Out and Prep a Damaged PEX Section
Begin by isolating the damaged PEX section: shut off the water supply, depressurize the line, and verify dryness with a towel or cloth.
Mark the damaged area and measure a straight removal length that fully clears cracks, kinks, or corrosion, allowing room for couplings.
Use a PEX tubing cutter to make square, burr-free cuts; avoid saws that crush the pipe.
Deburr and inspect cut ends for uniformity.
Clean the pipe exterior with a cloth and approved cleaner, then slide on any required sleeves or fittings per manufacturer guidance.
Confirm alignment and gap dimensions before proceeding to the repair coupling step.
Install a PEX Repair Coupling (Step‑by‑Step)
After preparing the pipe ends and confirming alignment, the technician fits the chosen PEX repair coupling onto one cut end, ensuring the ferrule or crimp ring sits squarely and the tubing is fully seated to the coupling shoulder.
Next the technician slides the opposite PEX tube onto the coupling until both ends abut the shoulder. For crimp-style fittings, a properly sized crimp tool compresses each ring evenly; for cinch/clampprofile fittings, the clamp is tightened to manufacturer torque.
The installer trims excess tubing if needed, inspects crimps or clamps for uniform compression, then pressures tests the repair at recommended PSI to verify a leak-free joint.
Use a SharkBite/Push‑to‑Connect to Repair PEX Quickly
When a short section of PEX has failed or a quick, reliable repair is needed without soldering, a SharkBite or other push‑to‑connect fitting is a practical choice.
First, the damaged section is isolated, the pipe is depressurized, and a straight, square cut is made and deburred to guarantee a proper seal.
The connector is then pushed firmly onto the prepared pipe until it seats fully, and the joint is checked for leaks before restoring water.
When To Use
In a straightforward repair situation where the damaged section of PEX is easily accessible and the pipe ends are clean and square, a SharkBite or similar push-to-connect fitting offers the fastest, most reliable fix. Use it when downtime must be minimal, the repair is temporary or permanent, and tool access is limited. It suits novice DIYers and pros needing speed. Avoid when fittings cannot seat fully or in concealed installations requiring code-approved methods.
| Situation | Advantage | Consideration |
|---|---|---|
| Emergency leak | Immediate seal | Verify fitment |
| Tight space | No soldering | Make certain full insertion |
| Temporary repair | Quick restore | Plan follow-up |
Prep And Cut
Before cutting, the work area should be isolated, depressurized, and cleared of obstacles so the pipe can be accessed easily.
The technician measures and marks the PEX straight segment to remove the damaged section, allowing room for the connector’s insertion depth without overlapping fittings.
Appropriate tools—a PEX tubing cutter or sharp PVC cutter—are selected and inspected for clean blades.
Cutting is performed squarely with a single smooth motion to prevent burrs or deformation.
Any rough edges are deburred and the tube is checked for roundness.
The area is wiped dry and inspected for remaining damage before proceeding.
Installing The Connector
Begin by ensuring the PEX ends are fully dry, round, and cut to the exact length required for the push‑to‑connect fitting’s insertion depth. The installer marks depth on the pipe, checks the O‑ring and grab ring inside the fitting, then pushes the PEX straight in until it seats against the stop. A firm twist is unnecessary; a slight twist verifies engagement. After connection, restore water slowly and inspect for leaks. If removal is needed, use the release collar or a removal tool. Record the repair location for future reference.
| Tool | Purpose |
|---|---|
| Marker | Depth mark |
| Release tool | Removal aid |
Crimping PEX Fittings Correctly: A Quick Guide
How should a crimped PEX connection look when finished? The finished crimp shows an evenly compressed metal ring, flush against the fitting shoulder with no gaps or sharp deformations.
The PEX tubing should seat fully over the fitting barb; tubing ends must be square and clean.
Crimp tool jaws should close completely, producing consistent ring compression around the circumference. Excessive crushing or visible tool marks indicate incorrect technique.
After crimping, a go/no‑go gauge verifies correct diameter.
Finally, inspect for cracks, splits or loose tubing; any irregularity requires cutting back and repeating the process with a new ring and careful alignment.
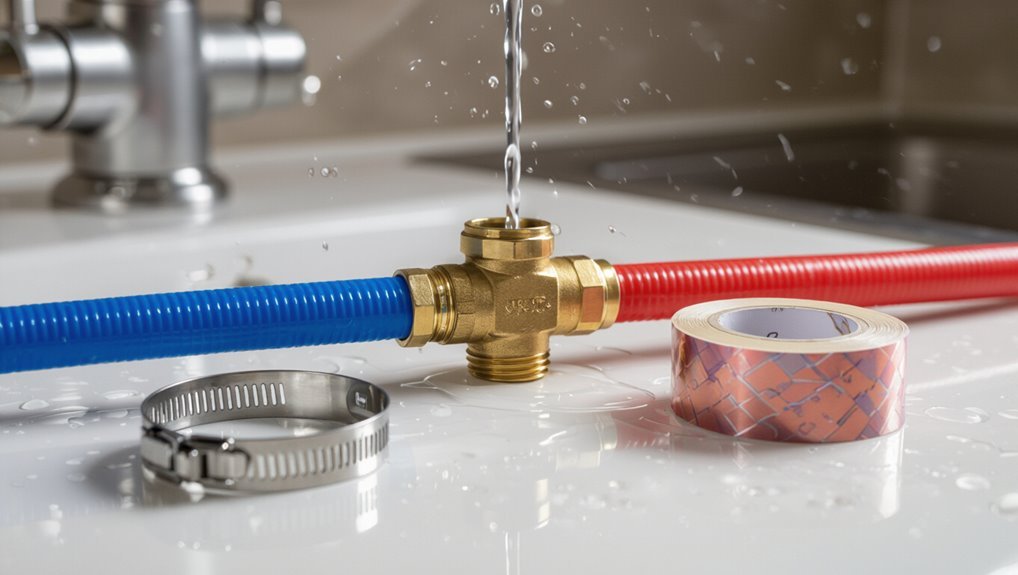
Use a Slip‑Sleeve or Clamp for Small Punctures
For small punctures or pinhole leaks in PEX, a slip-sleeve or stainless-steel clamp provides a fast, reliable repair without cutting out a section of pipe. The damaged area is cleaned, the sleeve slid over the leak, and the clamp tightened evenly to compress the sleeve against the PEX. This method suits narrow spaces and temporary or permanent fixes when done correctly. Inspect for full contact and smooth pipe alignment to avoid stress. Use appropriately sized sleeves and corrosion‑resistant clamps rated for potable water. Tighten to manufacturer torque and avoid overcompressing the PEX material.
| Item | Purpose |
|---|---|
| Sleeve | Seal puncture |
| Clamp | Secure sleeve |
| Size | Match pipe diameter |
Test the Repair and Restore Water Safely
The repair should be pressure tested using a gauge or by slowly recharging the section to the system pressure while checking for leaks.
If the test holds, water can be restored gradually by opening nearby valves in stages to monitor fittings and connections.
Only when no seepage appears at normal operating pressure should full service be resumed.
Pressure Test Procedure
Begin by isolating the repaired section and pressurizing the line to confirm a secure seal before restoring regular water service.
Close downstream valves, attach a hand pump or pressure gauge assembly to the test port, and slowly increase pressure to the system’s normal operating level or to the specified test pressure.
Hold pressure for at least 15 minutes while monitoring the gauge for drop and visually inspecting joints and fittings for moisture.
Release pressure gradually via the valve to avoid shock.
If pressure falls or leakage appears, depressurize, rework the repair, and repeat testing until pressure holds steady with no visible leaks.
Gradual Water Restoration
After a successful pressure hold with no visible leaks, water should be reintroduced slowly to confirm the repair under flow conditions without risking a surge or hidden failure.
The valve is cracked open gradually while an observer watches joints, fittings, and the repair patch for weeping.
Small flow stresses the joint, revealing issues missed under static pressure.
- Visualize a trickle advancing along the pipe, exposing hairline seepage.
- Picture fittings warming under flow, indicating seating or friction.
- Imagine the repaired area bearing steady, low-pressure flow before full restoration.
Once stable, restore normal supply and recheck.
PEX Expansion vs. Crimp: Which to Use and Why?
Which method—PEX expansion or crimp—best suits a given repair or installation depends on factors like tool availability, pipe size, joint accessibility, and longevity expectations.
Expansion fittings create a cold‑swelling connection that contracts for a smooth, low‑profile joint suited to tight spaces and quieter water flow; they require a dedicated expansion tool and skill for uniform rings.
Crimp systems use metal rings compressed with inexpensive crimpers, offering faster installs and easier repairs where access is limited, but rely on proper ring placement and tool calibration.
Choice balances cost, available tools, installer experience, and desired long‑term reliability.
PEX‑Specific DIY Mistakes That Cause Re‑Leaks (And Fixes)
Several common DIY mistakes account for most PEX re‑leaks, and recognizing them quickly secures repeated repairs.
Improper fittings, poor tool use, and rushed joints are typical causes; each has a clear corrective action.
Visualize the failure modes:
- Loose crimp or clamp: remeasure and re‑crimp with calibrated jaws until the ring sits squarely.
- Undersized or damaged tubing: cut back to clean pipe, deburr, and replace with correct diameter.
- Incomplete expansion or insertion: reassemble using manufacturer’s depth gauge and heat tool, confirming visual alignment.
A methodical check after repair secures longevity and reduces return trips.
When to Call a Licensed Plumber
If a PEX leak continues after attempted repairs, a licensed plumber should be consulted to identify hidden causes and prevent recurrent failure.
Persistent leaks can indicate compromised fittings, damaged tubing, or systemic issues that risk extensive water damage.
Prompt professional evaluation reduces the chance of major structural or mold problems and higher repair costs.
When Leak Persists
Often, persistent leaks indicate problems beyond simple DIY fixes and warrant professional assessment. A licensed plumber evaluates hidden causes, verifies fittings and manifold integrity, and determines whether temporary repairs are unsafe. Signs to call include ongoing seepage after multiple patches, rising water bills, or water staining that spreads.
- A plumber tracing behind walls and under floors with leak-detection tools.
- A technician testing pressure, connections, and manifold function to isolate the source.
- A professional recommending secure repairs, part replacements, or rerouting to prevent recurrence.
Prompt intervention limits damage and guarantees code-compliant, lasting solutions.
Major System Damage
Showing signs of extensive failure, a PEX system with burst pipes, widespread wetting, or repeated joint breakdown requires immediate attention from a licensed plumber. A professional evaluates structural risk, isolates damaged zones, and advises on replacement versus repair. DIY fixes can mask underlying issues, worsen corrosion, or violate codes. Call a licensed plumber when multiple leaks occur, water damage spreads, pressure loss persists, or safety systems are compromised. Document damage, shut off water, and preserve access. Expect diagnostic testing, pressure checks, and permit-guided repairs to restore system integrity and protect property value.
| Symptom | Severity | Action |
|---|---|---|
| Single pinhole | Low | Local repair |
| Multiple leaks | Medium | Pro assessment |
| Burst pipe | High | Emergency call |
| Joint failures | Medium | Inspect/replace |
| Widespread wetting | High | Structural check |
Preventing Future PEX Leaks: Maintenance Tips and Costs
Regularly scheduled inspections and simple preventative measures substantially reduce the risk of PEX pipe leaks and the costs associated with repairs.
Routine checks identify abrasion, UV exposure, and loose fittings early. Simple steps—insulating exposed runs, securing pipes away from sharp edges, and replacing aging manifolds—extend service life and lower emergency expenses.
Budgeting for modest annual maintenance (typically $50–$200) and occasional part replacement (clips, sleeves, manifolds) prevents larger failures.
Visualize common tasks:
- Inspect joints and shine a flashlight into crawlspaces.
- Feel along runs for cold spots and softening.
- Tighten or swap fittings before corrosion advances.
Consistent upkeep avoids catastrophic water damage.
Conclusion
When a PEX pipe leaks, quick action limits damage: shut off water, relieve pressure, apply a temporary clamp or rubber patch, then assess for proper repair or replacement. For example, a homeowner stopped a small joint leak with a hose clamp and rubber sleeve within minutes, then replaced the failed crimp fitting the next day to avoid recurrence. Routine inspection and correct fittings prevent most failures; call a licensed plumber if corrosion, multiple leaks, or unclear causes appear.