How to Cut ABS Pipe Cleanly: Easy DIY Plumbing Guide
To cut ABS pipe cleanly, follow these key steps:
- Measure Twice: Ensure accurate measurements and mark a level line.
- Support the Pipe: Use padded V-blocks or a vise with wood pads to stabilize the pipe near the cut.
- Choose the Right Tool: Utilize a fine-tooth saw, tubing cutter, or score-and-snap method for smaller diameters.
- Cut Steadily: Make your cut steadily to prevent melting the pipe.
- Deburr and Chamfer: Smooth the edge with a file or sandpaper after cutting.
- Dry-Fit Components: Before using solvent or couplers, check alignment.
- Cure Properly: Allow adequate curing time for the adhesive.
These steps will ensure a clean and effective ABS pipe cut for your plumbing project.
Quick: Cut ABS Pipe in 3 Steps
A steady hand and the right tools make quick work of ABS pipe; the three-step method — measure and mark, cut, and deburr — yields clean, square ends ready for joining.
First, measure twice, mark once, and use a square or wrap a tape for a precise line.
Second, choose a fine-toothed saw or PVC/ABS cutter and cut steadily, perpendicular to the pipe, supporting both ends to prevent binding.
Third, remove burs and shaved plastic with a deburring tool or utility knife, and lightly sand the edge for a snug fit.
Inspect for cracks and confirm a uniform, smooth surface before assembly.
What Type Of ABS Pipe Are You Cutting?
After mastering the basic three-step cutting method, attention turns to identifying the specific ABS pipe being worked on, since material formulation, wall thickness, and purpose-built application affect tool choice and technique.
Recognize schedule 40 vs. schedule 80: schedule 80 has thicker walls and may need a slower saw feed or different blade.
Drain-waste-vent (DWV) ABS is lighter and easier to cut than pressure-rated ABS.
Insulated or jacketted sections require additional prep.
Note fittings and solvent-welded joints; cut location influences cleanup and joining.
Confirm diameter and condition — brittle, sun‑degraded pipe benefits from gentler handling and sharper blades.
When To Cut ABS Pipe Vs. Replace The Fitting?
When faced with a damaged or misaligned joint, assess whether cutting the ABS pipe to rework the connection or replacing the entire fitting will best restore function and reliability.
Choose cutting when damage is limited to a short section of pipe, when fittings are standard and accessible, and when rejoining will maintain proper slope and seal.
Opt to replace the fitting if the fitting itself is cracked, warped, corroded, or glued permanently in a way that prevents a secure bond.
Consider long-term access, cost of replacement parts, and potential for future leaks before deciding which approach guarantees a durable repair.
Tools You Need To Cut ABS Pipe
Having decided that cutting a short section of ABS pipe is the appropriate remedy rather than replacing a fitting, the next step is gathering the right tools.
The list should be concise: a sharp cutting tool for clean ends, a deburring implement to remove burs, and a measuring and marking device for accuracy.
Quality matters to avoid ragged cuts or misalignment. Selection favors reliability and ease: a fine-toothed hacksaw or tubing cutter, a small file or deburring tool, and a tape measure with a pencil.
Proper tools reduce frustration and rework, producing neat joints and confident results.
- Precision
- Reliability
- Confidence
Safety Gear And Workspace Setup
Before cutting, appropriate personal protective equipment—safety glasses, gloves, and a dust mask—should be selected and worn.
The work area must be cleared of clutter and set on a stable, level surface to prevent slipping or shifting of the pipe.
Attention to protective gear and a secure workspace reduces injury risk and improves cut accuracy.
Personal Protective Equipment
Proper personal protective equipment and a well-organized workspace greatly reduce the risk of injury and guarantee cleaner cuts when working with ABS pipe. The operator should wear safety glasses, a dust mask, and cut-resistant gloves to protect eyes, lungs, and hands from chips and fumes. Hearing protection is optional for power tools. Clothing should fit close to the body to avoid snagging. Inspect PPE for damage before starting and replace worn items. Keep a small first-aid kit nearby for minor cuts. Maintain focus and pause if fatigue sets in; attention prevents most accidents.
- Relief at preparedness
- Confidence in protection
- Calm control during cutting
Clear, Stable Workspace
With safety gear in place, attention turns to arranging a clear, stable workspace that supports accurate, safe cuts.
The area should be well lit and free of tripping hazards, with a sturdy workbench or sawhorse positioned at waist height to reduce fatigue and promote control. Secure the pipe with a bench vise or pipe cradle and use clamps to prevent rotation. Keep cutting tools, measuring devices, and a marker within easy reach.
Maintain a clean surface by removing debris between cuts and place a waste container nearby for scrap.
Assure adequate ventilation and unobstructed egress for safety.
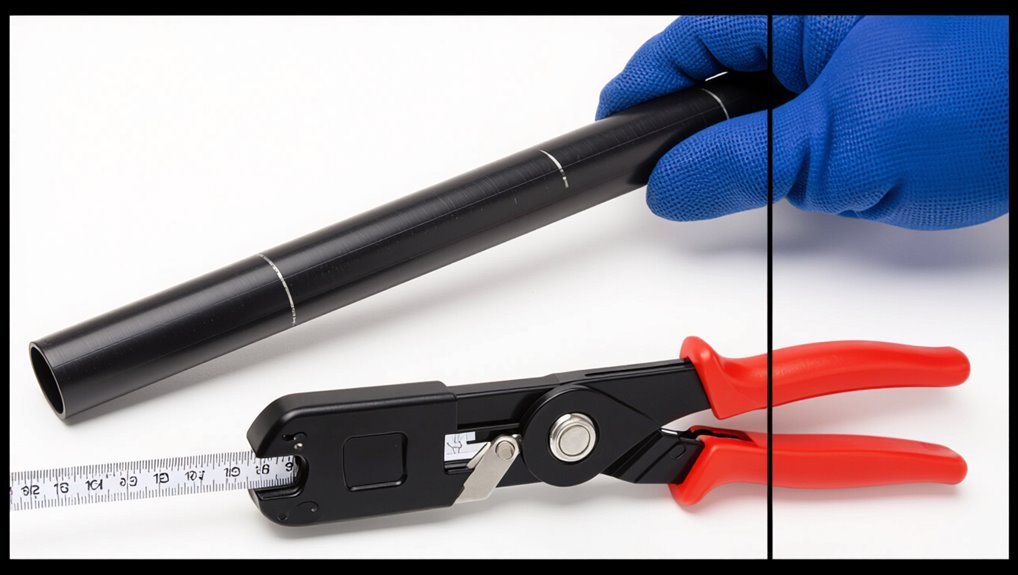
Measure And Mark Your Cut Line
Using a tape measure and a fine-tip marker, the installer determines the exact cut point by measuring from the pipe end or a fitting reference, accounting for any socket depth or coupling overlap.
Measurements are double-checked; a sharp marker draws a single clear line around the circumference. For larger pipes a crayon or wrap-around gauge guarantees level alignment.
The technician notes orientation for joints and leaves room for chamfering and solvent-cement space. Lightly scoring before a full cut can guide tools and reduce shavings.
Clean, exact marks minimize rework and guarantee proper fit when assembling the plumbing system.
- Relief: confidence before cutting
- Pride: neat, professional lines
- Calm: reduced anxiety about fitment
How To Support And Clamp ABS Pipe Before Cutting
For a clean, controlled cut the pipe should be securely supported so it cannot roll, shift, or vibrate under the tool.
Position the pipe on a flat, stable surface or in a workbench vise fitted with protective jaw covers to prevent marring.
Use pipe stands or blocks to support long runs, placing supports close to the cut—within a few inches—so the cut end is stabilized.
Employ strap or C-clamps with scrap wood pads to distribute pressure and avoid crushing.
Check alignment after clamping, then re-tighten.
Assure secure support before proceeding to cutting to maintain accuracy and safety.
Using A Hacksaw To Cut ABS Pipe Cleanly
Before sawing, the pipe is marked at the cut line and held firmly in a clamp or vise to prevent movement.
A steady, even stroke with a sharp hacksaw blade produces a straight cut without crushing the pipe.
After cutting, the edge is smoothed and deburred with a file or sandpaper to guarantee a proper fit and clean joint.
Marking And Securing Pipe
When preparing to cut ABS pipe with a hacksaw, accurate marking and firm securing are essential to a clean, square cut. The pipe is measured, the cut line scribed with a marker or awl, and checked against fittings. Clamping in a bench vise or using a padded pipe clamp prevents rotation and vibration; protect the pipe with scrap wood to avoid crushing.
Position the saw so the blade aligns with the mark, adopting a steady stance and controlled strokes. Proper preparation reduces rework and wasted material, increasing confidence and speed during the cutting process.
- Relief at precise alignment
- Confidence in a steady clamp
- Satisfaction from a perfect cut
Smooth And Deburr Edge
After sawing, the cut edge should be cleaned immediately to assure proper fit and safe handling.
The person removes burrs and roughness with a utility knife or deburring tool, running it around the outside and inside lips to prevent hang-ups and leaks.
A fine file or medium-grit sandpaper smooths remaining irregularities; motions follow the pipe’s circumference for even results.
Afterward, the edge is wiped with a clean cloth to remove plastic dust.
Final inspection checks for a square, uniform face and absence of jagged bits.
Proper deburring secures reliable seals and easier assembly into fittings.
Using A Pipe Cutter To Cut ABS Pipe Quickly
A pipe cutter offers a fast, controlled way to slice ABS pipe with minimal burrs and a square edge. The tool clamps around the pipe and is rotated while the cutting wheel is gradually tightened, producing consistent, perpendicular cuts. It excels on small-diameter runs and in tight spaces where saws are awkward. Proper alignment and steady pressure prevent cracking or deformation. After cutting, a quick deburr with a file or utility knife readies the joint for solvent cement. The method reduces cleanup and speeds installation for short sections or final adjustments.
- Relief: clean results remove worry.
- Confidence: precise cuts build trust.
- Satisfaction: quick work rewards effort.
Using A Miter Or Circular Saw For Long ABS Runs
For long runs of ABS pipe, a miter or circular saw provides rapid, repeatable cuts that maintain straight, square ends across many pieces.
Operators clamp pipe in a secure jig or miter sled to prevent movement and guarantee alignment.
Use a fine-tooth blade rated for plastics and set a shallow depth to avoid burrs or melting.
Cut at a steady feed rate; excessive speed creates heat and rough edges.
Deburr and chamfer the inner and outer edges after cutting.
Wear eye and hearing protection, and follow tool safety—keep guards in place and avoid binding during repetitive cuts.
Cutting Angled Or Curved ABS Sections
Cutting angled or curved ABS sections begins with selecting the appropriate tools, from fine-tooth saw blades for miters to coping saws or rotary tools for tight curves.
Proper technique—steady, incremental cuts and frequent test fits—ensures smooth, accurate profiles.
Finishing with a file or sandpaper refines edges and corrects minor deviations.
Choosing The Right Tools
Which tool best suits angled or curved cuts depends on the shape, thickness, and required finish.
A rotary tool with cut-off wheels excels on tight radii and thin walls; a sabre saw or oscillating tool handles thicker sections and faster removal; a fine-toothed hacksaw or coping saw gives control for small adjustments.
Prioritize tool stability, blade condition, and speed settings to reduce melting and chipping. Use clamping and light passes rather than force. Match accessory grit and tooth count to ABS. Consider dust control and safety gear; the right tool reduces stress and yields cleaner, confident results.
- Relief at finding the correct match
- Confidence from predictable outcomes
- Satisfaction in smooth, safe cuts
Techniques For Smooth Curves
Shaping smooth curves in ABS requires deliberate pacing, secure fixturing, and progressive tool selection to prevent melting, chipping, or irregular edges. The practitioner marks the curve, clamps the piece, and uses incremental cuts—starting with a coping saw or jigsaw, then refining with files and sanding drums. Cool the blade, keep light feeds, and follow contour templates for consistency. Final smoothing with wet sandpaper preserves roundness. Protective gear and steady hands reduce mistakes; test cuts on scrap confirm settings. Repeat passes yield cleaner radii than aggressive one‑pass cuts.
| Tool | Purpose |
|---|---|
| Coping saw | Rough curve |
| Jigsaw | Faster shaping |
| File | Define edge |
| Sand drum | Smooth contour |
| Wet sandpaper | Final finish |
Cutting ABS Inside Walls Or Tight Spaces
When working in narrow cavities or between studs, careful planning and the right compact tools are essential to score and sever ABS pipe without damaging surrounding structures.
A stubby hacksaw, right-angle rotary tool, or mini tubing cutter lets one reach confined spots; support pipe to prevent twisting and mark cut line clearly.
Remove insulation as needed and protect wiring and drywall with thin shields.
Work slowly, keeping blade perpendicular to pipe.
Clear debris frequently to maintain visibility.
After cutting, verify fit before solvent joining.
Patience and restraint reduce rework and hidden leaks.
- Tension eases with steady hands.
- Relief follows precise cuts.
- Confidence grows after success.
Deburring ABS After Cutting
Removing burrs and rough edges from ABS pipe immediately after cutting guarantees a proper fit, prevents seal damage, and reduces turbulent flow that can collect debris. The installer uses a deburring tool or utility knife to remove flash, working around the circumference with light, consistent strokes. Debris is brushed away and the cut face inspected for nicks. Small, controlled passes preserve diameter while eliminating sharp edges that impede fittings. Cleaned ends enable reliable solvent welds or mechanical joins. Visual checks and a quick wipe complete the task, ensuring longevity and leak-free connections.
| Tool | Motion | Result |
|---|---|---|
| Deburring tool | Rotate | Smooth edge |
| Utility knife | Light passes | Remove flash |
| File | Single direction | Remove nicks |
| Brush | Sweep out | Clear debris |
Sanding And Chamfering Pipe Ends For Fittings
After deburring and wiping the cut face, the installer prepares the ABS pipe end by sanding and chamfering to guarantee a snug, damage-free fit with fittings.
Using fine sandpaper wrapped around a dowel or a small file, the exterior and inner edge receive light, even passes to remove burrs and high spots.
A slight 15–30° chamfer on the pipe OD eases insertion without cutting the fitting socket.
Work progresses steadily, checking fit frequently.
Clean, consistent edges prevent stress and leaks while preserving solvent-weld surfaces.
Final inspection confirms uniformity and readiness for assembly.
- Relief at a perfect fit
- Confidence in durability
- Satisfaction in craftsmanship
Clean Pipe Ends Before Solvent Welding
Before solvent welding, the pipe ends must be free of dust, grease, and moisture to guarantee a reliable bond.
The technician inspects both pipe and fitting for debris, fingerprints, or oil, then wipes surfaces with a clean, lint-free cloth.
If contamination persists, a cloth dampened with a manufacturer-approved cleaner or ABS primer removes residues; allow surfaces to air-dry fully.
Avoid excessive rubbing that generates static or fibers.
Final verification involves visually confirming a smooth, consistent surface and feeling for tack-free dryness.
Properly cleaned ends assure solvent penetrates evenly, promoting full fusion and minimizing leaks or joint failure.
Dry-Fit And Measure Fittings After Cutting
After cutting, the installer checks fitment clearance to make certain pipes and fittings meet without interference.
Seams and alignment marks are positioned precisely so joints will sit true during final assembly.
A complete dry-run assembly is then tested to confirm fit and identify any adjustments before solvent welding.
Check Fitment Clearance
With the cut pieces laid out, the installer dry-fits each joint to verify clearance and alignment without adhesive or primer. Each connection is tested for smooth engagement, ensuring no burrs, excess bevel, or interference will prevent full seating. Measurements confirm proper gap for solvent cement and room for thermal expansion; tight spots are noted and addressed with light sanding or trimming. Clearances at nearby structures, brackets, and other pipes are checked to avoid future strain. Final dry-fit reviews document any adjustments before permanent bonding.
- Relief when parts seat perfectly
- Frustration eased by simple fixes
- Confidence before committing to glue
Align Seams Precisely
Standing over the trimmed pieces, the installer aligns seams precisely by rotating and sliding fittings until joint faces meet evenly and reference marks line up. With parts dry-fit, perpendicularity and concentricity are checked visually and with a square or straightedge. Small gap inconsistencies are corrected by trimming or slight reaming; excessive mismatch prompts re-cutting.
Bays and offsets are adjusted so solvent-weld access remains clear and flow path integrity is preserved. Once alignment satisfies measurement tolerances, the exact insertion depth is noted on both pipe and fitting. Cleanliness is maintained to prevent debris from altering final alignment before bonding.
Test Dry-Run Assembly
Begin a dry-run assembly by fitting each cut pipe and corresponding fitting together without solvent to verify alignment, insertion depth, and clearances. The installer inspects joints, notes tight or loose fits, and marks insertion lines. Measurements confirm chamfers and squareness; any binding or gaps are corrected before glue. This step prevents costly rework, guarantees proper flow paths, and lets the installer rehearse final positioning.
Once satisfied, parts are cleaned and reassembled for solvent welding. A calm, methodical dry-fit reduces mistakes and builds confidence prior to permanent bonding.
- Relief at a perfect fit
- Frustration eased by a quick fix
- Satisfaction before final glue
Solvent-Weld ABS Joints (Step-By-Step)
Prepare a clean workspace and gather primer, ABS solvent cement, a properly fitted brush or applicator, clean rags, and protective gloves and eyewear.
Make certain pipe ends and fittings are dry, square, and free of burrs.
Apply primer sparingly to both mating surfaces; allow a few seconds to soften the ABS.
Immediately coat the fitting socket with solvent cement, then the pipe end with a thinner layer.
Insert pipe fully with a quarter-turn twist to distribute cement and align joint.
Hold steady for 30–60 seconds to prevent push-out.
Wipe excess cement, label joints if required, and let cure per manufacturer’s recommendations before testing.
When To Use Couplings Or Mechanical Adapters?
After solvent-weld joints are completed and curing is underway, decisions about couplings and mechanical adapters focus on repair needs, movement, and material compatibility.
Use rigid couplings for permanent, same-material joins where alignment is good. Choose flexible or neoprene-lined mechanical adapters when pipes will move, vibrate, or when joining dissimilar materials like ABS to PVC or cast iron. Mechanical adapters also suit temporary fixes or sections where solvent welding is impractical. Consider pressure ratings, pipe size matches, and local codes. Properly tightened stainless hardware and correct gasket seating guarantee leak-free performance and longevity.
- Relief when a quick, reliable fix holds.
- Confidence in durable, code-compliant joins.
- Assurance that movement won’t cause failure.
Repairing An Uneven Or Bad Cut
Fixing an uneven or poorly cut ABS pipe starts with evaluating the defect’s extent and whether the cut can be squared or must be replaced.
If material remains sufficient, mark a square line with a carpenter’s square and trim with a fine-toothed saw or tubing cutter to produce a true end. Deburr and chamfer the edge lightly with a file or deburring tool to make certain proper seating and glue flow.
For cuts too short or damaged near the end, replace the section or use an appropriately sized coupling to span the flaw. Test fit before solvent welding and inspect for gaps or misalignment.
Prevent Cracking And Stress When Cutting ABS
To prevent cracking and stress when cutting ABS, the writer recommends using proper cutting tools sized for the pipe material and wall thickness.
The pipe should be supported firmly to distribute forces and prevent flexing during the cut.
Scoring the circumference before the final cut reduces stress concentration and yields a cleaner edge.
Use Proper Cutting Tools
Choose tools designed for plastic work to minimize cracking and stress when cutting ABS pipe. Proper tools reduce vibration and produce smooth edges, lowering the chance of fractures and the need for rework. A fine-toothed blade, sharp tubing cutter, or scored-and-snapped technique each suits different pipe sizes and access.
Ease of control and clean cuts preserve joint integrity and confidence during DIY repairs. Select tools that match pipe diameter and workspace constraints, and replace dull blades promptly to prevent chipping.
- Relief at seeing a perfect, clean edge
- Confidence in a reliable, lasting joint
- Satisfaction from a neat, professional finish
Support Pipe During Cutting
After selecting the right cutting tool, attention turns to supporting the ABS pipe to prevent cracking and stress during the cut. The pipe should rest on firm, level supports close to the cut—use padded V-blocks, foam, or scrap wood to distribute pressure and avoid point loading. Clamp gently with wide jaws or a soft-jaw vice to immobilize without crushing.
Support any overhanging sections to prevent bending moments that propagate cracks. For long runs, add intermediate supports every few feet. Make certain the support setup allows unobstructed blade travel and access for a smooth, controlled cut that minimizes material stress.
Score Before Final Cut
When preparing to cut ABS, scoring a shallow guide line around the circumference reduces stress concentration and helps prevent crack propagation during the final cut.
The technician marks the cut, rotates the pipe, and lightly traces the saw or utility blade to form a continuous groove. This shallow score aligns the tool, controls kerf depth, and minimizes vibration that can initiate fractures.
Scoring also allows a cleaner, straighter finished edge with less post-cut sanding. Apply steady, even pressure; repeat if the groove is faint.
Finish the cut slowly, following the score to preserve pipe integrity and make certain a tight fit.
- Frustration eased
- Confidence restored
- Pride in craftsmanship
Common Mistakes That Make ABS Cuts Messy
Common errors that lead to messy ABS cuts stem from improper tool choice, incorrect blade condition, and poor handling technique.
Using dull blades, mismatched saw types, or inappropriate cutters creates tearing rather than clean scores.
Skipping secure clamping allows pipe movement and angled cuts.
Rushing the cut causes chatter marks and uneven edges.
Overheating from excessive friction melts surfaces, producing rough, sticky finishes.
Neglecting to mark and align the cut invites inaccuracies.
Failing to deburr afterwards leaves burrs that impair fittings.
Ignoring safety—no eye protection or gloves—risks injury and compromises steadiness, further degrading cut quality.
Speed Tips For Multiple ABS Cuts (Jigs, Stops)
Messy cuts often trace back to inconsistent setup and handling, so productivity gains come from standardizing repeatable actions. For multiple ABS cuts, use a simple jig: a clamped base with a pipe cradle and adjustable stop to index lengths quickly. Mark one reference, set the stop, and feed each piece without remeasuring.
A sacrificial fence on a miter box prevents chatter; rapid cuts benefit from sharp blades and steady clamping. Label finished pieces to avoid confusion during installation. Consistency reduces waste and fatigue, turning repetitive cutting into a reliable, fast workflow.
- Satisfaction of flawless, identical cuts
- Relief from wasted time
- Pride in tidy, professional results
Disposing Or Recycling ABS Offcuts + Troubleshooting Leaks
The section outlines options for handling ABS offcuts, including local recycling programs and safe disposal practices to minimize waste.
It also summarizes common causes of ABS leaks and straightforward repair methods such as solvent welding, mechanical couplers, and proper sealing techniques.
Practical tips for sorting scrap and preventing future leaks are provided to reduce material loss and rework.
Recycling ABS Offcuts
Separating and storing ABS offcuts promptly reduces clutter and makes recycling or disposal straightforward. Offcuts should be cleaned of adhesives and contaminants, sorted by size, and kept dry. Local recycling programs vary; contact municipal facilities or specialized plastic recyclers to confirm acceptance of ABS (often coded as “7” or mixed plastic). If recycling isn’t available, consolidate offcuts for reuse in projects, donations, or proper landfill disposal following local guidelines. Keep documentation of pickup or drop-off locations. Small quantities can be stored until enough accumulates for economical transport, minimizing waste and environmental impact.
- Relief at responsible disposal
- Pride in reuse
- Confidence in compliance
Fixing ABS Leaks
After offcuts are managed, attention turns to repairing leaks in ABS piping to preserve system integrity and prevent further waste.
First, isolate the water supply and drain the line.
Clean and dry the damaged area; cut out cracked or softened sections with a proper saw.
Use matching ABS couplings and solvent cement for permanent repairs, applying primer where recommended and following dwell times.
For temporary fixes, use rubber repair tape or a cork-and-clamp method until replacement is possible.
Test the repair under low pressure, inspect for seepage, and retighten or redo as necessary.
Dispose of removed pieces per local recycling rules.
Conclusion
Cutting ABS pipe cleanly is simple when done methodically: identify the pipe type, choose the right tool, and follow safety and stress-reduction steps to avoid messy edges or cracks. With practice, even a novice can produce fittings that fit like they were machined in a factory—no giant‑sized rework needed. Keep common mistakes in mind, use jigs for repetitive cuts, and recycle offcuts properly; leaks are usually fixable if you inspect and deburr carefully.