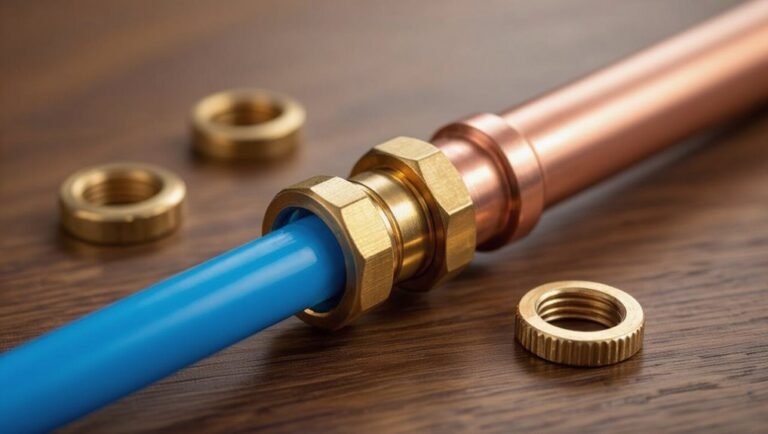
Copper Pipe Soldering Guide: Easy Steps for Leak-Free Joints
Soldering copper pipes creates durable, leak-proof joints when done correctly. Here are the key takeaways for successful soldering:
- Preparation: Cut the pipe squarely, deburr the edges, and clean both the pipe and fittings until they are bright.
- Flux Application: Apply the appropriate flux to the surfaces to ensure a good bond.
- Assembly: Assemble the joint with a slight twist to ensure proper alignment.
- Heating: Heat the joint evenly until the flux thins.
- Soldering: Feed lead-free solder to the joint edge, allowing capillary action to draw it in.
- Cooling and Cleaning: Let the joint cool naturally and clean off any residue.
For a detailed step-by-step technique, safety tips, and testing guidance, continue reading.
When to Solder Copper Pipe : Quick Answer
Determine whether soldering is required by evaluating the joint type and service conditions: use soldering (sweat connections) for copper tubing joined to fittings where a permanent, leak-proof seal is needed, when joining dissimilar metals with compatible flux and solder, or when brazing-level strength is unnecessary.
Soldering suits potable water, HVAC low-pressure lines, and small-diameter supply runs where vibration and high temperature are limited.
It is inappropriate for joints exposed to sustained temperatures above solder melting range, for pressurized systems needing higher mechanical strength, or where mechanical fittings or compression joints offer required serviceability.
Assess code, accessibility, and future maintenance before choosing soldering.
Tools and Materials for Soldering Copper Pipe
For successful copper pipe soldering, a compact set of reliable tools and properly specified materials is essential.
Recommended tools include a pipe cutter, deburring tool or reamer, wire brush or emery cloth, propane or MAPP gas torch, adjustable wrench or pliers, heat-resistant cloth or flame shield, and flux brush.
Materials should consist of lead-free solder rated for potable water, appropriate flux (water-soluble or no-clean per pipe type), and correctly sized copper fittings.
Optional items: a fire extinguisher, temperature indicator, and tubing bender.
Quality and compatibility guarantee clean joints and consistent capillary action during soldering.
Safety Checks and Prep Before You Start
Before beginning, the worker confirms appropriate personal protective equipment is available and worn, including safety glasses, gloves, and a respirator if needed.
The work area is checked for adequate ventilation and cleared of flammable materials.
All tools and materials are inspected for damage, cleanliness, and proper function before starting.
Personal Protective Equipment
To make certain a safe work environment, the installer checks and dons appropriate personal protective equipment (PPE) before any soldering begins. The installer wears flame-resistant clothing, heat-resistant gloves, eye protection, and a face shield when needed. Ear protection is used for noisy cutting tools. Boots with non-slip soles and closed toes prevent injuries. All PPE is inspected for damage and fitted properly. The installer replaces compromised items and guarantees easy access during work. A simple PPE checklist helps maintain consistency and safety practices on every job.
| Item | Purpose |
|---|---|
| Gloves | Heat protection |
| Goggles | Eye safety |
| Shield | Face protection |
| Boots | Foot protection |
Workspace Ventilation Check
With the work area clear of combustible debris and windows or vents opened, the installer verifies adequate airflow to disperse soldering fumes and combustion byproducts.
He assesses room size, proximity to occupants, and cross-ventilation paths.
Mechanical ventilation is engaged where natural airflow is insufficient, using fans positioned to draw fumes away from breathing zones and toward exhaust points.
Doors to adjacent spaces remain closed to prevent spread.
Combustion appliances are turned off per manufacturer guidance to avoid backdrafting.
If ventilation cannot be guaranteed, work is postponed until temporary exhaust or professional measures are implemented to maintain safety.
Tools And Material Inspection
Having confirmed adequate ventilation and secured the work area, the installer inspects tools and materials to guarantee safe, effective soldering.
Attention focuses on condition, compatibility, and readiness before heat is applied.
- Verify torch functionality and check hoses, valves, and fittings for leaks or damage.
- Confirm correct flux and lead-free solder alloy for pipe size and application; inspect for contamination or expiration.
- Make certain pipe cutters, reamers, and brushes are sharp and clean to produce smooth, debris-free ends and proper fit.
- Assemble safety gear: goggles, flame-resistant gloves, fire extinguisher, and heat shield; test accessibility and condition.
Cut and Clean Copper Pipe for a Tight Joint
Cut the copper pipe squarely and remove burrs before fitting to guarantee a clean, leak-free joint.
The installer measures and marks the cut, uses a tubing cutter for a true 90° end, and rotates smoothly to avoid crushing.
After cutting, a reamer or deburring tool removes inside and outside burrs; a slight chamfer prevents damage to fittings.
Surfaces are wiped with a clean cloth to remove metal shavings, oil, and moisture.
For hard water or tarnished areas, a Scotch-Brite pad or emery cloth restores bright metal without over-thinning.
Proper preparation guarantees close metal-to-metal contact and reliable soldering.
Apply Flux and Fit the Joint Correctly
Before applying solder, the installer brushes a thin, even coat of flux onto both the outside of the pipe and the inside of the fitting to promote capillary flow and prevent oxidation during heating.
Attention to fit and alignment guarantees a reliable joint. The installer then inserts the pipe fully, rotating slightly to distribute flux evenly. Excess flux is wiped away. Final checks confirm gap uniformity and seating depth before heating.
- Use appropriate flux for copper.
- Guarantee pipe is fully inserted.
- Maintain concentric alignment.
- Remove excess flux and debris.
Heat and Solder a Leak-Free Joint
With the joint cleaned, fluxed, and properly seated, the installer moves on to heating and applying solder to form a leak-free seal. The torch flame is directed evenly around the fitting, heating the joint rather than the solder.
When the metal reaches soldering temperature, measured by the flux thinning and slight smoking, the solder is touched to the joint edge; capillary action draws it into the gap. The installer feeds solder steadily until a continuous fillet appears around the joint circumference. Excess solder is avoided. Flames are adjusted to prevent scorching nearby materials. Proper technique yields a uniform, secure, leak-free connection.
Cool, Clean, and Pressure-Test Joints
After soldering, the joint should be allowed to cool naturally for the recommended time to prevent stress and ensure a solid bond.
Once cool, any excess flux and solder splatter must be cleaned from the fitting and pipe surfaces to prevent corrosion and ensure a proper seal.
Finally, a controlled pressure test should be performed to verify integrity before returning the system to service.
Cool Down Time
Once the solder has flowed and the torch is removed, the joint must be allowed to cool naturally until it reaches room temperature to prevent disturbance of the fillet.
Cooling time varies with pipe size and ambient conditions; rushing risks cracks or cold joints. The technician waits without touching, handling, or applying cooling media.
After cooling, visual inspection precedes pressure testing.
- Record ambient temperature and estimated cool duration.
- Avoid forced cooling (water, compressed air) that stresses the joint.
- Confirm fillet appearance: smooth, continuous, shiny.
- Proceed to pressure test only when the assembly feels ambient and stable.
Cleaning Solder Surfaces
Prior to pressure testing, the technician guarantees soldered joints are fully cool and cleans any flux residue or oxidation that could compromise seal integrity or interfere with inspection.
Using a soft brush and clean rag, the technician removes visible flux, slag, and loose debris from each joint.
A mild solvent or warm water with a detergent is applied when manufacturer guidance allows, then surfaces are rinsed and dried thoroughly to prevent corrosion.
Any solder balls or sharp edges are smoothed.
Cleanliness is verified under good light; joints must appear bright and free of contaminants to assure reliable long‑term performance and accurate subsequent checks.
Pressure Testing Joints
Before applying pressure, the technician confirms all soldered joints are cool and visibly clean, then prepares the system for testing by isolating sections, installing suitable test fittings, and connecting calibrated gauges or a pressure/air source rated for the piping.
The procedure proceeds methodically to detect leaks and verify integrity.
- Pressurize slowly to specified test pressure, monitoring gauges for stability.
- Hold pressure for required duration, observing for drops or audible leaks.
- Inspect joints visually and with soapy solution or electronic leak detector.
- Depressurize cautiously, document results, and repair any deficiencies before returning system to service.
Quick Fixes and Common Soldering Mistakes to Avoid
Frequently, quick fixes are attempted when a joint leaks or a job runs behind schedule, but these shortcuts often create more problems than they solve. The guide advises against tape, sealants, or over-applied solder as permanent solutions.
Common errors include insufficient cleaning, cold joints from inadequate heat, excessive flux left inside, and using wrong solder or filler. Poor alignment and uneven heating lead to weak seals.
Proper technique—thorough cleaning, correct flux, controlled heat, and appropriate solder—prevents issues. If a joint fails, cut out and redo it rather than relying on temporary patches that risk corrosion or future leaks.
Conclusion
With the steps outlined, the reader sees how preparation, proper tools, and steady technique turn messy leaks into reliable connections. Could a bright bead of solder, cooling to a smooth fillet, be any clearer proof of craftsmanship? By cutting true, cleaning thoroughly, applying flux, heating evenly, and testing under pressure, joints become dependable. Attention to safety and common pitfalls makes certain each repair or installation stays leak-free and long-lasting, giving confidence in every system.