How to Clean Underground Drains: Step-by-Step Guide for Homeowners
To effectively clean underground drains, homeowners should first identify the type of drain and look for signs of blockage, such as pooling water, unpleasant odors, or soggy areas in the yard. Prior to starting the cleaning process, it’s essential to follow safety protocols, check for any necessary permits, and locate any underground utilities. Equip yourself with basic tools like shovels, gloves, augers, snakes, brushes, inspection cameras, and hydro jets. Begin by hand-excavating to expose cleanouts, isolate sections of the drain, and use flushing or snaking techniques to clear blockages. Utilizing a camera inspection can help identify persistent issues, and it may be necessary to repeat the cleaning process until the drain is clear. To maintain optimal drain function, conduct quarterly checks, manage root growth, and consult professionals for any structural problems. Further practical steps and tips are provided below.
What homeowners need to know about underground drains
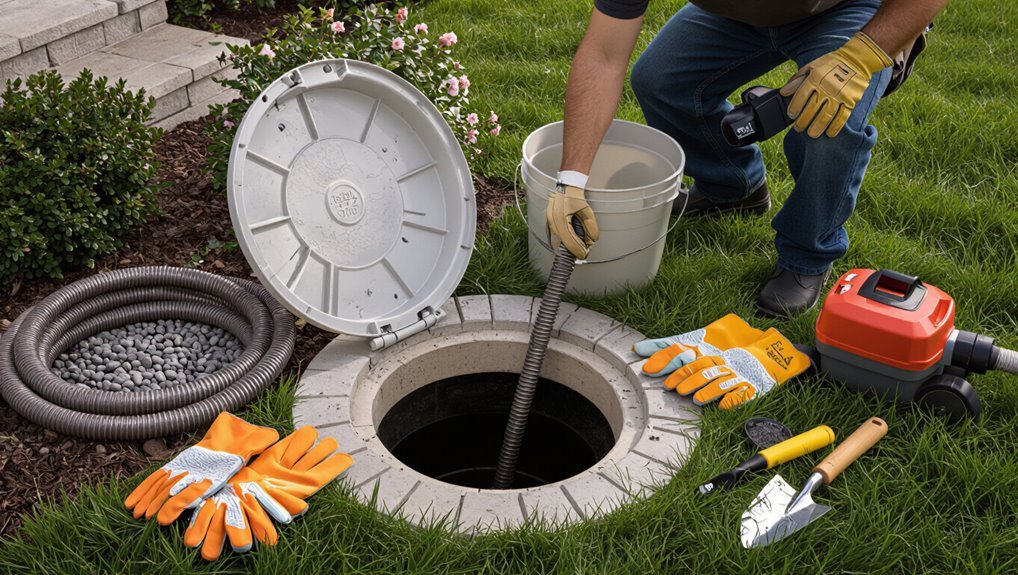
Homeowners should understand the common types of underground drains—surface drains, French drains, storm drains, and sewer laterals—and the materials typically used, such as PVC, corrugated plastic, clay, and concrete.
A basic grasp of how these systems channel water and connect to municipal or private lines helps identify where blockages are likely to form.
Visible pooling, slow drainage, foul odors, or soggy patches in the yard are clear signs that an underground drain may need cleaning.
Types of underground drains and common materials
Underground drainage systems come in several types—French drains, channel drains, catch basins, and downspout drains—each designed for specific site conditions and water flow needs.
Materials include perforated PVC, corrugated HDPE, concrete, and cast iron.
Homeowners should recognize material differences to plan maintenance and select appropriate tools and cleaners when learning how to clean underground drains safely and effectively.
How underground drain systems work (surface drains, French drains, storm drains, sewer laterals)
Understand how different drain types move water to anticipate problems and plan maintenance:
Surface drains collect runoff from paved areas and lawns via grates and shallow channels;
French drains use perforated pipe surrounded by gravel to intercept subsurface water;
Storm drains carry large volumes from streets and gutters into municipal systems;
and sewer laterals transport household wastewater from the building to the public sewer.
Maintenance, access points, gradients, and materials dictate inspection and repair.
Signs your underground drain needs cleaning
When drains begin to show trouble, early warning signs can help prevent costly repairs and property damage. Homeowners should watch for slow drains, persistent odors, gurgling sounds, sewage backups, and pooling water near foundations or in yards.
Increased insect or rodent activity and unusually lush patches of grass also indicate leaks or blockages. Timely inspection and cleaning reduce structural and health risks.
Safety, permits, and when to call a professional
Before attempting any work on an underground drain, the homeowner should equip themselves with proper PPE and follow basic safety precautions to prevent injury and contamination.
They must also verify local regulations, easements, and permit requirements that can affect access and allowable repairs.
If a blockage is persistent, involves structural damage, or crosses public property lines, a licensed plumber or drain specialist should be engaged.
Safety equipment and precautions for DIY cleaning
A few essential pieces of personal protective equipment—gloves, eye protection, a respirator rated for organic vapors if sewer gases are present, and sturdy boots—should be worn whenever attempting DIY cleaning of underground drains;
additionally, a gas detector and a charged phone or radio are recommended for confined-space hazards and emergency communication.
Inspect tools, isolate electrical sources, ventilate openings, avoid chemical mixes, work with a partner, and stop for signs of collapse or exposure.
Legal, municipal, and property-access considerations
Legal and municipal rules often dictate who may access and maintain underground drains, and ignoring them can create liability or safety risks.
Homeowners should confirm sewer easements, utility locations, permit requirements, and local ordinances before work.
Obtain neighbor or municipal consent where lines cross property.
Record permits and inspections, use licensed contractors when statutes require, and document actions to limit liability and guarantee compliance.
When to hire a plumber or drain specialist
Judgment calls determine when a homeowner should engage a plumber or drain specialist.
Professionals are required for persistent blockages, collapsed or unknown pipe locations, structural damage, or sewer backups.
Hire when permits, municipal codes, or confined-space entry are involved.
Use licensed contractors for camera inspections, heavy-duty jetting, or repair work.
Prioritize safety, liability protection, and documented permits to avoid fines and hazards.
Tools and materials required for cleaning underground drains
The discussion begins with the essential hand tools and basic supplies—gloves, shovels, and hand augers—used for initial access and minor blockages.
It then covers mechanical and power equipment such as drain snakes, hydro jets, and rotary cutters for more stubborn obstructions, plus inspection tools like drain cameras, inspection mirrors, and soil probes.
Finally, it outlines chemical and eco-friendly cleaning options along with safety cautions and environmental considerations.
Hand tools and basic supplies (gloves, shovels, hand augers)
When preparing to clean an underground drain, a small set of reliable hand tools and basic safety supplies covers most routine jobs.
Essential items include sturdy gloves, eye protection, a digging shovel and trenching spade, hand auger or drain snake for short clogs, pipe brushes, bucket, rags, and a flashlight.
These minimize risk and allow careful, controlled clearing without power equipment.
Mechanical tools and power equipment (drain snake, hydro jet, rotary cutter)
Equip technicians with robust mechanical and powered gear for stubborn or deep blockages: a motorized drain snake (electric or petrol-driven) for long runs and tough roots, rotary cutters or drum cutters for scaling pipe interiors and cutting tree roots, and a hydro-jet system for high-pressure scouring of grease and sediment.
Select appropriate cable diameters, cutter heads, pressure ratings, hose lengths, and safety guards; guarantee trained operation and fuel/electrical precautions.
Inspection tools (drain camera, inspection mirror, soil probe)
Begin inspections with specialized tools that quickly reveal pipe conditions: a push or crawler drain camera for full-length visual assessment, a handheld inspection mirror for shallow-access joints and fittings, and a soil probe to locate collapsed sections or voids outside the pipe.
Cameras document blockages, cracks, root intrusion and allow targeting repairs; mirrors assist tight areas; probes confirm burial depth and external sinkage.
Chemical and eco-friendly cleaning options and cautions
Several targeted chemical and eco-friendly cleaning options are available for underground drains, each requiring specific tools and safety measures.
Commercial enzymatic cleaners, oxygen bleach, and biodegradable degreasers reduce organic buildup; caustic drain gels and strong acids clear heavy blockages but need PPE, neutralizers, and ventilation.
Tools: chemical-resistant gloves, goggles, respirator, dosing pump, containment tray, and clear disposal plan to protect soil and pipes.
Preparing the site before cleaning
Before any cleaning begins, the technician locates drain lines and maps the underground system to identify routes and connections.
Access points are exposed and the work area is protected with barriers and surface covers to prevent damage and contamination.
Water supplies are shut off and affected sections isolated to guarantee a safe, controlled operation.
Locating drain lines and mapping the system
A site plan and careful inspection are essential to locate underground drain lines and map the system accurately before any cleaning work begins.
The homeowner reviews property records, observes surface indicators (grates, vents, depressions), and uses utility maps.
Metal detectors, pipe locators, and camera inspections confirm routes and slopes.
Results are sketched, noting cleanouts, junctions, and potential obstructions for safe planning.
Exposing access points and protecting the work area
Expose access points methodically and cautiously to minimize damage and guarantee safe entry to underground drains.
Clear vegetation, mark utilities, and remove surface obstructions. Use hand tools for delicate excavation, avoiding heavy machinery near lines.
Install barriers, warning signs, and ground protection to prevent collapse and contamination.
Provide stable footing and adequate lighting for safe access and efficient inspection.
Shutting off water and isolating affected sections
With access points uncovered and the work area secured, the next step is to shut off water and isolate the affected drain sections to prevent flow, backflow, or contamination during cleaning.
Identify upstream and downstream shutoff valves, close them methodically, and use plugs or inflatable test balls to seal pipe segments.
Verify isolation by relieving pressure and confirming dry access before beginning cleaning operations.
Step-by-step cleaning process for common scenarios
The following outlines practical, step-by-step procedures for typical underground drain problems.
Preferred approaches vary by situation; key topics to cover include:
- Clearing clogged surface or yard drains
- Cleaning French drains or gravel-filled trenches
- Removing roots and debris from sewer lateral lines and flushing sediment from long runs and culverts
Readers will find concise methods and safety notes tailored to each scenario.
Clearing a clogged surface or yard drain
Begin by evaluating the visible drain area and surrounding runoff patterns to determine blockage severity and likely causes. This initial inspection guides which tools and safety measures are needed before any cleaning begins.
Remove grate, clear surface debris by hand or with a stiff brush, then use a plumber’s snake or pressure washer to dislodge roots and silt.
Rinse and test flow; replace grate.
Cleaning a French drain or gravel-filled trench
Inspect the trench to identify blockage location, drainage pipe condition, and areas where gravel has compacted or washed away.
Remove surface debris, excavate carefully to expose the pipe, and scoop out contaminated gravel.
Flush the pipe with low-pressure water to dislodge sediment, then replace washed or compacted gravel with clean, coarse material.
Regrade and compact soil to restore flow and separation fabric.
Removing roots and debris from sewer lateral lines
After addressing gravel compaction and exposed pipe sections in a French drain, attention shifts to the sewer lateral where roots and debris commonly cause slow drains and backups.
A camera inspection locates intrusions. Mechanical cutters and rooters remove growth; augers clear blockages.
Segments damaged by roots are exposed and section-replaced. Post-repair inspection confirms flow restoration and prevents recurring infiltration.
Flushing sediment from long runs and culverts
Flushing sediment from long runs and culverts requires a systematic sequence that combines flow control, targeted agitation, and controlled discharge to move accumulated silt without causing downstream clogging or erosion.
Inspect access points, isolate sections, then use high-pressure flushing or air scouring to mobilize deposits.
Capture and filter effluent, repeat until clear, restore flow gradually, and document condition for future maintenance.
Using inspection cameras and diagnosis
A camera inspection begins by feeding a waterproof probe through the access point and recording continuous footage while noting pipe location and depth.
The operator interprets common findings — such as root intrusions or grease blockages, cracks or breaks, and pipe sags or offsets — to determine cause and urgency.
All findings should be logged with timestamps and images to support a repair recommendation and cost estimate.
How to perform a camera inspection
Begin by selecting an appropriately rated inspection camera and confirming battery, lighting, and recording functions before insertion into the access point.
Feed the camera slowly, monitor real-time video, and note pipe orientation and joint locations.
Pause at anomalies for multiple angles and distance measurements.
Retract while recording a final pass.
Save and label footage, then prepare concise notes for any required cleaning or repair.
Interpreting common camera findings (blockages, breaks, sags)
With footage saved and notes prepared, the inspector next interprets visible patterns to diagnose blockages, breaks, and sags.
Solid, immobile masses indicate roots or debris; soft, shifting material suggests grease or sediment.
Cracks, displaced joints, and sharp edges signal breaks.
Longitudinal dips, low spots, or pooled water reveal sags.
Each finding guides cleaning method selection without yet assigning repair scope.
Documenting damage and deciding on repairs
Using camera footage and inspection notes, the inspector catalogs visible defects—cracks, joint separations, root intrusions, sags, and obstructions—assigning severity ratings and annotating exact pipe locations and depths.
Recommendations specify repair options: cleaning, spot repair, pipe lining, or replacement. Cost estimates, urgency levels, and risk assessments accompany images and time-stamped video clips to guide homeowner decisions and contractor bids.
Repair and remediation options after cleaning
Following cleaning and inspection, attention turns to repair and remediation tailored to the problem found.
Minor interventions can include re-seating joints, replacing damaged grates, and recompacting backfill to restore function.
More extensive work may require pipe replacement, re-lining or trenchless techniques, along with regrading and erosion control to re-establish proper drainage.
Simple fixes (re-seating joints, replacing grates, compacting backfill)
After cleaning an underground drain, simple physical repairs often resolve residual issues:
Re-seat loose joints by realigning pipes and tightening couplings or applying fresh sealant to prevent leaks.
Replace damaged or missing grates to restore protection and proper flow.
Compact backfill evenly in layers to support pipes and prevent future settling.
Inspect work and test drainage to confirm repairs are effective.
Structural repairs (pipe replacement, re-lining, trenchless repair)
When cleaning reveals cracked, collapsed, or severely corroded sections, structural repairs restore integrity and long-term flow. Technicians assess damage, then choose pipe replacement, cured-in-place re-lining, or trenchless bursting based on condition, access, and budget. Proper materials and seals prevent recurrence; inspection confirms success.
| Repair Type | Advantage | Typical Use |
|---|---|---|
| Replacement | Durable | Severe collapse |
| Re-lining | Less digging | Moderate damage |
| Trenchless | Fast | Long runs |
Restoring drainage grade and erosion control
Restore the designed slope and stabilize surrounding soil to secure cleaned drains function reliably and resist erosion.
Regrade trenches to original pitch, compact backfill in layers, and replace bedding with suitable aggregate.
Install erosion control measures—geotextile, riprap, retaining edges, or vegetation—where runoff concentrates.
Ensure outlet protection, check alignment, and monitor during storms to confirm restored hydraulics and prevent future undermining.
Preventive maintenance and seasonal care
Preventive maintenance for underground drains centers on a regular schedule and concise checklist to catch issues before they escalate.
Proper landscaping—selecting low-risk plants, keeping roots away from lines, and using root barriers—reduces the likelihood of intrusion.
Seasonal actions such as clearing debris before storms and insulating or draining vulnerable sections before freeze-thaw periods protect system integrity.
Regular maintenance schedule and checklist
A simple, consistent maintenance schedule keeps underground drains functioning and prevents costly repairs; it should define inspection frequency, seasonal tasks, and action thresholds.
A concise checklist guides homeowners through routine care, recording dates and observations, prioritizing repairs, and noting debris, odors, or slow drainage.
- Quarterly inspection and clear debris
- Pre-winter camera check and flush
- Immediate follow-up for backups or odors
Landscaping and planting practices to reduce root intrusion
After establishing a routine inspection and response plan, attention turns to landscaping choices that limit root intrusion into underground drains.
Select non-invasive, shallow-rooted plants and maintain a root-free radius around drain lines.
Position large trees and shrubs well away from sewer routes, use root barriers where necessary, and mulch sparingly to discourage aggressive rooting while preserving soil stability and surface drainage.
How to protect drains during heavy rain and freeze-thaw cycles
During periods of heavy rain and repeated freeze‑thaw cycles, drains face accelerated clogging, displacement, and structural stress that demand targeted seasonal care.
Homeowners should clear grates, inspect drainage slopes, and secure loose joints before storms.
Install temporary debris guards, improve surface runoff with swales or downspout extensions, and apply flexible joint sealants.
Schedule post‑freeze inspections to repair cracks and remove accumulated sediment.
Common problems and troubleshooting
Persistent slow drainage is examined by noting symptom patterns, evaluating access points, and outlining diagnostic steps such as camera inspection and targeted jetting.
Odors and contamination risks are addressed by identifying organic buildup, cross-connections, and recommending containment, disinfection, and safety precautions.
Surface flooding that recurs after storms is tied to potential underground failures like collapsed pipes or blocked laterals and prompts guidance on inspection priorities and when to call a professional.
Persistent slow drainage’ diagnosis and next steps
Investigate slow drainage by systematically eliminating common causes and prioritizing safety:
Begin with a visual inspection of accessible fixtures and clean strainers.
Then check for localized blockages in traps and P-traps before considering deeper line problems.
If flow remains reduced, use a hand auger or drain camera to locate obstructions, document findings, attempt mechanical clearing, and schedule professional sewer-line service if roots, collapses, or persistent sediment are detected.
Odors and contamination risks
After ruling out slow flow sources like clogged traps or line blockages, attention shifts to odors and contamination risks that indicate sanitary failures or biological hazards.
Foul smells suggest sewer gas leaks, degraded seals, or biofilm buildup. Homeowners should inspect cleanouts, venting, and joint integrity, avoid direct contact with contaminated water, and consult a professional for testing, repairs, or disinfection when sewage exposure or persistent odors occur.
When surface flooding indicates underground failure
Surface flooding over a yard, driveway, or street often signals an underground drainage failure rather than a simple surface runoff issue.
Persistent pooling, repeated wet spots, or sinkholes suggest collapsed pipes, joint separation, root intrusion, or blocked catch basins.
Homeowners should inspect visible inlets, test flow with water, avoid driving over soft areas, and call a professional for camera inspection and targeted repairs.
Cost estimates and budgeting for cleaning and repairs
Costs for cleaning and repairing underground drains vary widely between DIY approaches and professional services, so a clear budget comparison helps set expectations. Factors such as difficult access, extent of damage, and specialized equipment can greatly raise the final price. The table below summarizes typical ranges and cost drivers for quick reference.
| Typical DIY vs Professional | Factors that Increase Cost |
|---|---|
| DIY: $20–$200; Professional: $150–$2,000+ | Access complexity (excavation, confined spaces) |
| DIY limited to basic tools; pros include camera inspections and jetting | Damage severity and need for pipe replacement |
Typical DIY vs professional cost ranges
A clear budget framework helps homeowners decide between DIY cleaning and hiring a professional: basic DIY options like manual rodding or a wet/dry vacuum typically cost $10–$100 for tools and supplies, while renting a power auger or chemical cleaner can raise that to $50–$200.
By contrast, professional drain cleaning services generally range from $150 for a simple jetting or rodding job to $400–$800 for more complex blockages, with sewer inspections, pipe repairs, or excavation pushing total expenses into the thousands.
DIY saves labor costs but trades time, risk, and limited effectiveness; professionals offer speed, expertise, and warranty.
Factors that increase cost (access, damage, equipment)
Because underground drain work often reveals complications not visible from the yard, several key factors can substantially raise expenses: difficult access (deep lines, landscaping, pavement or concrete removal), existing pipe damage that requires repair or replacement, and the need for specialized equipment such as high-pressure jetters, inspection cameras, or excavation machinery.
Additional cost drivers include permit requirements, site restoration, hazardous material handling, and overnight labor.
Quick reference: emergency steps for blocked underground drains
When a blocked underground drain becomes an emergency, prompt practical steps can limit damage and prepare for professional help.
- Shut off water sources and clear surface runoff.
- Contain sewage with temporary barriers and remove valuables from the area.
- Record location, symptoms, and any recent work to relay to the emergency plumber.
A concise checklist like this helps non‑specialists act quickly and give the plumber the critical information needed.
Immediate actions to minimize damage
Act quickly to limit water intrusion and property damage: stop using fixtures that feed the affected drain, divert surface runoff away from the area, and turn off nearby outdoor water sources.
Contain standing water with sandbags or temporary barriers, protect electrical panels and valuables, document visible damage with photos, ventilate damp spaces, and remove saturated items to prevent mold growth while arranging professional assessment and repairs.
Information to give to an emergency plumber
A concise summary of the situation and site conditions helps the emergency plumber prioritize response and prepare appropriate equipment.
Provide location, visible symptoms (backups, odors, standing water), onset time, recent work or blockages, access points and hazards, pipe material and age if known, property layout, and whether utilities are active.
Note any temporary measures taken and contact details for follow-up and access authorization.
Additional resources and product recommendations
The section outlines recommended inspection and cleaning tools suitable for homeowners, including basic cameras, augers, and safe cleaning agents.
It also explains how to locate qualified contractors and which credentials, insurance, and local licensing to verify.
Practical tips for choosing between DIY and professional service are provided.
Recommended inspection and cleaning tools for homeowners
Several practical tools and a few quality products make inspecting and cleaning underground drains manageable for most homeowners.
Recommended items include:
- Push camera or inspection scope for locating blockages and evaluating pipe condition.
- Handheld drain auger and replacement cables for small clogs.
- High-pressure nozzle attachment and protective gloves for flushing and safe handling.
Choose corrosion-resistant materials and follow manufacturer guidance.
How to find qualified contractors and verify credentials
Homeowners who find inspections or DIY cleaning beyond their comfort or capability often need to hire a professional. Identifying a qualified contractor requires focused research and verification.
Check licensing, insurance, and local certifications; request references and recent project photos; verify online reviews and Better Business Bureau ratings; obtain multiple written estimates and confirm warranty terms.
Prefer contractors experienced with underground drains and camera inspection equipment.
Conclusion
Like a lantern guiding footsteps through a storm, the cleaned underground drains become quiet channels that restore the home’s breath. Homeowners are reminded that careful preparation, the right tools, and respect for safety transform tangled roots and sediment into flowing lines. When tasks exceed skill, a professional is the steady lighthouse. Routine care polishes these hidden arteries, keeping the house’s systems bright and safe for seasons yet to come.