How Long Does It Take for a Pipe to Unfreeze? Fast Fixes & Tips
Key Takeaway: Frozen pipes typically begin to thaw within 30 minutes to a few hours once safe, steady heat is applied.
When addressing frozen pipes, several factors influence thawing time, including pipe material, diameter, insulation, and the extent of the ice blockage. Smaller copper or PEX lines and exposed pipes warm up faster than buried or concealed ones. To effectively thaw pipes, use gradual heat sources such as a hair dryer, hot towels, or heat tape, and open faucets to relieve pressure while monitoring for leaks. Additional practical tips and safety steps are provided below.
Short Answer: Typical Frozen Pipe Thaw Times
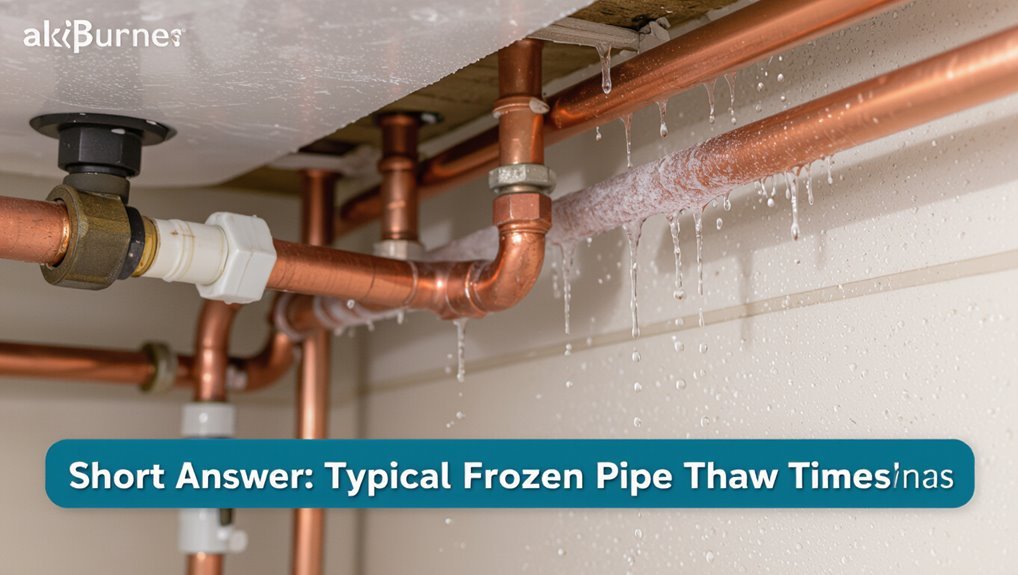
In typical household conditions, a frozen water pipe can begin to thaw within 30 minutes to several hours once heat is applied.
Thaw time depends on pipe material, diameter, insulation, ambient temperature, and ice extent.
Copper and PEX conduct heat differently; smaller-diameter lines warm quicker.
Exposed segments near exterior walls thaw faster than buried or concealed runs.
Low ambient temperatures slow progress, while continuous, moderate heat yields steady thawing without thermal shock.
Complete clearance may require repeated warming cycles to eliminate internal ice plugs.
Assessment of flow restoration confirms success; persistent blockage suggests deeper freeze or damage needing professional evaluation.
Quick Action Checklist to Unfreeze a Pipe Now
How should one proceed when a pipe freezes and immediate thawing is necessary?
Begin by locating the affected section and opening nearby faucets to relieve pressure and confirm flow. Apply gentle heat: use a hairdryer, heat gun on low, or hot towels—work from faucet toward the blockage. Never use open flames.
Insulate exposed pipes with towels or foam as heat is applied to retain warmth. Monitor for leaks as ice melts.
Keep someone informed of progress and check surrounding areas for water damage. If thawing fails within 30–60 minutes or pipes leak, contact a professional plumber promptly to prevent escalation.
Shut Off the Main Water and Why It Matters
Before attempting repairs, the homeowner should locate the main shutoff valve to stop the water supply quickly.
Turning off the main helps prevent extensive water damage if a frozen section bursts.
After shutting off the main, outdoors faucets and hose bibs should be checked and drained to make certain no trapped water remains.
Locate Main Shutoff Valve
To stop water flow quickly and prevent further damage, the homeowner must locate and turn off the main shutoff valve; this step isolates the building from the supply and limits flooding if a frozen pipe bursts.
The main valve is commonly near the water meter, at the property line, in a basement, utility room, or garage. It may be a gate, ball, or wheel valve; labeling speeds identification. Inspect access for obstructions and make sure the handle turns smoothly. If the valve is corroded or stuck, keep a wrench nearby and contact a plumber. Record the valve location for future emergencies.
Prevent Water Damage
When a freeze threatens piping, shutting off the main water supply is the fastest way to limit interior flooding and downstream damage.
Turning the main valve isolates the building, preventing pressurized water from entering compromised sections while thawing occurs.
Swift action reduces saturation of walls, floors, and belongings, lowering mold and structural risks.
After the supply is closed, relieve system pressure by opening nearby faucets and draining low points.
Document valve position and notify occupants.
Keep access clear for emergency crews.
Restoration should proceed only after a full inspection confirms pipes are intact and safe to repressurize.
Check Outdoor Faucets
Along the exterior walls, outdoor faucets and hose bibs should be inspected and shut off after the main water supply is closed to prevent trapped water from freezing in exposed lines.
After shutting the main, draining outdoor lines by opening each faucet and closing any shutoff valves prevents residual pockets.
Insulate recessed or exposed valves with foam covers or heat tape rated for outdoor use.
Disconnect and store hoses to avoid trapping water.
Verifying that spigots are fully closed and blow-out procedures are applied where applicable reduces burst risk.
Documenting shutoff locations speeds future response and limits winter damage.
Immediate Safety Checks Before Thawing a Pipe
Before attempting to thaw a frozen pipe, a clear assessment of immediate hazards is essential: verify that water supply valves are shut off, check for electrical sources near the affected area, and look for signs of pipe damage or leaks that could worsen with warming.
The observer should note surrounding materials, accessibility, and whether nearby occupants are at risk; documented observations guide decisions and emergency responses. If uncertainty exists, professional consultation is recommended before proceeding. Visualize potential consequences and control points to reduce risk.
- Frost-lined crawlspace with brittle insulation
- Copper pipe bowed near a joint
- Water pooling beneath drywall
- Extension cord draped over pipes
Fast Safe Methods Overview (What Works Best)
The section summarizes the most effective rapid approaches for thawing, emphasizing controlled heat application to avoid pipe damage.
It outlines safe methods such as using a hair dryer, heat gun at low setting, or electric pipe heating tape while maintaining even warming.
It also highlights simple pressure-relief steps to reduce burst risk before and during thawing.
Safe Heat Application
Apply heat gradually and directly to the frozen section using methods that balance speed with pipe safety. The goal is to thaw ice without overheating fittings or insulation. Safe choices provide controlled, even warmth and allow monitoring for leaks. Avoid open flames and sudden temperature shocks.
- A hair dryer moved slowly along the pipe, warm air melting ice.
- An electric space heater placed nearby, not touching pipe or insulation.
- Heat tape or cable wrapped per manufacturer instructions for steady heat.
- Warm towels soaked and wrung out, wrapped and replaced as they cool to transfer heat.
Pressure Relief Steps
Once heat begins to melt a frozen section, pressure relief steps should be taken promptly to prevent sudden ruptures from trapped water expanding or steam forming.
The technician or homeowner should open nearby faucets—hot and cold—to allow melted water and steam to escape and reduce internal pressure.
If valves are frozen, gently warm accessible supply stops to avoid forcing them.
Inspect joints and fittings for leaks as thawing progresses; shut off the main supply if any compromise appears.
Use a pressure gauge if available to monitor system pressure, keeping it below manufacturer limits.
Proceed slowly and continue heat application until flow is restored.
Thawing With a Hair Dryer: Step-by-Step
Using a hair dryer, one should direct warm air along the frozen section of pipe in steady passes, keeping the nozzle several inches away to prevent overheating fittings or insulation.
One notes the frozen area’s length, keeps outlets open, and works from the faucet toward the colder section.
Movement prevents hot spots; patience avoids damage.
Power cords remain dry; interruptions are avoided until flow resumes.
If warming fails within a reasonable time, contact a professional.
- warm breath of air gliding over metal
- steady hand sweeping along a frost line
- faint drip turning to steady flow
- relieved condensation beading on the pipe
Using a Portable Space Heater Safely
When using a portable space heater to thaw a frozen pipe, proper placement and clearance are essential to prevent nearby combustibles from igniting.
The heater should sit on a stable, level surface with at least three feet of open space on all sides and never be placed directly on or aimed at insulation or flammable materials.
Additionally, electrical safety precautions—using a grounded outlet, avoiding extension cords, and checking cords for damage—reduce risk of overload and fire.
Placement And Clearance
In a confined work area, the portable space heater should be positioned on a stable, level surface at least three feet away from walls, furniture, combustibles, and insulation to prevent heat buildup or ignition.
The operator assures clearances to maintain airflow around the heater, directing warmth toward frozen pipe runs without blocking vents or placing units on uneven ground.
He keeps pathways unobstructed for rapid removal and monitors surrounding materials for discoloration or melting.
Placement avoids narrow alcoves and overhead joists where heat can accumulate.
Regular visual checks confirm no drift of storage or linens into the hazard zone.
- A heater centered on a concrete floor
- Pipes exposed on an open wall
- Nearby wooden shelving cleared back
- A three-foot perimeter taped off
Electrical Safety Precautions
Taking care with power sources and cords, the operator makes certain the portable space heater is plugged directly into a properly rated, grounded outlet and never into an extension cord or power strip.
The device is inspected for frayed cords, damaged plugs, or loose connections before use.
A dedicated circuit reduces overload risk.
The heater is positioned away from water, combustible materials, and traffic paths to prevent tipping or contact.
Automatic shutoff and tip-over features are enabled.
Unattended operation is avoided; the heater is turned off and unplugged when not actively monitored.
Routine checks guarantee safe, reliable temporary pipe thawing.
Hot Towels and Heat Packs: Quick Technique
Using hot towels or portable heat packs provides a fast, localized way to thaw a frozen section of pipe without introducing open flame or high-pressure appliances.
The method involves warming damp towels with hot water or activating sealed heat packs, then wrapping them snugly around the chilled pipe and replacing them as they cool.
This concentrates gentle, conductive heat where ice forms, reducing stress on fittings.
Monitor for leaks as thawing proceeds and keep heat sources off insulation or wiring.
Maintain ventilation if using chemical heat packs and discard single-use packs after cooling.
- Hands wrapping a steaming towel tightly around copper
- Soft heat packs cradled along a joint
- Condensation beading and melting frost
- A drip pan catching the first thawed water
Electric Heat Tape: How It Works and Timing
Electric heat tape consists of a resistive heating element wrapped along a pipe to supply steady, controlled warmth that prevents or thaws ice.
When properly installed and powered, heat tape can begin warming frozen sections within 15–30 minutes, though full thawing time depends on pipe diameter, ice length, and ambient temperature.
Users should monitor progress and follow manufacturer timing guidelines to avoid overheating or electrical hazards.
How Heat Tape Works
When wrapped along a pipe, heat tape delivers controlled warmth through an internal resistive element that converts electrical energy into heat, preventing ice formation and thawing frozen sections; its effectiveness depends on tape type (self-regulating or constant-wattage), correct installation, and appropriate thermostat or built-in temperature responsiveness.
The tape either modulates output as ambient temperature falls or runs at steady wattage, requiring careful spacing, insulation over the tape, and secure attachment.
Proper grounding and following manufacturer ratings for pipe material and outdoor exposure are essential.
Visualize installation and operation:
- A ribbon coiled snugly along a copper pipe
- Insulation tucked over warm tape
- Thermostat probe clipped nearby
- Power cord routed to a protected outlet
Typical Thawing Time
Typical thawing time for pipe heat tape varies widely, commonly ranging from 30 minutes to several hours depending on ice thickness, tape type, ambient temperature, pipe material, and installation quality.
Heat tape rated for self-regulating power warms faster on metal than on plastic because metal conducts heat away; thicker ice layers and lower outside temperatures slow progress.
Proper contact, continuous wrap, and insulation reduce thawing time.
Thermostatically controlled tape cycles and low-wattage models may extend duration.
For safety, monitor for hotspots, follow manufacturer guidelines, and allow sufficient time before applying water pressure.
When in doubt, consult a professional.
Heat Gun vs Heat Tape: When to Avoid Heat Guns
Practically always, a heat gun proves too aggressive for many frozen-pipe situations and should be reserved for controlled, non-plastic applications; its high, concentrated heat can crack PVC, damage insulation, scorch fittings, or ignite nearby combustibles, whereas heat tape delivers low, even warmth suited to metal and plastic lines and long-term protection.
A heat gun risks localized overheating, unpredictable thermal stress, and voided warranties on plastic plumbing; use it only when pipes are metal, exposed, and clear of flammable material. Heat tape, properly installed, minimizes hotspots and provides continuous protection. Consider professional assessment for complex or concealed runs.
- charred insulation beneath a nozzle
- warped PVC joint near a focused beam
- neat rows of applied heat tape
- a long, insulated basement run
Warm Water for Exposed Pipe Sections
When pipes are exposed, applying warm water can be an effective way to thaw localized ice without open flames or high heat. Guidance should cover methods of application, appropriate water temperatures and timing to avoid thermal shock, and practical safety precautions to protect the pipe and the person performing the task.
Clear, stepwise instructions and warnings help minimize risk and guarantee consistent results.
Warm Water Application Methods
For exposed pipe sections, applying warm water is a direct, controlled way to thaw localized ice without introducing heat sources that could damage fittings. The method focuses on steady, gentle warming: pour or spray warm (not boiling) water along the frozen span, work from the faucet toward the blockage, and repeat until flow resumes. Care is taken to protect nearby insulation and fittings from sudden temperature shock. Continuous observation guarantees leaks are detected early. Tools include a kettle, spray bottle, or low-pressure hose delivering warm water in short bursts to avoid stressing joints.
- steam rising from copper at dawn
- a gloved hand guiding a spray
- beads of water racing along pipe seams
- a slow, steady trickle returning to life
Temperature And Timing
In applying warm water to an exposed frozen pipe, temperature and timing must be balanced to thaw ice efficiently without stressing fittings: water should be warm enough to melt ice (about 100–120°F / 38–49°C) yet well below boiling, and applied in steady, short intervals progressing from the faucet toward the blockage until flow resumes.
The operator should monitor pipe warmth, using brief applications to avoid thermal shock; extend exposure gradually if thawing stalls. Focused, repeated passes concentrate heat where needed while minimizing expansion stresses.
Once flow returns, maintain gentler heating briefly to clear residual slush before restoring normal use.
Safety And Precautions
Throughout the warm-water thawing process, strict safety measures are essential to protect both the pipe and the operator: verify water temperature stays within the recommended 100–120°F (38–49°C) range, avoid direct application to joints or fittings that show signs of corrosion or cracking, wear heat-resistant gloves and eye protection to guard against splashes, and make certain electrical devices and outlets remain dry and at a safe distance.
The operator should apply warm water gradually, monitor pipe condition, and stop if leaks or unusual noises occur. Proper planning reduces damage and injury risk.
- A gloved hand testing a slow stream
- Steam curling from metal
- Damp insulation peeling back
- A puddle near an outlet avoided
Open Flames: Why They’re Dangerous
When applied directly to frozen plumbing, open flames introduce rapid, uneven heat that can warp fittings, weaken solder joints, and ignite nearby combustibles.
Experts warn that torching pipework risks ruptures as metal expands faster than surrounding materials, causing seams to split.
Insulation, wall cavities, and accumulated dust may catch fire before a user detects smoldering.
Flames also damage rubber seals and plastic tubing, creating slow leaks that go unnoticed until thawing.
Professional guidance favors controlled, indirect warming methods.
Liability and insurance complications can follow fire damage.
Safer alternatives reduce property loss and personal injury compared with improvised flame use.
How to Locate the Frozen Pipe Section Fast
After warning against open flames, attention turns to locating the frozen section quickly to minimize damage and restore water flow.
One scans exposed runs, feeling for cold spots and frost; listen for quiet taps or absence of flow at fixtures. Check areas prone to cold: exterior walls, crawlspaces, basements, and near uninsulated valves.
Use a non-contact thermometer or thermal camera for accuracy. If accessible, trace the pipe from the nearest working faucet backward toward colder sections.
Avoid unnecessary disturbance that could worsen a crack; if the frozen area is uncertain, call a professional.
- Frost on an exterior wall pipe
- Icy condensation beads
- An unresponsive faucet
- Pale, cold metal surface
Signs a Frozen Pipe Is Beginning to Thaw
A thawing pipe is often first indicated by a noticeable rise in the pipe’s surface temperature near the frozen section.
Shortly afterward, a gradual restoration of water flow — slow at first, then increasing — confirms that ice is melting inside the line.
Observers should monitor both warmth and flow to gauge progress and detect any persistent restrictions.
Warmer Pipe Temperature
With a thawing pipe, the metal and surrounding insulation will gradually feel noticeably warmer to the touch as trapped ice melts and water resumes movement. Temperature rise often begins near joints and fittings where heat seeping from nearby rooms is greatest. A steady, increasing warmth over minutes to hours signals progressive thawing rather than intermittent warming. Caution is advised: warmth can precede leaks where ice plugs shift. Monitoring by touch and noncontact thermometer helps verify warming without disturbing fragile sections. Visual clues may include condensation and slight frost retreat on adjacent surfaces.
- Bare copper pipe warming under a basement window
- Insulation becoming soft, not cold-to-touch
- Frost line shrinking along a pipe run
- Dampness forming where ice gives way
Gradual Water Flow Restored
As warming spreads along the pipe and insulation softens, a slow return of water movement becomes the next observable sign that an ice plug is yielding.
Small drips shift to an intermittent trickle, then to a steadier stream as internal ice fractures and meltwater finds channels.
Flow may sputter, contain air, or be discolored briefly; these are normal interim indicators.
Increased pressure and louder sounds can signal progressing thaw but warrant caution to detect leaks.
Monitoring duration, temperature, and fixture response helps assess recovery.
If flow stabilizes without leaks, the pipe is likely clear; persistent issues require professional inspection.
How to Monitor Thaw Progress Safely
When monitoring thaw progress safely, attention focuses on gradual temperature changes, clear visual indicators, and consistent checks to guarantee sudden pressure surges or refreezing are prevented; observers should record temperature at regular intervals, watch for water flow at fixtures, and listen for hissing or bulging that signal leaks or impending rupture.
The observer notes timestamped readings, inspects joints and insulation, and keeps pathways clear for quick shutoff.
If unexpected signs appear, heating pauses and isolation valves close.
Communication with household members guarantees no appliance use that raises pressure until stability is confirmed.
- Frost retreating along a copper seam
- Condensation beading on fittings
- Slow steady drip at a tap
- Soft swelling behind drywall
How Water Movement Affects Thaw Speed
Water movement alters how quickly ice within a pipe melts by changing local heat transfer and shear at the ice interface.
Higher flow rates typically accelerate thawing by bringing warmer water and increasing convective heat transfer, while slow or stagnant flow prolongs freezing.
Directional flow can concentrate thawing downstream first, creating uneven melts that affect pressure and potential refreeze points.
Flow Rate Effects
Any increase in flow rate accelerates heat transport along a frozen pipe by convective mixing, reducing the time for ice to melt. Faster-moving water replaces cold boundary layers, delivering warmer fluid to the ice interface and carrying melted water away, which prevents refreezing. Pressure rises slightly with flow, helping dislodge fragile ice plugs. Conversely, very low flow yields stagnant pockets that prolong freeze. Practical thawing balances safe flow rates with heat application to avoid pipe stress.
- a rushing current nudging thin ice to crumble
- warm water sweeping a frost-lined tube
- slow, still pockets holding hard, opaque plugs
- steady flow flushing slushy fragments
Directional Thawing
Along the pipe’s length, the direction and speed of flow determine where thawing initiates and how quickly it progresses.
Cooler, slower-moving sections freeze more solidly; flowing water carries latent heat that concentrates thawing downstream from the warm source.
When flow is toward the frozen zone, turbulent eddies and convective heat transfer speed ice melt at the leading edge.
Reverse or stagnant flow prolongs blockages and promotes ice bridges.
Strategic warming should favor the flow direction to leverage advective heating.
Monitoring pressure and gradual temperature increases prevents ruptures.
Understanding directional thawing helps prioritize interventions and reduces unfreeze time with minimal risk.
Pipe Material and Thaw Speed: Copper, PEX, PVC
Pipe-metal differences directly affect thawing speed and safe heat application: copper conducts heat rapidly, PEX retains heat longer but melts at lower temperatures, and PVC is slow to absorb heat and can soften or split if overheated. The material dictates thaw technique: gentle, even heat for copper to prevent hotspots; controlled low-temperature warming for PEX to avoid deforming; and very cautious, evenly distributed warmth for PVC to prevent softening. Thermal conductivity and melting points determine risk and time.
Visualize risks and outcomes:
- Bright, fast-warming copper glowing slightly under a heat gun
- PEX holding warmth like elastic tubing
- PVC discoloring and warping
- Frosted fittings cracking under stress
Pipe Diameter and Length: Influence on Thaw Time
When considering thaw time, diameter and length directly determine the volume of frozen water and the surface area available for heat transfer; larger diameters hold more ice and require more energy, while longer runs increase total heat needed and raise the chance of partially thawed sections refreezing downstream.
Wider pipes need proportionally greater heat input because mass increases with cross-sectional area, while conductive and convective heat transfer scale with surface area. Long runs create thermal gradients; central sections may stay frozen longer.
Accessibility for heating methods and insulation along the run also affects practical thaw speed, with segmented approaches often more effective.
How to Estimate Thaw Time From Pipe Length
Estimating thaw time begins by recognizing that longer runs of frozen pipe generally require proportionally more time to restore flow.
The rate of thawing depends on both the length affected and the heat source applied, with higher intensity or closer contact shortening required time.
Practical estimates combine pipe length with the heat delivery method to predict a realistic thaw window.
Pipe Length vs. Thaw Time
A straightforward relationship links pipe length to thaw time: longer runs require proportionally more time to warm through, all else equal.
Estimating thaw time uses length as a primary factor; a short exposed segment thaws quickly, while miles of buried main take far longer. Flow path, fittings, and insulation alter effective length but not the basic proportionality. Predictive rules of thumb scale minutes per foot for similar conditions; doubling length roughly doubles time. Practical planning treats length as the baseline input for any thaw schedule or response estimate.
- A short kitchen branch like a finger warming in sunlight
- A long attic run stretching across rafters
- A basement loop coiling under concrete
- A municipal main marching down the street
Heat Source And Rate
How much heat is applied and how quickly it is delivered determine how pipe length converts into thaw time: a high-power, concentrated source will melt ice along the run far faster than diffuse, low-rate heating.
Thaw rate depends on heat flux (W/m²) and contact quality: direct-clamp heaters, heat guns aimed at fittings, or electric tracing provide high localized flux and shorten time per meter.
Radiant heaters, warm air, or room heating give lower flux and require longer exposure along the entire length.
Insulation and pipe material alter required energy.
Estimating time combines length, heat flux, thermal resistance, and target temperature rise.
Location Matters: Indoor, Crawlspace, Foundation, Exterior
When thawing a frozen pipe, the pipe’s location dictates access, risk, and method selection: indoor pipes in heated spaces allow gentler heat sources, crawlspace and foundation lines may require protective measures against trapped moisture and limited clearance, and exterior or exposed runs demand faster, weather-aware techniques to prevent re-freezing and structural damage.
Professionals assess insulation, accessibility, and nearby materials before choosing heat tape, space heaters, or controlled hot-air application. They prioritize preventing water damage and avoiding open flames. Typical considerations vary by setting and dictate time, tools, and safety protocols.
- Narrow crawlspace beneath a floor joist
- Shallow foundation trench
- Wall cavity behind drywall
- Exposed outdoor run along siding
Ambient Temperature and Its Effect on Thawing
Ambient ambient temperature differences between indoor and outdoor settings strongly influence how quickly a frozen pipe will thaw.
Wind chill and direct exposure can lower effective temperatures around exterior pipes, slowing natural thawing compared with sheltered indoor or crawlspace locations.
Evaluating the surrounding air movement and typical indoor heating patterns helps determine whether active thawing methods are needed.
Indoor Vs Outdoor Temperatures
Does temperature differ enough between inside and outside to change thawing time markedly? Indoor spaces normally stay above freezing, supplying steady heat that shortens thawing from hours to minutes for accessible pipes.
Outdoor or unheated crawlspaces expose pipes to lower ambient temperatures, slowing conduction and prolonging ice presence despite identical pipe materials.
Placement, insulation, and thermal bridges control rates; proximity to heated rooms matters.
Typical scenarios:
- A kitchen wall cavity warmed by appliances and people
- An attic with minimal insulation and colder air
- A sunlit exterior wall warming pipes slightly midday
- A buried outdoor line in compacted frozen soil
Wind Chill And Exposure
Having established how indoor warmth and enclosure affect thawing rates, exposure to wind and open-air conditions becomes the next controlling factor.
Wind removes insulating air layers around pipes, accelerating conductive heat loss and lowering surface temperature below ambient. Exposed outdoor and unshielded attic or crawlspace pipes freeze faster and take longer to thaw than sheltered ones. Wind-driven cold can defeat modest heat sources, so restoration requires stronger, sustained heating or physical wind barriers.
Rapid assessment should note wind direction, gusts, and pipe orientation. Temporary shielding, targeted heat application, and preventing drafts shorten thaw time and reduce burst risk.
Insulation and Surrounding Thermal Mass Effects
When evaluating how quickly a frozen pipe will thaw, the insulating layer and the thermal mass around the pipe largely determine heat flow: insulation slows external heat gain and traps residual warmth, while surrounding materials such as concrete, soil, or packed insulation act as heat reservoirs that either supply or absorb energy, changing thaw rate and required heating energy.
A thick foam jacket reduces heat loss but delays external warming methods; concrete slabs or earth store cold, requiring more energy and time to raise pipe temperature.
Access for directed heat and thermal bridges influence practical thawing choices.
- Pipe wrapped in foam within a wall cavity
- Copper line embedded in a concrete slab
- Plastic pipe surrounded by loose soil
- Metal bracket contacting cold framing
Partial vs Full Freeze: What It Means for Thawing
The distinction between a partial blockage and a full freeze directly affects thawing strategy and time. A partially frozen pipe may allow limited flow and respond quickly to localized heat, whereas a full freeze often requires more extensive heating and pressure management.
Recognizing indicators of a complete seal—such as no downstream flow and cold pipe surface along a continuous section—guides safe, effective thawing decisions.
Partial Blockage Effects
Partial ice formation in a pipe alters flow dynamics and thawing behavior in ways that differ markedly from a complete freeze. A partial blockage narrows the passage, increasing pressure upstream and reducing flow speed past the ice.
Thawing begins unevenly: warmer water and heat sources may bypass the obstruction, causing gradual melting at edges while core ice persists. This can lead to localized strain on fittings, intermittent flow, and misleading signs of recovery. Targeted thawing—controlled heat application and pressure monitoring—reduces rupture risk and speeds restoration, but care is needed to avoid sudden pressure surges as channels reopen.
- Narrowed channel with slow trickle
- Bulging joint under stress
- Ice collar clinging to pipe wall
- Sudden gusher when a plug breaks
Full Freeze Indicators
Recognizing whether a pipe is fully frozen rather than partially blocked shifts the thawing strategy and risk assessment. Indicators of a full freeze include rigid pipe sections, no water flow after taps open, frost on exposed lengths, and bulging fittings. Complete freezes demand slower, controlled thawing to avoid pressure spikes and bursts; targeted heat and monitoring are advised. Partial freezes may allow trickles and lower burst risk. Assessments should be swift: check multiple fixtures, listen for cracking, and inspect exposed pipes. Use professional help when uncertain or when visible deformation exists.
| Indicator | Meaning |
|---|---|
| No flow | Full freeze |
| Frost | Surface freezing |
| Bulging | High burst risk |
| Cracking sounds | Imminent failure |
Preventing Burst Pipes While You Thaw
Proceed cautiously when thawing to reduce pressure that can cause pipes to burst; slow, controlled warming and monitoring for leaks are essential.
The person should open nearby faucets to relieve pressure, apply gentle heat with a hair dryer or heating pad, and inspect joints frequently.
Avoid open flames and rapid temperature changes.
If any cracking sounds or wet spots appear, stop and reassess.
Keep the area clear for quick access and have towels ready to catch drips.
Visualize warning signs to act fast:
- Frost on a dull, rigid pipe surface
- A tiny bead of water forming at a joint
- A hairline crack leaking slowly
- Warmth radiating where ice has melted
What to Do If a Pipe Bursts During Thawing
If a pipe bursts while thawing, immediate containment and flow stoppage take priority to limit water damage. The homeowner should shut off the main water valve, open taps to relieve pressure, and move valuables away. Electrical hazards must be avoided; shut power if water reaches outlets. Photograph damage for records and call a licensed plumber promptly. Temporary patches (rubber and hose clamps) can slow flow but are not permanent. Drain remaining water and ventilate the area to reduce mold risk. Professional repair and inspection follow containment; restoration addresses structural and finish repairs once plumbing is secure.
| Action | Purpose | Priority |
|---|---|---|
| Shut off main | Stop flow | High |
| Open taps | Relieve pressure | High |
| Call plumber | Permanent fix | High |
| Photograph | Record damage | Medium |
How to Check for Leaks After Thawing
After thawing, a careful visual inspection should be conducted to spot cracks, wet spots, or corrosion along exposed pipe sections and fittings.
Concurrently, water pressure should be monitored for unexpected drops or fluctuations that could indicate hidden leaks. Any signs of damage or pressure changes warrant immediate shutting off of the supply and professional assessment.
Visual Inspection For Damage
How should one confirm that thawed piping sustained no damage? A visual inspection begins immediately after thawing: look for wet spots, corrosion, bulges, or hairline fractures along accessible pipe runs.
Examine joints, fittings, and valves for drips or mineral streaks. Use a flashlight and mirror for hidden sections, and feel along the pipe for soft spots or temperature inconsistencies.
If any suspect area appears, mark it and shut water off until repaired. Document findings with photos for reference or professionals. Prompt action prevents small defects becoming major failures.
- Wet ring under a ceiling joint
- Pale rust streak trailing a seam
- Slight pipe bulge near a bend
- Hairline crack shining in light
Monitor Water Pressure Changes
Once visual checks are complete and any suspect areas are marked or isolated, attention should shift to monitoring water pressure to reveal leaks hidden from sight. The inspector notes baseline readings at the main shutoff and individual fixtures using a pressure gauge.
After restoring flow, any steady pressure drop while all fixtures are closed suggests a leak. Intermittent fluctuations can indicate partially open valves or thermal expansion effects. Correlate drops with audible signs, damp spots, or meter movement when household consumption is zero.
Record readings over 15–30 minutes; persistent decreases warrant localized isolation and professional assessment to prevent structural damage.
Safely Restoring Water Pressure After a Thaw
With pressure restored gradually, the homeowner should first inspect visible pipe runs, fixtures, and exposed fittings for leaks or signs of stress before fully reopening supply valves.
Then open the main valve slowly, watch pressure at faucets, and listen for drips or hisses.
Close any faucet that sputters to purge air pockets; open each fixture fully once flow steadies.
Monitor the water meter for unexplained movement and recheck joints after 15–30 minutes.
If minor weeps appear, tighten fittings; if flow is weak, check upstream supply and sediment traps.
- Frost-rimmed exterior hose bib
- Moist under-sink P-trap
- Hairline crease along copper run
- Steady kitchen faucet stream
When to Call a Professional Plumber Now
Recognize when restoring flow exceeds homeowner capability: persistent leaks after thawing, visible pipe distortion or burst sections, no water despite open valves, sewage backup, or gas-scented appliances all warrant immediate professional intervention.
A plumber evaluates structural damage, isolates system leaks, and prevents secondary harm like mold or electrical exposure.
Immediate service is advised for shared-main failures, compromised hot-water heaters, or when thawing attempts risk worsening cracks.
Call before turning water back on if pipes show warping or seams split.
For renters, notify landlords and document conditions.
Keep water supply off and evacuate areas with contamination or strong odors until help arrives.
Professional Thawing Equipment and Typical Times
Professional plumbers typically use specialized tools—such as electric resistance thawers, steam machines, and heated cable systems—selected based on pipe material and accessibility.
Expected thawing times vary widely, from under an hour for accessible short runs to several hours for long or complex freezes, and estimates should include setup and inspection.
Safety measures and preparatory steps, including shutting off water, checking for leaks, and ensuring proper ventilation and electrical grounding, are essential before work begins.
Equipment Types Overview
In discussing professional thawing equipment, the main categories are electric heat guns and cable systems, steam trailers, hot water flushing rigs, and hydro-jetters adapted for thawing. Each type targets different pipe materials and access conditions; choice depends on safety, allowed pressure, and surrounding infrastructure. Operators assess pipe diameter, length, and freeze location before selecting gear.
Portable electric units suit confined spaces; steam trailers deliver high thermal energy for longer runs; hot water rigs circulate warmed fluid through service lines; hydro-jetters can apply warmed, pressurized flow for stubborn ice while minimizing thermal shock.
- a compact electric heat gun warming a copper line
- a steam trailer beside a driveway
- hoses from a hot water flushing rig
- a hydro-jetter nozzle in a utility pit
Typical Thawing Durations
After selecting the appropriate thawing method based on pipe material, diameter, length, and access, estimating how long a thaw will take becomes the next practical consideration.
Professional electric trace heaters typically thaw short sections in 15–60 minutes; longer runs may require several hours.
Steam or hot-water units thaw faster on metal pipes, often 10–30 minutes per localized freeze, depending on ice thickness.
Induction and high-power electric systems can clear substantial freezes in 30–120 minutes but depend on operator skill and setup.
Plastic pipes warm more slowly and need gentler rates to avoid damage, extending times versus metal by 25–100 percent.
Safety And Preparation
Before any thawing begins, a thorough risk assessment and site preparation must be completed to protect personnel, property, and the pipe system.
Trained technicians choose equipment—induction heaters, circulating hot-water units, electric trace systems—based on pipe material, accessibility, and freeze extent.
PPE, lockout/tagout, and ventilation prevent injury; thermal cameras and flow meters monitor progress.
Typical professional thaw times vary: small exposed copper may clear in minutes; long buried or multi-layered assemblies can take hours.
Post-thaw inspection for leaks and insulation replacement is mandatory to prevent recurrence.
- Technician with induction coil near pipe
- Hot-water cart beside service valve
- Thermal camera display showing hot spot
- Insulation being rewrapped around pipe
Temporary Bypass Lines: When and How to Use Them
When a section of piping must be isolated for thawing or repair, a temporary bypass line provides a controlled alternate route for flow to maintain service and protect the system from pressure surges.
Install bypasses only when isolation valves and system maps are verified.
Select tubing or hose rated for system pressure and fluid temperature, and include shutoffs to control flow.
Make certain secure connections, support to prevent sagging, and relief or venting to avoid trapped air.
Monitor for leaks and pressure anomalies while work proceeds.
After thawing and repair, purge, test, and remove the bypass, restoring normal routing and documenting changes.
Short Fixes When Thawing Is Slow or Impossible
In situations where thawing progress stalls or is impractical, short fixes can restore limited function and prevent damage until a permanent repair is possible.
A shutoff, pressure relief, and temporary reroute minimize stress and leaks while a professional plan is arranged.
Quick measures aim to prevent burst pipes and water damage without pretending to be long-term solutions.
- Wrapping a frozen section with towels and warm water to encourage localized melting
- Installing a temporary bypass with flexible tubing around the affected segment
- Partially opening nearby faucets to reduce internal pressure
- Placing buckets and towels under suspect joints to catch drips
Thawing Exterior Hose Bibs and Spigots Quickly
Thawing an exterior hose bib or spigot quickly requires focused heat application and pressure management to avoid pipe damage and water intrusion. The technician applies controlled heat (hair dryer, heat lamp) to the bib and adjacent wall, opens indoor shutoff valves to relieve pressure, and checks for leaks as ice melts. Avoid open flames and excessive heat on fittings. Once flow returns, inspect for cracks and restore insulation. If uncertainty or damage appears, shut off water and call a professional.
| Action | Purpose |
|---|---|
| Apply heat | Melt ice safely |
| Open indoor valve | Relieve pressure |
| Inspect fittings | Find damage |
| Restore insulation | Prevent refreeze |
Thawing Sprinkler and Irrigation Pipes Safely
For sprinkler and irrigation systems, careful thawing protects buried lines, valves, and backflow preventers from bursting as ice melts and pressure shifts. Technicians first isolate zones and shut off water at the main, relieve pressure, then apply gentle heat sources to frost-affected valves and visible risers. Patience prevents sudden pressure spikes; monitor fittings for leaks as ice yields. If underground lines are frozen, consult a pro to avoid excavation errors or damage to irrigation controls. Resume watering slowly once fully thawed and inspected to confirm integrity and proper operation.
- frost-crusted valve box lid
- ice-ringed riser stem
- snow-packed lateral lines
- frozen backflow assembly
Speeding Thawing in Crawlspaces and Basements
When pipes freeze in crawlspaces or basements, rapid thawing requires a controlled approach that minimizes pipe stress and prevents water damage.
Inspect access points, shut off main valves if joints or visible ice exist, and open nearby faucets to relieve pressure.
Apply heat gradually using space heaters, infrared lamps, or electric heat tapes; avoid open flames.
Monitor pipes and surrounding insulation for moisture and mold risk.
Contain and direct any meltwater with towels and a wet vacuum.
Restore insulation and seal drafts after thawing.
If damage or persistent freezing is found, contact a licensed plumber promptly for repairs.
Recurring Freezes: How Repeat Events Change Thaw Time
Repeated freezes often shorten the time it takes for ice within a pipe to melt, because residual cold, microfractures in the pipe wall, and accumulated mineral deposits change thermal and mechanical behavior.
Recurrent cycles raise thermal conductivity of surrounding material, thin protective air gaps, and leave hairline cracks that both speed local thawing and increase leak risk.
Pipes exposed repeatedly require quicker attention; thaw time predictions must account for degraded insulation and uneven melting.
Monitoring for leaks during and after thawing is critical, as weakened sections can fail despite faster ice clearance.
- Frost-lined copper with glinting mineral streaks
- Cracked fittings oozing slow drips
- Thawed channels forming irregular water paths
- Insulation compressed, showing cold dark gaps
Overnight Freeze: How Long It Takes to Clear
Overnight freezes typically form thin to moderate ice plugs that can begin to clear within a few hours of active thawing.
If thawing is applied promptly — warm air, localized heat tape, or heated cloths — flow often resumes in two to six hours.
Factors altering time include pipe diameter, insulation, water pressure, and ambient temperature. Small copper or PEX lines thaw faster than larger iron mains.
Slow, uniform warming reduces rupture risk; rapid heating of exposed fittings may help but requires caution.
Persistent obstruction after six to twelve hours warrants professional inspection to check for hidden ice or damage.
How Recurring Freezes Affect Pipe Condition and Risk
Experience with thawing times highlights a different concern: freeze–thaw cycles progressively weaken pipe systems. Repeated freezing stresses joints, thins metal from microfractures, and degrades solder and seals. Each event raises leak probability and sudden rupture risk, often without obvious warning signs.
- A hairline crack widening like an ice vein along copper.
- Bulging PVC bowing outward after multiple expansions.
- Corroded fittings flaking where water pooled and froze.
- Insulation matted down and ineffective like a flattened blanket.
Owners should monitor aging runs, inspect for subtle damage, and prioritize preventive measures before catastrophic failure.
Cost vs Speed: DIY Tools vs Hiring Pros
How quickly a frozen pipe is returned to service often hinges on whether an owner opts for DIY tools or hires a professional: DIY kits and heat guns can lower immediate expense but typically require time, skill, and caution, whereas a licensed plumber costs more upfront yet usually resolves the issue faster and with diagnostic certainty that reduces downstream risk.
A DIY approach suits minor, accessible freezes when the owner is confident and follows safety guidance; it risks missed damage and slower detection of leaks. Pros deliver speed, proper testing, and warrantyed repairs, making them cost-effective when time, complexity, or potential collateral damage is significant.
DIY Heat-Tape Installation Tips for Fast Thawing
Install heat tape carefully, following the manufacturer’s layout and electrical requirements to guarantee effective, safe thawing of frozen pipes. One should disconnect power, inspect tape for damage, and lay it along the pipe’s length without overlapping.
Secure tape with approved ties, keep thermostats or self-regulating sections accessible, and route cords to grounded outlets with GFCI protection. Monitor initial operation and avoid combustible contact.
- A narrow copper pipe wrapped snugly with thin heat tape glowing faintly
- A GFCI outlet near a basement workbench
- Neat zip ties holding tape every few inches
- A labeled thermostat dial set to recommended temperature
Insulation Upgrades That Cut Thaw Times Dramatically
By adding proper pipe insulation and sealing surrounding gaps, homeowners can cut thaw times substantially while reducing heat loss during cold snaps.
Foam tube insulation, rubber sleeves, and closed-cell spray foam each offer different R-values and application methods suited to exposed, crawlspace, or exterior lines.
Insulating elbows and joints prevents localized freeze points; wrap seams with weather-resistant tape.
Increasing surrounding cavity insulation and sealing drafts with caulk or foam reduces convective losses.
For buried or outdoor pipes, apply insulated jackets and protective housings.
Regular inspection guarantees materials remain effective; degraded insulation should be replaced promptly to maintain rapid thaw performance.
Using Thermostats and Heat Zoning to Prevent Freezes
Through strategic thermostat placement and zoning, homeowners can maintain targeted warmth in vulnerable areas to prevent pipe freezes without heating the entire house. A zoned system isolates basements, crawlspaces, garages, and bathrooms, allowing slightly higher setpoints where pipes run. Programmable schedules raise temperatures before forecasted cold snaps and lower them when risk is low, saving energy. Balance dampers and smart thermostats (not sensors) distribute heat efficiently; professional zoning installation guarantees proper airflow and control. Regular verification of zone performance and thermostat calibration keeps protections reliable.
This approach reduces freeze risk while minimizing overall heating costs.
- Basement corner with exposed copper pipe warmed gently
- Crawlspace duct delivering steady, low heat
- Garage buffer zone preventing outer wall drops
- Bathroom wall cavity kept above freezing
Smart Sensors That Detect Freezing Early
Smart sensors combine temperature, humidity, and flow detection to identify freezing conditions before pipes ice over. They monitor trends, send alerts, and trigger heaters or shutoff valves to limit damage. Installation is straightforward near vulnerable runs and entry points. Data logging aids maintenance decisions and verifies environments for insurance. Battery backup and connectivity options (Wi‑Fi, Zigbee, Z‑Wave) affect reliability. Costs vary by feature; integration with smart thermostats simplifies responses. Consider sensor placement, alert thresholds, and false‑alarm reduction. Maintenance includes periodic testing and firmware updates. The table below summarizes common sensor attributes for quick comparison.
| Feature | Benefit | Typical Range |
|---|---|---|
| Temp sensor | Early warning | -40–125°C |
| Humidity sensor | Freeze risk indicator | 0–100% |
Emergency Kit Checklist for Frozen-Pipe Events
When a pipe freezes or bursts, a compact, well-organized emergency kit lets occupants act quickly to reduce water damage and begin repairs. The kit includes tools and supplies to isolate leaks, control flow, and perform temporary fixes until professional help arrives. Items are chosen for portability and immediate utility, stored together near main shutoff valves and entry points.
Regular checks make certain batteries and sealants remain effective. A simple checklist taped inside the kit guides untrained users through steps to shut water, contain leaks, and safely apply temporary patches while documenting damage for follow-up.
- Towels, buckets, tarp for containment
- Adjustable wrench, pliers
- Pipe repair tape, epoxy putty
- Flashlight, spare batteries
Estimate Repair Time & Cost After a Freeze
Evaluating repair time and cost after a frozen pipe requires a quick but methodical evaluation of visible damage, the pipe’s material and accessibility, and any secondary water damage to walls, floors, or mechanical systems.
A straightforward thaw with no rupture and accessible piping often takes an hour or two and minimal labor cost.
A leak requiring section replacement, fittings, or drywall repair extends labor and materials to several hours or days and raises costs accordingly.
Complex situations—hidden pipes, insulation removal, or mold remediation—increase time and expense further. Obtain multiple estimates and document damage for insurance or warranty claims.
Common Homeowner Mistakes That Delay Thawing
After estimating repair time and cost, homeowners often make mistakes that actually prolonging thawing and increase damage. They act hastily, use improper heat sources, or ignore systemic issues. The result is uneven thawing, burst joints, and longer disruption. Clear, measured steps prevent setbacks.
- Pointing a blowtorch at exposed copper, blackening insulation and risking fire.
- Wrapping a hair dryer in a damp towel, reducing heat output and soaking wiring.
- Turning water back on full pressure before confirming flow, stressing weakened joints.
- Leaving cabinets closed around frozen supply lines, trapping cold and delaying recovery.
Troubleshooting When Thawing Takes Longer Than Expected
Why is the thaw taking longer than expected? The homeowner should first check heat source effectiveness and continuity: low output heaters, closed vents, or intermittent power prolong thawing.
Inspect for multiple freeze points or long pipe runs that require more time.
Poor insulation or cold drafts reduce warming; sealing and adding insulation accelerates progress.
Mineral buildup or partial blockages can trap cold pockets, slowing flow restoration.
If warm water appears intermittently, controls or thermostats may be cycling.
When uncertainty persists or pressure loss, contact a plumber to avoid damage.
Document conditions to inform professional assessment.
Real-World Thaw-Time Examples (Locations & Materials)
Across different climates and pipe materials, thaw times vary widely: a short, exposed copper run in a heated basement may clear in under an hour, while a long PVC line buried in an uninsulated exterior wall can take many hours or longer.
Real-world examples illustrate typical ranges: outdoor hose bibs freeze fast but thaw quickly when warmed; attic runs without insulation stay frozen longer despite brief warm spells; slab-embedded conduits require professional intervention and extended heat; and long polyethylene service lines under cold soil resist thawing until sustained heat reaches them.
- A sunlit, exposed copper spigot thawing within 30–60 minutes
- An attic PVC branch taking several hours on a warm day
- A slab-concealed steel line needing professional thawing over many hours
- A buried polyethylene service line requiring sustained warming across days
Action Plan Checklist: Step-by-Step Unfreeze & Follow-Up
An action plan checklist outlines clear, prioritized steps for safely locating, thawing, and restoring a frozen pipe, plus immediate follow-up to confirm system integrity and prevent recurrence. The checklist directs assessment, controlled thawing, leak checks, insulation, and documentation. Each step assigns tools, safety measures, and timeframe. Prioritize shutting valves, gentle heat application, and monitoring. After thawing, inspect for damage, run fixtures, and note vulnerabilities. Schedule permanent fixes and insulation upgrades. Record actions and outcomes for future reference.
| Step | Purpose |
|---|---|
| Assess | Locate freeze, isolate zone |
| Thaw | Apply heat safely |
| Inspect | Check for leaks |
| Restore | Reopen system |
| Prevent | Insulate, document |
Conclusion
A homeowner stands in a quiet, frost-bright kitchen, listening as silence gives way to a tiny, triumphant drip. Time and steady warmth coax the ice inside the pipe to melt, rivulets racing like thawing streams toward freedom. With valves attended and safety checked, patience and careful heat restore ordinary flow. The house exhales, radiators hum, and the simple return of running water feels like sunlight after a long, cold night.