How to Bend Copper Pipe: Easy DIY Guide for Perfect Plumbing Bends
Bending copper pipe can be done easily and effectively with the right approach. Here’s a quick guide to help you achieve perfect plumbing bends:
Key Takeaways:
- Choose the Right Copper: Use soft copper or anneal hard copper before bending.
- Proper Tools: Utilize a correctly sized tube bender or a spring insert to prevent kinks.
- Mark and Measure: Clearly mark the bend point and ensure proper alignment before starting.
- Steady Technique: Apply even pressure while bending and check the angle frequently to maintain accuracy.
- Finish Up: Deburr any cuts, inspect bends for cracks, and pressure-test the system after completing your bends.
Follow these steps for a successful copper pipe bending project, and consider additional details on tool choices, minimum radii, code requirements, and common mistakes to enhance your plumbing skills.
Quick Step‑By‑Step: Bend Copper Pipe Safely
When preparing to bend copper pipe, the installer gathers the pipe, a suitable bender or spring, a marker, and safety glasses. Then, they measure and mark the bend location to guarantee accuracy.
The installer secures the pipe, aligns the bender with the mark, and applies steady pressure to form the curve, checking angle progress frequently. For tight bends, a spring insert prevents kinking; for larger radii, a hand bender provides control.
After bending, the installer inspects for cracks, smooths any deformity with appropriate tools, deburrs cut ends, and verifies the fit before proceeding with joining or installation steps.
When Should You Bend Copper Pipe Instead of Using Fittings?
Choosing to bend copper rather than add fittings can reduce material and labor costs by eliminating joints.
Fewer fittings also preserve internal smoothness, lowering turbulence and potential leak points.
The decision balances cost savings with the need for proper bending tools and clearances.
Save On Fittings
A plumber should favor bending copper pipe instead of adding fittings when the run requires only gentle direction changes and maintaining flow efficiency matters; bends reduce potential leak points and keep internal resistance lower than multiple elbows.
Bending saves material and labor: fewer couplings, solder joints, and parts to buy or install. For accessible, unobstructed runs a single well-formed bend often costs less in time and components than several fittings.
Budget-conscious jobs benefit from planning continuous lengths and using a proper bender. However, avoid overextending techniques; use fittings when structural support, replacement ease, or tight angles demand discrete joints.
Maintain Flow Integrity
If preserving smooth, efficient flow is the priority, bending copper pipe is preferable to adding fittings for runs that require only gradual direction changes.
Bends reduce turbulence, pressure loss, and potential leak points compared with multiple elbows or couplings. For long, continuous runs or when maintaining laminar flow matters—such as supply lines to appliances or radiant heating loops—use measured bend radii and proper tools to avoid kinks.
Avoid bending where sharp changes, frequent disassembly, or code-required fittings are necessary. Inspect bends for work-hardening and stress; anneal where needed.
Choose bending over fittings when uninterrupted flow, fewer joints, and system longevity outweigh convenience.
Types and Sizes of Copper Pipe for Plumbing
The discussion shifts to the common diameters used in plumbing, noting that 1/2‑inch and 3/4‑inch are typical for residential systems while larger sizes serve mains and commercial lines.
It also distinguishes soft (annealed) copper, which bends easily and suits in‑place shaping, from rigid (hard) copper, which requires fittings or heat to form.
Understanding these differences helps determine when bending is practical versus when fittings are preferable.
Common Pipe Diameters
Pipe sizing for copper plumbing uses a set of standard nominal diameters and corresponding actual outside and inside measurements that plumbers must match to fittings and flow requirements.
Common nominal sizes include 1/4″, 3/8″, 1/2″, 3/4″, 1″, 1¼”, 1½” and 2″. Each nominal size aligns with specific outside diameters—for example, Type L and M 1/2″ have a 5/8″ OD—and wall thickness varies by type, affecting internal capacity.
Choice depends on fixture demand, run length, and pressure drop. Adapters and fittings are manufactured to these standards, so correct matching prevents leaks and flow loss.
Soft vs Rigid Copper
Copper plumbing comes in two primary forms—soft (annealed) and rigid (hard)—each suited to different installation needs and bending requirements.
Soft copper is malleable, easily bent by hand or with a spring or lever bender, ideal for curved runs and retrofits; it requires annealing after work hardens occur.
Rigid copper holds shape, preferred for straight runs and when soldered fittings provide joints; bending requires mechanical benders and tighter radius control to avoid kinking.
Both types come in standard nominal diameters (K, L, M classifications affect wall thickness).
Choice depends on bend frequency, access, pressure rating, and corrosion considerations.
Soft vs Hard Copper: What You Can Bend by Hand
Many homeowners and tradespeople distinguish between soft and hard copper when deciding what can be bent by hand: soft (annealed) copper is pliable and readily forms smooth curves, while hard (drawn) copper resists hand bending and risks kinking without tools.
Soft copper, available in 1/2″ to 2″ sizes, allows gentle shaping by hand for minor routing and compact installations.
Hard copper keeps dimensional stability for straight runs and supports but requires more force to alter.
Selecting the correct type prevents damage, guarantees proper fit, and reduces leaks.
Identify markings or ask suppliers to confirm annealed versus drawn stock.
Tools You Need for Safe, Neat Copper Bends
Before bending begins, assemble a small set of purpose-built tools that guarantee clean, controlled curves and reduce the risk of kinks or damage.
Essential items include a quality tube bender sized to the pipe (3/8″–1″), a deburring tool to remove burrs after cutting, and a tubing cutter for straight, clean cuts.
A mallet with a soft face helps seat fittings without deforming pipe. Use a bending spring or support mandrel for longer runs of soft copper to maintain roundness.
Protective gloves and safety glasses complete the kit, ensuring safe, precise work and consistent, professional bends.
Optional Tools for Complex Bends
For particularly tight or intricate curves, a spring bender provides internal support to prevent kinking while allowing manual shaping.
For heavier-gauge or multiple bends where consistent radius and torque control are critical, a hydraulic pipe bender offers greater power and precision.
The choice depends on pipe diameter, wall thickness, and the required bend accuracy.
Spring Bender Use
A spring bender slips over copper tubing to support the wall and prevent kinking during tight-radius bends, making it the preferred optional tool for complex curved runs. The tool is lightweight, reusable, and suited to soft copper sizes commonly used in plumbing.
It requires minimal setup: slide the coil over the tube, bend evenly, then remove the spring.
- Protects tubing wall integrity during bends.
- Enables smooth, consistent curves without mandrels.
- Ideal for confined spaces and delicate runs.
Proper technique avoids overstressing joints; springs match tube diameter for best results.
Hydraulic Pipe Bender
Where a spring bender supports soft copper for tight, hand-controlled curves, a hydraulic pipe bender supplies rated force for larger-diameter or heavier-wall copper and for bends requiring repeatable accuracy.
The tool uses a driven ram and matched formers to produce smooth radii without kinking or wall collapse. It suits shop or on-site work where multiple identical bends are needed.
Operators select the correct die, secure the tube, and actuate slowly while monitoring alignment and springback.
Hydraulic benders demand safety awareness, maintenance of fittings and fluid, and appropriate capacity selection to avoid damage to pipe or equipment.
Choosing the Right Bend Radius
When selecting a bend radius, the installer must balance pipe integrity, flow requirements, and available space.
Guidance ties material thickness and tubing type to minimum radii to prevent kinking and flattening. Flow efficiency favors gentler curves; tight bends raise pressure loss and risk fatigue.
Space constraints sometimes force compromise, but code and manufacturer limits govern acceptable minimums. Practical choices depend on service (hot, cold, gas) and expected thermal movement.
- Follow manufacturer minimum bend radius for tubing type and diameter.
- Prefer larger radius to reduce pressure drop and stress.
- Use tighter radius only when code permits.
Prepare Pipe and Workspace
Before bending begins, the pipe and workspace should be thoroughly prepared: the tubing must be clean, free of dents and kinks, and cut squarely, while the work area should be clear, level, and well-lit with tools and supports staged for immediate use.
The operator inspects the copper for corrosion, anneals if necessary to avoid cracking, and deburrs the cut ends. Protective surfaces or clamps prevent marring.
Appropriate safety gear—gloves, eye protection—needs to be worn. Guarantee access to bending tools, a bending spring or form, measuring tape, and a marker.
Confirm adequate clearance for full bend radius and stable pipe support.
How to Measure and Mark Bend Points Accurately
The installer measures bend locations from a fixed reference point to guarantee consistent placement.
Each measurement is transferred to the pipe and a clear line is marked where the center of the bend should fall.
Accurate measuring and crisp bend lines prevent misalignment and reduce rework.
Measure From Reference
How should the installer establish a reliable starting point for each bend? The installer selects a fixed reference—wall stud, fixture centerline, or existing fitting face—and measures consistently from that datum. Consistency prevents cumulative error and guarantees alignment with fixtures.
- Measure from the reference to the pipe end, noting whether measurement is to centerline, edge, or fitting face.
- Account for bend allowance: subtract or add the manufacturer’s known offset before marking the start point.
- Record measurements on a sketch and transfer them to the pipe, rechecking distances before any bending begins to confirm accuracy.
Mark Bend Lines
With the reference point set and measurements recorded, the installer transfers those dimensions to the pipe and marks the exact bend locations. A fine-tip permanent marker or scribe creates thin, visible lines; wrap a piece of paper or masking tape to make evenly spaced marks around the circumference for orientation.
Double-check distances from the reference and between bends with calipers or a tape measure. Note bend allowance if using a bender with a specified take-up length and mark the start and center of each bend accordingly.
Clean the marking area so lines remain clear during bending and adjust if trial fittings reveal alignment shifts.
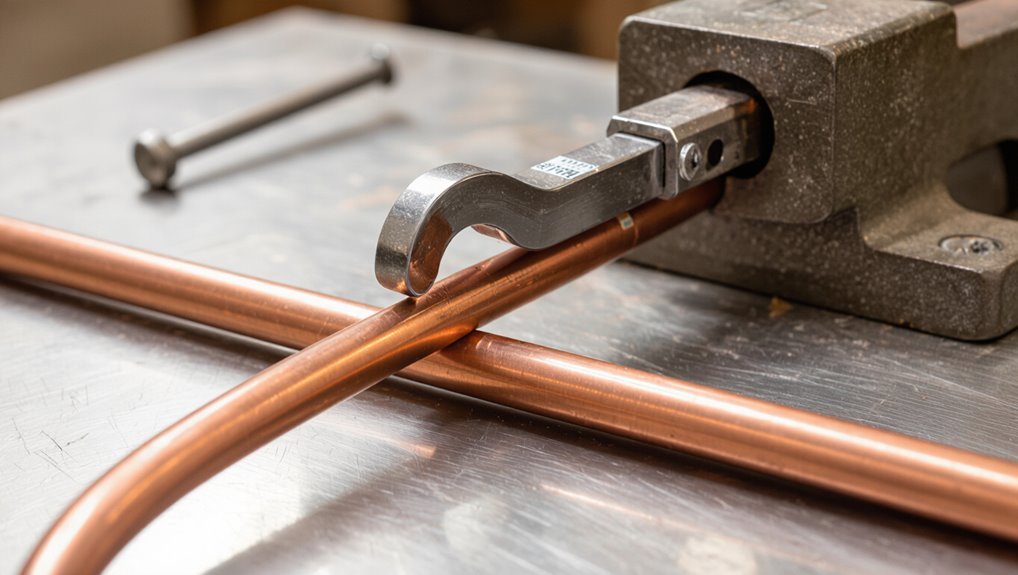
Hand‑Bending Soft Copper Pipe: Step‑By‑Step
Begin by securing the soft copper pipe firmly in a bench vise or with padded clamps to prevent twisting; this provides a stable foundation for accurate bends.
The technician measures and marks the bend point, then supports the pipe beyond the mark to control curve radius.
Using steady, even pressure, the pipe is bent by hand, rotating slightly as needed to maintain plane alignment.
After achieving the desired angle, the bend is inspected for smoothness and corrected if necessary with small, controlled adjustments.
- Measure and mark clearly.
- Support and bend slowly.
- Inspect and fine‑tune.
Using a Spring or Sleeve to Prevent Kinks
Although soft copper can be bent by hand, inserting a spring or sleeve before forming provides consistent internal support that prevents kinks and preserves flow. A spring with coils sized to the tube ID slips inside, maintaining diameter through tight radii; a split sleeve or expandable foam alternative offers similar reinforcement for larger pipes.
Positioning matters: center the support over the designated bend, secure ends to avoid migration, and remove springs when not needed. After bending, inspect for deformation and clean internal surfaces.
Springs and sleeves are inexpensive, reusable, and particularly useful where space limits gradual bends or where repeated adjustments occur.
Using a Manual Pipe Bender for Consistent Bends
After supporting the tube interior with a spring or sleeve when needed, using a manual pipe bender offers predictable, repeatable bends without kinking.
The operator aligns the pipe in the die, sets the desired angle via degree marks, and applies steady pressure to the handle. Consistent technique yields uniform radii and clean fittings-ready work.
Careful measurement and support prevent twisting or deformation. For tight spaces, select a compact bender; for thicker wall tube, use the correct size die.
Follow manufacturer guidelines for bending limits to avoid overworking the metal.
- Align pipe and die
- Set angle marks
- Apply steady pressure
Making Long Gradual Bends and Offsets
For long gradual bends and offsets, the technician selects the bending method that best suits pipe diameter and site constraints.
They maintain an even radius along the curve to prevent kinks and preserve flow.
Accurate measurement and marking guide each bend and guarantee the offset aligns with fixtures.
Choose Bending Method
When preparing to form long gradual bends or offsets in copper pipe, the installer selects a method that balances pipe diameter, bend radius, and finish quality to prevent flattening or kinking. Choices hinge on access, required curvature, and available tools.
Hand-bending with spring inserts suits soft 1/2–3/4″ tubing for gentle curves. A lever-style tube bender gives consistent results for larger diameters. For very long offsets, using a former or mandrel and slow, steady pressure minimizes distortion.
- Hand bend with spring insert — quick, low-cost, limited radius control.
- Lever tube bender — precise, repeatable, needs clearance.
- Mandrel/former — best finish, slower setup.
Maintain Even Radius
Maintaining an even radius along a long copper bend prevents flattening, creasing, and uneven stress that can weaken the tube or impair flow.
To achieve consistent curvature, the worker applies a steady, controlled force while rotating the pipe gradually through the bend. Using a form or bending spring supports the tubing internally, preventing ovaling during extended radii.
Frequent visual checks for uniform curvature and wall thickness help catch irregularities early. For offsets, equal, mirrored bends spaced correctly keep alignment without sharp changes.
Slow, deliberate motion and incremental adjustments yield smooth, predictable bends suitable for long runs and reliable flow.
Measure And Mark
Several precise measurements and clear marks are essential before forming long, gradual bends or offsets in copper pipe. The technician measures run length, accounts for bend radius, and marks neutral axis lines to maintain alignment.
Reference points on the pipe and surrounding fittings are noted; tape and pencil marks must be visible during bending. Templates or a bending jig can be aligned to marks to guarantee consistency. Steps emphasize verification before deformation to avoid costly rework.
- Measure run and offset distances.
- Mark neutral axis and start/end points.
- Cross-check against fixture locations.
Forming 90° and 45° Bends Without Fittings
Bending copper pipe to precise 90° and 45° angles without fittings requires controlled technique and the right tools to prevent kinking or ovaling.
The pipe is measured and marked, supported near the bend, and bending begins slowly using a spring or adjustable tube bender sized to the tubing. For 90°, a steady, continuous motion around the bender’s form yields a smooth curve; for 45°, stop at the appropriate index.
Check the outside radius against specifications to avoid stress. After bending, inspect for flattening or cracks, and straighten minor spring-back by small, careful adjustments.
Annealing Hard Copper Safely for Bending
Before forming tight-radius bends in hard copper, the metal is often annealed to restore ductility and reduce the risk of cracking; this controlled heating softens the copper by recrystallizing its grain structure.
The procedure requires cleanliness, controlled flame, and cooling technique. Work in a ventilated area, remove flux and oils, and secure the tube.
Heat evenly to a dull red, avoiding overheating which can scale or melt soldered joints. Quench in water if rapid cooling is desired, or allow air cooling for gentler results.
Inspect color change and test flexibility before bending.
- Prepare: clean, protect fittings, secure tube.
- Heat: even, dull-red target.
- Cool: quench or air, then test.
Avoiding Common Mistakes: Kinks, Flattening, Springback
Avoid common mistakes by recognizing their causes and using preventive techniques: kinks form when tubing is bent too sharply or without internal support, flattening occurs from uneven pressure or insufficient mandrel use, and springback results from the metal’s elasticity after forming.
Use the correct tube bending die, match bend radius to pipe diameter, and employ a mandrel or spring support for tight bends.
Apply steady, even force and avoid abrupt stops. Check alignment frequently and control heat when annealing.
Measure and mark bend points precisely. Maintain tooling and replace worn dies to guarantee consistent, professional results.
How to Fix a Kinked Copper Pipe Without Replacing It
When a copper pipe kinks but the rest of the run is sound, it can often be restored without a full replacement by reshaping the metal and repairing any compromised wall thickness; success depends on the kink’s severity, pipe diameter, and whether the line will carry potable water or be exposed to pressure.
The process: assess for cracks or splitting, then work slowly to relieve the deformation.
- Use a hardwood mandrel or rounded punch and support block to coax the kink back to shape.
- Anneal locally with controlled heat if metal work hardening prevents reshaping.
- Reinforce with a compression sleeve or internal liner if wall thinning is apparent.
Inspecting and Pressure‑Testing Bent Joints
Inspect the bent joint visually and by touch to detect cracks, creases, or thin spots that could fail under pressure; any visible breach or sharp crease warrants replacement rather than repair.
Next, cap the line and apply a controlled air or water pressure test to the system at or slightly above normal operating pressure, watching for gradual drops or audible leaks.
Use soapy water on joints to reveal micro-leaks as bubbles. Record pressure and duration; hold for several minutes to guarantee stability.
If pressure decays or bubbles appear, isolate and rework or replace the offending section before returning to service.
When to Use Fittings Instead of Bending (Code & Practicality)
After confirming a bent joint is sound, the installer must decide whether further directional changes should be accomplished by additional bends or by adding fittings.
Practicality, accessibility, and future serviceability guide the choice. Bends preserve flow and reduce leak points; fittings simplify tight maneuvers and repairs. Consider tool limits, available space, and skill level.
- Use bends when smooth flow and minimal joints are priorities, and room allows correct radius.
- Choose fittings for compact turns, fixtures, or where bending risks kinking or exceeding tool capacity.
- Prefer fittings when future disassembly, replacement, or soldering access is anticipated.
Common Code Requirements for Bent Copper Pipe
Local building codes dictate where and how copper pipe bends may be made, often referencing specific plumbing standards and inspection requirements.
Minimum bend radii must be observed to prevent kinking and guarantee flow, with the allowed radius varying by pipe type and wall thickness.
Installed bends must also meet the system’s pressure and temperature ratings so the piping remains safe and compliant under operating conditions.
Local Building Codes
When bending copper pipe, compliance with local building codes is essential because they define allowable materials, maximum bend radii, support spacing, joint types, and inspection requirements that guarantee system safety and longevity.
Codes vary by jurisdiction; professionals consult municipal plumbing codes, the International Plumbing Code (IPC), or state amendments to confirm permitted pipe types (Type K, L, M), approved fittings, and soldering or brazing standards.
Permits and inspections may be required for concealed or pressurized runs. Key considerations include corrosion protection, seismic anchoring, and accessibility for maintenance.
- Verify applicable code edition and local amendments.
- Obtain permits when required.
- Schedule inspections per code.
Minimum Bend Radii
Minimum bend radius specifications establish the smallest allowable curvature for copper pipe to prevent kinking, thinning, or undue stress that can compromise flow and longevity.
Codes typically reference pipe type (soft, hard), material temper (annealed or drawn), and nominal diameter to set radii, often expressed as multiples of pipe OD (for example, 3–6× for annealed tubing, larger for rigid).
Inspectors expect documented compliance; manufacturers publish minimums for each product.
Installers must measure bends, use appropriate tooling, and avoid exceedance.
Adhering to these common requirements preserves structural integrity, reduces leak risk, and guarantees regulatory acceptance.
Pressure And Temperature Ratings
Following minimum bend-radius considerations, pressure and temperature ratings define the operating limits for bent copper pipe and determine which alloy and temper are acceptable for a given installation.
Codes specify maximum allowable working pressures at defined temperatures; bending can reduce wall thickness and consequently rated capacity. Selection depends on system temperature, internal pressure, and fluid type. Inspectors expect compliance with standards such as ASTM and local plumbing codes.
Common considerations include:
- Temperature derating for annealed (soft) versus hard temper alloys.
- Pressure charts that match pipe size, material, and temperature.
- Safety factors and testing after bending (pressure test).
Cost and Time Comparison: Bending vs Fittings
Although initial material costs for copper fittings may appear lower on small projects, overall expenses and labor hours can shift considerably depending on project scale and complexity. A comparison weighs material, time, joint count, failure risk, and tooling. Bending reduces joints and leak points but requires skill and occasionally a bender purchase; fittings simplify geometry and speed for novices but add parts and soldering time. For longer runs with many bends, bending often lowers total cost and time. For complex networks or occasional repairs, fittings may be faster. Assess project size, access, and worker experience when choosing.
| Factor | Impact |
|---|---|
| Material cost | Varies |
| Labor hours | Varies |
| Leak points | Reduced with bends |
| Tooling | Bending requires tools |
| Scalability | Bends benefit large runs |
Maintenance Best Practices for Bent Copper Lines
Because bends change stress distribution and expose more surface area to potential corrosion, regular inspection and targeted upkeep are essential for preserving the integrity of bent copper lines.
Visual checks should look for discoloration, pinholes, and joint movement. Flush schedules help remove sediment that accelerates wear. Protective measures include proper insulation and securing brackets to prevent vibration.
- Inspect monthly for corrosion, leaks, and mechanical stress points.
- Flush annually and test water chemistry to limit corrosive conditions.
- Re-seat supports and replace deteriorated insulation to reduce fatigue and thermal cycling.
Document findings and act promptly on any anomalies.
Quick Fixes: Answers to the Most Common Bending Problems
How can common bending issues be resolved quickly and effectively? A concise troubleshooting list addresses kinks, sprung curves, and fractures.
For mild kinks, reheat the section with a torch and reform with a bending spring or proper tool; replace severely crimped segments.
For flattened bends, insert a mandrel or use an expander to restore profile.
Leaks at joints require cleaning, re-soldering or replacing fittings and ensuring proper flux and heat.
Work-hardened sections benefit from annealing then reshaping.
Prevent recurrence by supporting runs, using correct bend radius, and choosing tubing thickness suited to the application.
Conclusion
In the end, the reader is gently reminded that bending copper is a noble vanity project — like origami for plumbers — where triumph smells faintly of flux and regret. One imagines pipe obediently curving, inspectors applauding, and leaks confessing defeat. Practicality, however, sits quietly with a ruler and a fitting catalog, whispering that sometimes straight lines and commerce are kinder. Still, the bend looks lovely on a weekend warrior’s resume.