How to Turn Off Dishwasher Water Supply Fast: Step-by-Step Guide for Homeowners
To quickly turn off your dishwasher’s water supply, first, cut the power to the appliance. Next, find the dedicated shutoff valve, typically located under the sink or behind the dishwasher, and turn it clockwise to close it. If the valve is stuck, use penetrating oil and a gentle wrench, or alternatively, shut off the main water supply. Prepare towels, a bucket, and pliers to manage any residual water and potential leaks. Once the water is secured, drain and dry the area before proceeding with repairs or preventive upgrades.
How to Turn Off Your Dishwasher Water Supply Quickly and Safely
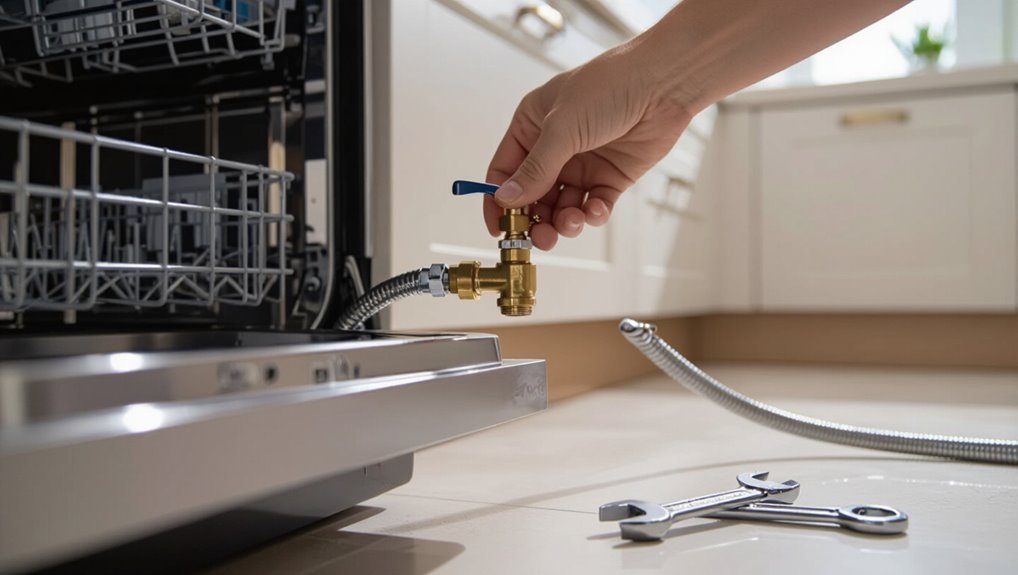
Situations such as visible leaks, overflowing water, or suspected valve failure require immediate shutdown of the dishwasher water supply to prevent water damage.
Before attempting to turn off the valve, the person should cut power to the appliance and guarantee the area is safe from electrical hazards.
They should also have towels or a bucket ready and know the location of the shutoff valve or the home’s main water supply.
When and why you might need to shut off the dishwasher water supply immediately
When should the dishwasher’s water be turned off immediately? A sudden leak, burst hose, overflowing tub, or suspected valve failure requires prompt action.
Also shut off during major plumbing repairs, electrical faults near water, or when persistent slow leaks risk water damage or mold.
Homeowners benefit from knowing how to turn off dishwasher water supply quickly to limit damage and protect flooring, cabinets, and appliances.
Safety precautions before you begin
Before attempting to shut off a dishwasher’s water supply, the person should cut power to the appliance, locate and close the correct shutoff valve, and put on basic protective gear (gloves and eye protection) to reduce risk from sharp edges, hot water, or electrical faults.
Confirm water and power are off, clear the area, have towels and a bucket ready, and call a professional if unsure.
Identify the Type and Location of Your Dishwasher Water Shutoff
The reader should first locate the dishwasher’s shutoff, which is often found under the kitchen sink, behind the dishwasher, in a basement or utility area, or at the home’s main water valve.
They can recognize the dishwasher supply by a small 3/8″ or 1/2″ braided or copper line leading to a dedicated angle stop or inline valve.
Any signs of leaking, stiffness when turned, corrosion, or obstructed access should be noted before attempting to shut the water off.
Common shutoff valve locations: under the sink, behind the dishwasher, basement or utility area, main house valve
Identifying the dishwasher’s shutoff valve begins with checking a few typical locations: beneath the kitchen sink at the cabinet’s back, directly behind or beside the dishwasher, in the basement or utility area where supply lines enter, or at the home’s main water shutoff.
Other possibilities include crawlspace access or an exterior meter box; valves vary by home age and plumbing layout, so inspect visibly and note valve type and accessibility.
How to recognize the dishwasher supply line and valve
Once likely valve locations have been checked, attention turns to recognizing the dishwasher supply line and the valve that controls it.
The supply line is a flexible braided hose or copper pipe running from a nearby shutoff to the dishwasher inlet.
The valve is typically a small quarter-turn or multi-turn stop under the sink, behind the unit, or on a small branch in a utility area.
Signs the valve is leaking, stuck, or inaccessible
Several clear signs indicate a dishwasher shutoff valve is compromised: dampness or mineral deposits around the valve, a persistent drip from the supply connection, difficulty turning the handle, or visible corrosion and mineral buildup that suggest internal failure.
Additional indicators include water stains on nearby cabinetry, unexplained decreases in water pressure, audible hissing, or a valve located behind obstructive panels or tight cabinet corners that prevent access.
Step-by-Step Fast Shutdown Procedure
A concise sequence of actions guides a quick shutdown of the dishwasher water supply.
First, gather basic tools and attempt to close the dedicated shutoff valve under the sink or the isolation valve behind the dishwasher; if neither is reachable, shut off the home’s main water supply.
Finally, confirm the supply is off and drain any remaining water from the appliance.
Step 1 Prepare tools and materials for a quick shutoff
Gather the right tools and materials before attempting a quick shutoff to guarantee the job is safe and efficient.
The homeowner assembles adjustable wrench, slip-joint pliers, flashlight, bucket, towels, and a rag. Protective gloves and safety glasses are included. A wrench size chart or adjustable option prevents delays.
A water shutoff reference card and phone for emergency contact complete the compact, ready kit.
Step 2 Turn off the dedicated dishwasher shutoff valve under the sink
Locate the dedicated dishwasher shutoff valve beneath the sink and position the flashlight for clear visibility.
A quarter-turn or multi-turn valve connects the dishwasher supply line; turn clockwise until resistance indicates closed.
Confirm closure by feeling for tautness and checking the valve stem orientation.
Open the dishwasher cycle briefly to verify no water flows, then monitor for leaks at the connection.
Step 3 If the dedicated valve is inaccessible, shut off the dishwasher at the isolation valve behind the dishwasher
If the shutoff valve beneath the sink cannot be reached, access the dishwasher’s isolation valve at the rear of the appliance for a fast shutdown.
Pull the unit slightly away from the cabinet, locate the small threaded or quarter-turn valve on the water line, and turn it clockwise to stop flow.
Verify closure by running a short rinse cycle and checking for leaks.
Step 4 If neither local valve works, turn off the home’s main water supply quickly
Shut the home’s main water supply immediately when neither the under-sink nor dishwasher isolation valves can stop the leak; this halts flow to all fixtures and prevents further water damage while the appliance is secured.
Locate the main shutoff—usually near the meter, basement, or exterior wall—turn the valve clockwise or close the lever, then notify household members and prepare for repairs or professional assistance.
Step 5 Verify water is off and drain remaining water from the dishwasher
Confirm the water is fully off and remove any standing water to prevent damage and make repairs safer.
The homeowner checks the inlet hose and nearby faucet for no flow, then opens the dishwasher door and uses towels and a cup to scoop remaining water from the tub.
If equipped, run a short drain cycle powered off or manually tilt the appliance to expel residual water.
Alternative Fast Actions for Active Leaks
When shutting off the dishwasher supply, immediate stop-gap measures can limit damage while the valve is closed.
A bowl or towel can catch drips, or a bucket and a wet/dry vacuum can speed water removal.
Temporary repairs such as pipe tape, a compression coupling, or a hose clamp may provide short-term control until a proper fix is made.
Use a bowl or towel to contain leaking water
Place a shallow bowl or several absorbent towels beneath the leak to catch escaping water and prevent spreading while further steps are taken.
The container or towels should be positioned to catch drips without disturbing connections. Replace saturated towels promptly and wring into a sink or bucket.
Continue monitoring and repositioning as needed until the supply is shut off or repairs begin.
How to use a bucket and wet/dry vacuum for faster cleanup
Grab a sturdy bucket and a wet/dry vacuum to accelerate cleanup of pooling water. The bucket collects large volumes quickly while the vacuum removes residual moisture from floors and crevices.
Empty the bucket into a drain as needed, wring towels into it, and run the vacuum over grout lines and under cabinets.
Park fans for faster drying and check for hidden dampness.
Temporary fixes: pipe tape, compression coupling, or hose clamp for immediate control
Act quickly to limit water damage by applying temporary fixes like pipe tape, a compression coupling, or a hose clamp to control active leaks until a permanent repair can be made.
These measures provide short-term sealing: wrap pipe tape tightly, position a compression coupling over the damaged area, or clamp a rubber patch with a hose clamp.
Seek professional repair promptly to guarantee safety and durability.
Troubleshooting Common Problems During Shutdown
When the shutoff handle is seized, recommended approaches include applying penetrating oil, using a wrench with a cloth to protect the fitting, and gently working the valve back and forth to free it.
If no visible valve can be found, checking under the sink, behind toe kicks, and at the home’s main water access or utility room can reveal hidden shutoffs.
If water continues after the valve is closed, inspect for a secondary supply line, a failed valve seat, or the need to shut off the main water to the property.
Valve is stuck or hard to turn safe methods to free it
A seized or stiff shutoff valve can prevent a timely water stop, so it should be approached methodically to avoid damage or leaks.
Apply penetrating oil, wait per instructions, then gently work the valve back and forth with appropriate pliers or a wrench; avoid excessive force.
If still immobile, shut off the main supply and call a plumber to replace the valve safely.
No visible shutoff valve how to locate hidden valves
If no shutoff valve is visible near the dishwasher, the homeowner should systematically search common concealed locations—under the sink, behind the toe-kick panel, inside adjacent cabinets, and along the basement or crawlspace ceiling directly below the appliance—to locate an inline or shared shutoff.
Check the water supply line for a small ball or angle valve, inspect nearby utility shutoffs, and follow plumbing runs to find hidden access points.
Water still flowing after valve closure what to check next
Check the valve handle and surrounding fittings for obvious defects or leaks before assuming the shutoff failed: a partially closed valve, a stripped stem, a faulty washer, or a bypassing supply connection can allow water to keep flowing despite the handle being turned.
Inspect downstream fittings, supply hose crimps, dual supply lines, and nearby isolation valves; consider turning off the main water and calling a plumber if flow persists.
Preventive Measures to Avoid Emergency Shutoffs
To reduce the likelihood of emergency shutoffs, the article recommends regular testing and maintenance of the dishwasher shutoff valve, including exercising and inspecting it for leaks or stiffness.
Consider upgrading to accessible or quarter-turn shutoff valves to guarantee reliable, quick operation when needed.
For added protection, installing an automatic water shutoff device can stop leaks before they escalate.
How to test and maintain the dishwasher shutoff valve periodically
Regularly exercising and inspecting the dishwasher shutoff valve helps catch wear and leaks before they become emergencies.
Every three months, turn the valve fully off and on to prevent stiffness. Inspect for drips, corrosion, and loose fittings.
Tighten packing nuts gently if minor seepage appears. Replace washers or the valve promptly when leaks persist or operation feels rough.
Upgrading to accessible or quarter-turn shutoff valves
Consider replacing old angle stops with accessible or quarter-turn shutoff valves to reduce response time and failure risk during leaks.
Homeowners benefit from valves that require only a 90-degree turn, resist seizing, and fit tight spaces under sinks.
Professional replacement guarantees correct sizing, proper connections, and compliance with local codes, improving reliability and making emergency shutoffs faster and less stressful.
Installing an automatic water shutoff device for the dishwasher
When a leak threatens floors or cabinetry, an automatic water shutoff device for the dishwasher provides rapid, reliable isolation by sensing flow, leaks, or abnormal pressure and closing the supply line without homeowner intervention.
Installation involves mounting a valve on the supply, connecting sensors or flow meters, wiring to a controller, and testing operation.
Periodic battery and sensor checks guarantee continued protection.
After the Emergency: Repair and Restoration Steps
After shutting off the supply and containing any water, the homeowner should inspect hoses, fittings, and the dishwasher inlet for visible damage or corrosion.
Minor issues like loose fittings or a split hose can be handled with basic tools and replacement parts, but persistent leaks, hidden damage, or uncertain shutoff valves warrant calling a licensed plumber.
Once repairs are complete, restore the water slowly, observe all connections for leaks, and run a short cycle to confirm the dishwasher operates normally.
Inspecting hoses, fittings, and the dishwasher inlet for damage
Begin by visually and physically examining the dishwasher’s supply hoses, couplings, and inlet port for cracks, corrosion, bulging, frayed braid, mineral buildup, or loose connections that could cause leaks or restrict flow.
Note pinholes, stiff or soft spots, stripped threads, and mineral deposits around fittings.
Document damage, tighten loose fittings gently, and remove light buildup with a brush; replace compromised parts promptly.
When to call a licensed plumber vs. DIY fixes
If homeowners are comfortable with basic tools and have already isolated the water supply, they can handle routine checks and minor repairs—tightening fittings, replacing a damaged hose, or clearing mineral buildup.
However, signs of extensive corrosion, persistent leaks, compromised shutoff valves, water damage to cabinets or floors, or uncertainty about the appliance’s internal valves warrant calling a licensed plumber.
Professional help is advised for hidden leaks, electrical interaction, or repeated failures.
Steps to restore water and test for leaks after repair
Once repairs are complete and fittings are secure, the water supply should be restored slowly while monitoring for leaks and proper operation.
Open the shutoff slowly, check all connections and hose junctions for drips, inspect under the sink and around the dishwasher base.
Run a short cycle to confirm drainage and no leaks, and tighten or reseal any weeping joints before full use.
Quick Reference: Fast Shutdown Checklist
Refer to this compact checklist to shut off a dishwasher water supply quickly and safely:
- Locate the dishwasher shutoff valve beneath the sink or at the appliance.
- Turn valve clockwise until fully closed; use pliers if stiff.
- Disconnect power at the breaker before handling connections.
- Open nearest faucet and run dishwasher to confirm water is stopped and no residual pressure remains.
Comparison of Shutoff Options and Reliability
Having completed the quick shutdown checklist, the next step is to compare available shutoff options and their reliability to determine the best choice for a given installation. Evaluate valve accessibility, failure modes, and maintenance frequency. Consider isolation valves, braided hose shutoffs, and automatic leak detectors for pros, cons, and reliability trade-offs.
| Option | Reliability notes |
|---|---|
| Isolation valve | High if brass, accessible |
| Automatic detector | Variable; needs power and testing |
Conclusion
When a dishwasher leak or malfunction demands immediate attention, the homeowner can act decisively by locating and closing the correct water shutoff—under-sink valve, dedicated appliance valve, or the home’s main—then disconnecting power if necessary. Acting quickly can stop damage in its tracks, saving time and expense. With preventive checks and basic repairs arranged afterward, the problem will be put to bed, and normal kitchen life can be restored without breaking the bank.