How to Clean an Electric Wall Heater: Step-by-Step Safe Guide
To clean your electric wall heater safely, first turn off the power at the breaker and confirm with a tester. Remove the grille, vacuum dust using a brush attachment, and gently clean the fins and heating elements. Wipe down the covers with a mild detergent. Inspect the wiring, contacts, and filters; replace any damaged parts or consult a professional for issues like corrosion or persistent odors. After reassembling, restore power and monitor the heater’s first run for any unusual sounds or smells. For additional troubleshooting steps, refer to the guide below.
What It Takes to Clean an Electric Wall Heater Safely
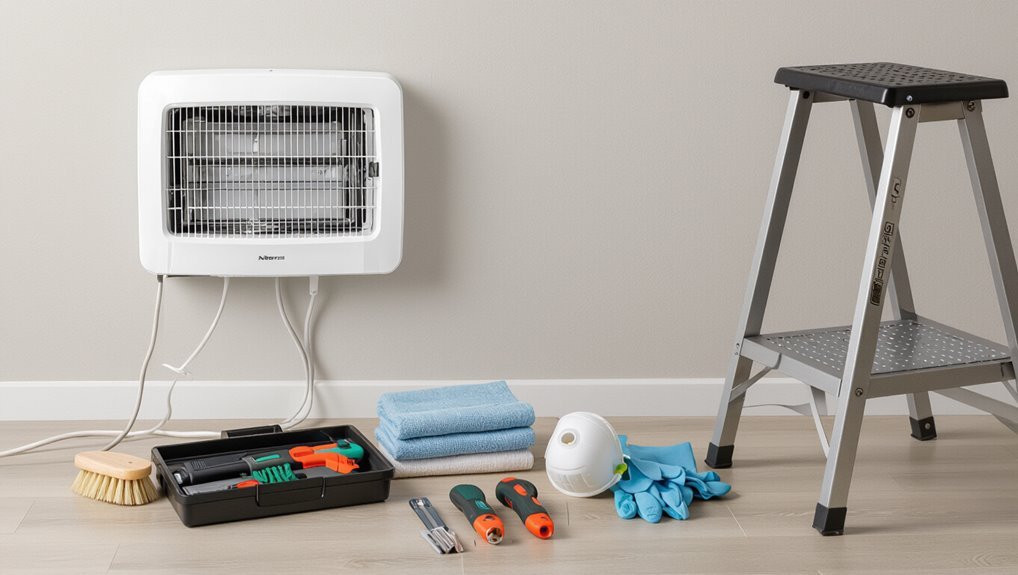
Before beginning, the writer lists the essential tools and materials required for cleaning an electric wall heater, from screwdrivers and soft brushes to vacuum attachments and appropriate cleaning agents.
They emphasize required safety equipment and precautions—power shutoff, insulating gloves, and eye protection—along with steps to verify the circuit is de-energized.
The writer then explains how to identify the heater’s type and model so the correct cleaning method and replacement parts can be selected.
Tools and materials checklist
A concise checklist of tools and materials guarantees the cleaning process is efficient and safe.
The reader learns essential items needed to follow how to clean electric wall heater steps without interruption.
- Vacuum with brush attachment
- Soft cloths and small brushes
- Screwdrivers and flashlight
- Replacement filter or contacts cleaner
Safety equipment and precautions before you start
When preparing to clean an electric wall heater, the user should prioritize personal protective equipment and electrical safety measures to prevent injury and damage.
Recommended PPE includes insulated gloves, safety glasses, and a dust mask.
Verify power is disconnected at the breaker and confirm with a voltage tester.
Work in dry conditions, use a stable ladder if needed, and keep a fire extinguisher nearby.
How to identify your heater type and model
Having confirmed power is off and personal protective equipment is in place, the next step is to identify the heater type and model so cleaning methods match the unit.
Inspect the exterior for manufacturer labels, model and serial numbers, and voltage ratings.
Note grille style (convection, fan-forced, or baseboard).
Photograph labels, consult the manual or manufacturer website, and record specifics before cleaning.
Quick Safety Overview and Immediate Answer
A qualified homeowner can usually clean an electric wall heater safely by turning off power, removing dust and debris, and following the manufacturer’s instructions.
A professional should be hired if the unit has damaged wiring, persistent odors, strange noises, or requires internal repairs beyond basic cleaning.
When in doubt about electrical components or safety, opting for a technician is the safest choice.
Can you clean an electric wall heater yourself? (short, clear answer)
Yes — with basic tools and precautions, a homeowner can safely clean an electric wall heater.
Routine tasks like dusting, vacuuming vents, and wiping accessible surfaces are manageable. Power must be turned off and safety steps followed.
Avoid disassembling complex components or touching wiring unless qualified.
Proper cleaning improves efficiency and reduces fire risk when done correctly and carefully.
When to hire a professional instead
When should a professional be called?
A technician is advisable if the heater shows electrical faults, persistent odors, smoke, burning marks, tripped breakers, damaged wiring, malfunctioning thermostats, or internal component issues.
Also hire a pro for complex disassembly, uncertain diagnoses, or if local codes require licensed work.
For safety and warranty preservation, avoid DIY beyond basic cleaning when these signs appear.
Preparation Steps Before Cleaning
Before cleaning, the power to the electric wall heater should be turned off at the breaker and verified with a noncontact tester to confirm no live electricity remains.
Furniture and floor areas near the heater should be moved or covered to protect them from dust and debris.
The heater cover or grille should then be removed according to the manufacturer’s instructions, using appropriate tools and care to avoid damaging fasteners or sharp edges.
How to turn off power and verify it’s off
Shut off the heater’s power at the circuit breaker and at the unit’s switch, then confirm the circuit is dead before beginning work.
Lock or tag the breaker if available.
Use a non-contact voltage tester on heater terminals, controls, and nearby wiring to verify absence of voltage.
Test the tester on a live source before and after.
Proceed only when all checks show no power.
Removing furniture and protecting surrounding areas
With power confirmed off at the breaker and at the unit, attention turns to clearing and protecting the work area.
Remove furniture, rugs, and wall hangings within two meters. Cover nearby floors and belongings with drop cloths or plastic sheeting. Tape edges to prevent dust migration.
Guarantee clear access for tools and a safe, unobstructed path for removing debris to minimize damage and tripping hazards.
Removing the heater cover or grille safely
Begin by inspecting the heater faceplate and surrounding trim to identify fasteners, clips, or tabs that secure the cover.
Power must be off at the breaker and confirmed.
Use appropriate screwdriver or gently depress clips; support the grille while loosening.
Lift or swing the cover free, noting hinge orientation.
Place hardware and cover on a clean surface to avoid scratches or loss.
Step-by-Step Cleaning Process
The cleaning process proceeds in clear stages, beginning with vacuuming dust from vents and interior components and following with gentle brushing and wiping of heating elements and fins.
Next, attention turns to the grille, cover, and exterior surfaces, with targeted methods for stubborn grime or buildup.
Finally, the heater is reassembled and subjected to final checks to confirm safe operation.
Vacuuming dust from vents and interior components
Before vacuuming, the heater should be powered off at the breaker and allowed to cool. Any removable grille or cover must be taken off to expose the vents and interior components.
Using a vacuum with a soft brush attachment, gently remove loose dust from vents, fan housing, and accessible surfaces. Avoid forcing the nozzle into tight gaps and keep vacuuming steady to prevent dislodging fragile parts.
Brushing and wiping heating elements and fins
Using a soft-bristled brush and a lint-free cloth, carefully loosen and remove dust from heating elements and fins, working along the length of each fin to avoid bending them.
Support fins with one hand when accessible, brush gently into a handheld vacuum nozzle, then wipe residual dust with the cloth.
Inspect for corrosion or damage; stop and consult a technician if deformities or burnt residue are present.
Cleaning the grille, cover, and exterior surfaces
After removing dust from the fins and elements, attention turns to the grille, cover, and external surfaces to complete the cleaning.
The grille is wiped with a microfiber cloth dampened in mild detergent solution, then rinsed and dried.
Metal covers can be vacuumed and wiped; plastic exteriors cleaned with a mild soap solution.
Confirm all parts are fully dry before reassembly and power restoration.
Dealing with stubborn grime or buildup
Tackle stubborn grime methodically, progressing from gentler methods to stronger ones to protect finishes and internal components.
Begin with a soft brush and mild detergent, then use cotton swabs for crevices.
For grease, apply a degreaser sparingly and let it sit briefly before wiping.
Avoid abrasive tools near heating elements; test solvents on a small area first to ascertain compatibility.
Reassembling the heater and final checks
Once grime and buildup have been removed and surfaces are dry, reassembly can begin with a methodical, component-by-component approach.
Reinstall the heating element, guard, and grille in reverse order of disassembly, securing screws evenly.
Reconnect power only after confirming wires are properly seated and insulation intact.
Perform a final visual inspection, restore power, and run the heater briefly to verify normal operation and absence of unusual noises.
Maintenance Tasks After Cleaning
After cleaning, the heater should be tested with a monitored first run to confirm proper operation and to catch unusual noises or odors.
The article then outlines recommended cleaning frequency based on usage and environment.
Finally, a concise checklist of simple monthly and seasonal maintenance tasks is provided to keep the unit reliable.
Testing the heater and monitoring first run
Power the unit and observe its initial cycle to confirm safe operation and proper performance.
Note any unusual noises, odors, sparks, or tripped breakers.
Verify thermostat responsiveness and steady heat output across settings.
Reinspect visible connections for warmth or discoloration.
After 15–30 minutes, turn unit off, allow cooling, then perform a brief visual check.
Record findings and schedule repairs if anomalies appear.
Recommended cleaning frequency
Regularly scheduled cleanings help maintain efficiency and safety; for most electric wall heaters, a thorough cleaning every 6 to 12 months is sufficient, with biannual service recommended in dusty environments or where pets shed.
More frequent checks are warranted after heavy use, renovation dust, or odor/smoke detection.
Replace filters and inspect wiring as part of scheduled maintenance to prevent performance degradation and fire risk.
Simple monthly and seasonal maintenance checklist
Create a concise checklist to follow each month and at the start of heating and off-season periods to keep an electric wall heater reliable and safe.
Monthly and seasonal tasks focus on quick inspections, simple upkeep, and readiness.
- Inspect grille and housing for debris or damage.
- Test thermostat and controls for proper function.
- Check mounting and electrical connections for security.
- Schedule professional service if faults or unusual noises appear.
Common Problems Found During Cleaning and How to Fix Them
During cleaning, common issues such as loose wiring, buzzing, or unusual smells require immediate attention to prevent hazards.
Corrosion, rust, or damaged heating elements must be assessed to determine whether repair is feasible or replacement is safer.
Blocked airflow and compromised insulation are frequent causes of poor performance and should be cleared or repaired before reassembly.
Loose wiring, buzzing, or unusual smells immediate actions
If any loose wiring, buzzing sounds, or unusual smells are noticed while cleaning an electric wall heater, power should be cut at the breaker immediately and the panel locked or tagged to prevent accidental re-energizing.
The area should be ventilated, and visible loose connections noted. Do not restore power.
Contact a qualified electrician to inspect, diagnose, and repair; document findings for safety records.
Corrosion, rust, or damaged elements repair vs. replace
After cutting power and documenting any loose wiring or burning smells, attention should turn to inspecting elements and metal components for corrosion, rust, or physical damage.
Light surface rust may be cleaned and treated with rust inhibitor; minor pitting requires monitoring.
Severely corroded heating elements, warped fins, or compromised connections necessitate replacement.
Always follow manufacturer guidance and consult a licensed electrician for replacements.
Blocked airflow and insulation issues
Inspecting for blocked airflow and damaged insulation is essential because restricted circulation and deteriorated padding reduce heater efficiency and create fire hazards.
During cleaning, the technician removes lint, dust, and debris from vents and blower paths, checks insulation for brittleness or charring, and replaces compromised padding with heat-rated materials.
Restore clear airflow and proper insulation to guarantee safe, efficient operation.
Safety Risks and How to Avoid Them
Cleaning an electric wall heater carries specific safety risks that merit attention, including fire hazards from lint and dust accumulation.
There is also a danger of electrical shock unless proper lockout procedures are followed to disconnect power before work begins.
Additionally, certain cleaning methods or unauthorized disassembly can void the manufacturer’s warranty.
Fire hazards from lint and dust accumulation
Lint and dust buildup inside an electric wall heater can create a serious fire hazard by insulating heating elements, restricting airflow, and providing combustible material that ignites at high temperatures.
Regular inspection, vacuuming with a brush attachment, and removing lint from vents reduce risk.
Replace damaged filters, clear nearby combustibles, and schedule professional cleaning if deposits are extensive or heating performance is uneven.
Electrical shock risks and proper lockout procedures
Any contact with live terminals or damaged wiring in an electric wall heater can cause severe electric shock or electrocution.
Technicians must de-energize circuits, verify zero voltage with a tester, and lockout/tagout breakers or disconnects.
Wear insulated gloves and tools, keep panels closed when not servicing, and post warnings.
Never assume power is off without testing; follow local electrical codes.
When cleaning could void the warranty
When might routine maintenance cross the line into warranty-voiding territory? The manufacturer’s warranty often forbids unauthorized disassembly, tampering with safety switches, or using nonapproved replacement parts.
Cosmetic cleaning is usually safe; internal repairs or altering wiring typically void coverage.
Always consult the manual, record service actions, and contact authorized technicians to preserve warranty rights and guarantee safe, compliant maintenance.
Energy Efficiency and Performance Benefits of Regular Cleaning
Dust buildup on an electric wall heater reduces airflow and forces the unit to run longer, increasing energy use and lowering heat output.
Regular cleaning restores efficient airflow and helps maintain designed heating performance.
If the heater still runs cold, cycles frequently, or causes unusually high bills after cleaning, these are signs of underperformance that warrant professional inspection.
How dust buildup affects energy use and heating performance
Efficiency declines as dust accumulates inside an electric wall heater, creating insulation over heating elements and restricting airflow.
This forces the unit to run longer and at higher power to reach the same temperature, increasing energy consumption and operational costs.
Reduced heat transfer also causes uneven room temperatures, greater thermostat cycling, accelerated wear on components, and higher peak loads that shorten lifespan and raise maintenance needs.
Signs your heater is underperforming despite cleaning
Detecting subtle signs that an electric wall heater is still underperforming despite recent cleaning helps pinpoint lingering problems quickly.
Indicators include uneven heat distribution, slow warm-up times, higher-than-expected energy bills, persistent odors or noise, frequent cycling, tripped breakers, and thermostat discrepancies.
These symptoms suggest issues beyond surface dust—faulty elements, wiring, controls, or airflow restrictions—warranting professional inspection and targeted repairs.
Product and Tool Recommendations
Recommended tools include a crevice tool, soft-bristle brush, and a brush attachment with low suction for use with a household vacuum to remove dust from vents and fins.
For surface cleaning, a mild, non-abrasive detergent solution or isopropyl alcohol on a soft cloth is appropriate, while ammonia, bleach, and oil-based cleaners should be avoided.
Protective gloves and a mask are advised when handling dust and cleaning agents.
Best vacuum attachments and brushes for wall heaters
Choosing the right vacuum attachments and brushes can greatly reduce dust buildup and prevent damage when cleaning an electric wall heater.
Recommended tools focus on soft bristles and narrow reach to protect fins and electrical components.
- Soft-bristle dusting brush for grills and louvers.
- Crevice tool for gaps and vents.
- Upholstery brush for removable filters.
- Mini motorized brush for stubborn debris.
Safe cleaning solutions and what to avoid
After selecting gentle vacuum attachments and brushes to protect fins and components, attention turns to which cleaning solutions and tools are safe to use — and which should be avoided.
Use mild dish soap diluted in water, isopropyl alcohol sparingly on non-painted metal, microfiber cloths, and soft brushes.
Avoid harsh solvents, bleach, abrasive pads, pressurized water, and metal scrapers that damage coatings or electrical parts.
Troubleshooting Table for Common Symptoms
A concise troubleshooting table helps identify when an issue is beyond routine cleaning and requires a licensed HVAC technician or electrician. The table below lists common symptoms, likely causes, and recommended action to clarify when professional service is appropriate. If the recommended action indicates a professional, stop attempts at DIY and contact a licensed provider.
| Symptom | Likely Cause | Recommended Action |
|---|---|---|
| No heat | Tripped breaker or failed element | Reset breaker; if unresolved, call an electrician |
| Intermittent operation | Loose wiring or faulty thermostat | Turn off power and call an electrician |
| Burning smell or smoke | Overheated components or electrical fault | Cut power immediately and call a licensed HVAC/electrician |
When to call a licensed HVAC or electrician
When should a homeowner call a licensed HVAC technician or electrician for an electric wall heater?
A professional is needed for persistent no-heat conditions, frequent tripping breakers, burning odors, visible smoke, exposed wiring, overheating, faulty thermostats, or after attempted DIY fixes failed.
Also contact a pro for complex component replacements, safety inspections, code compliance, or if uncertainty about electrical systems exists.
Maintenance Log Template and Checklist for Homeowners
One concise maintenance log template helps homeowners track inspections, cleaning, and repairs for electric wall heaters over time.
It records dates, actions, observations, technician contacts, and next due tasks. Use simple entries to identify patterns and prioritize safety.
- Date and inspector
- Cleaning performed
- Issues found and repairs
- Next inspection due
Conclusion
Regular cleaning keeps the electric wall heater safe, efficient, and reliable; regular inspection prevents dust buildup, loose connections, and overheating; regular maintenance preserves lifespan, improves airflow, and reduces energy bills. Following simple preparation, careful cleaning steps, and periodic post-clean checks minimizes risk, guarantees steady heat output, and supports warranty compliance. With routine attention, homeowners protect comfort, conserve energy, and avoid costly repairs—turning a neglected appliance into a dependable, long-lasting component of the home.