How to Put a Compression Fitting on a Copper Pipe: Step-by-Step Guide for Beginners
To successfully install a compression fitting on a copper pipe, follow these steps: First, ensure the pipe is cut square and deburred. Slide the nut and ferrule onto the pipe, then insert it into the fitting body until it seats. Hand-tighten the nut, then use two wrenches to tighten it an additional quarter to half turn. Finally, check for leaks and retighten if necessary. Always adhere to torque specifications and safety precautions to prevent damage. For more detailed guidance, continue reading.
What a Compression Fitting Is and When to Use It
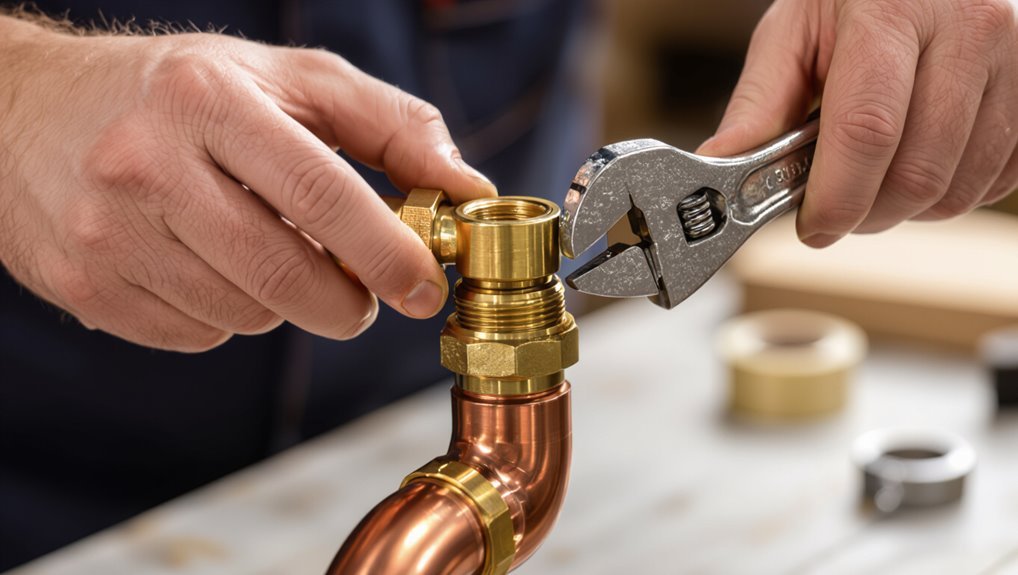
A compression fitting consists of a nut, ferrule (ring), and body that compress onto a copper tube to create a mechanical seal.
It is commonly used for small-diameter water lines, meter connections, and situations where heat from soldering is undesirable.
Compared with soldered and push-fit joints, compression fittings offer a reliable, serviceable connection but can be bulkier, more prone to leaks if not tightened correctly, and less suitable for very high-pressure or permanent installations.
Definition and basic components of a compression fitting
Compression fittings are simple mechanical joints that join copper pipe without soldering, relying on three basic parts: the nut, the ferrule (or olive), and the fitting body.
The nut compresses the ferrule onto the pipe against the fitting body to create a seal. Understanding these components is essential when learning how to put a compression fitting on a copper pipe correctly and reliably.
Common applications for copper pipes
Knowing the nut, ferrule, and fitting body sets the stage for recognizing when compression fittings are appropriate.
Copper pipes commonly serve potable water supply, chilled-water HVAC lines, and small-diameter refrigeration circuits. They also appear in domestic gas services, hydronic heating loops, and instrument lines where corrosion resistance and thermal conductivity matter.
Compression fittings suit accessible joints and retrofit repairs without soldering.
Advantages and limitations compared with soldered and push-fit connections
Weighing speed, skill level, and serviceability guides the choice between compression fittings, soldered joints, and push-fit connectors.
Compression fittings require moderate skill, no heat, and allow disassembly for maintenance, but can leak if overtightened and are bulkier.
Soldered joints are permanent and slim but need torch skills.
Push-fit is fastest and foolproof yet costlier and less suited for long-term high-temperature or concealed runs.
Tools and Materials You’ll Need
To install a compression fitting on copper pipe, gather basic tools—adjustable or open-end wrenches, a pipe cutter, deburring tool, and a measuring tape—and the necessary materials such as the compression fitting parts, copper pipe, PTFE tape, and emery cloth.
Optional tools like a tube cleaning brush or vice can speed the job and improve fit. Having everything organized before starting reduces errors and rework.
Required tools (wrenches, pipe cutter, deburring tool, measuring tape)
A small set of basic tools makes installing a compression fitting on copper pipe straightforward: two adjustable wrenches for tightening the nut, a quality pipe cutter for clean cuts, a deburring tool to remove sharp edges and interior burrs, and a measuring tape to guarantee correct lengths and fittings placement.
Optional aids include a marker for cut lines and a small brush to clear filings.
Required materials (compression fitting parts, copper pipe, PTFE tape, emery cloth)
After gathering the basic tools, attention shifts to the materials that will actually form the joint.
Essential items include the compression fitting (nut, ferrule/olive, and body), appropriately sized copper pipe, PTFE tape for threaded connections, and emery cloth to clean and polish pipe ends.
Confirm fittings match pipe diameter and that the pipe is free of burrs, corrosion, and oil before assembly.
Optional tools for convenience ()
Several handy extras can speed the job and improve results: a tube cutter for clean, square cuts; a deburring tool to remove inner lip; a small adjustable wrench or two for easier tightening; slip-joint pliers for holding fittings; and a soft-jaw vise or pipe clamp to prevent marring.
- Flashing light or headlamp
- Magnetic parts tray
- Small brush for cleaning burrs
Safety Precautions and Preparations
Before starting, the water supply should be shut off and the line drained to prevent leaks and water damage.
The work area and nearby finishes ought to be protected, and appropriate personal protective equipment such as gloves and eye protection should be worn.
The copper pipe should be inspected for corrosion, cracks, or incompatible sizing to guarantee a proper, reliable seal.
Turning off water supply and draining the line
Shut off the appropriate water supply valve to isolate the section of pipe where the compression fitting will be installed.
Then open nearby faucets or a drain cock to relieve pressure and remove standing water from the segment.
Use a bucket and absorbent cloths to capture residual moisture.
Confirm no flow at the work area before cutting or disassembling the pipe to prevent leaks and water damage.
Protecting surrounding areas and using personal protective equipment
While preparing to work on the copper pipe, make sure the immediate area is cleared of combustible materials, valuables, and tripping hazards.
Cover nearby surfaces with drop cloths or plastic sheeting to catch debris and water.
The worker should wear safety goggles, gloves, and hearing protection if cutting; use knee pads for prolonged crouching; guarantee adequate lighting and ventilation; keep a fire extinguisher nearby.
Checking pipe condition and compatibility
Inspect the copper pipe visually and by touch to confirm it is clean, undamaged, and the correct type for a compression fitting.
Verify diameter and wall thickness match the fitting specification.
Check for corrosion, dents, kinks, or soft spots.
Ascertain pipe ends are free of burrs and properly cut square.
Replace or repair any compromised sections before proceeding to installation.
Measuring and Cutting the Copper Pipe
Accurate measurement guarantees the pipe extends the correct distance into the compression fitting without stressing the joint.
The pipe should be cut squarely with a proper tubing cutter and then the cut end deburred and cleaned to remove burrs and oxidation. These steps prevent leaks and make assembly straightforward.
How to measure for a proper fit
A few careful measurements confirm the compression fitting seats correctly and the joint remains leak-free.
The installer measures twice: overall run length and insertion depth specified by the fitting manufacturer. Allow clearance for ferrule and nut, and mark pipe end for square cut.
Account for any elbows or valves, subtracting their port depths. Recheck marks before cutting to confirm exact fit.
Correct cutting technique with a pipe cutter
Begin by securing the marked copper pipe in a vise or clamp to prevent rotation.
Then position the pipe cutter so its cutting wheel aligns exactly with the mark.
Tighten the cutter moderately, rotate the tool around the pipe, and after each full rotation, incrementally tighten the wheel.
Maintain even pressure and smooth turns until the cutter severs the pipe cleanly without crushing.
Deburring and cleaning the cut end
With the cut complete and the pipe removed from the cutter, attention turns to dressing the end so fittings seal and seat properly.
Burrs are removed with a deburring tool or reamer, chamfering the inside and slightly beveling the outside.
The surface is then cleaned with emery cloth or a brush to remove filings, oil, and oxidation, ensuring a smooth, contaminant-free joint for the compression fitting.
Assembling the Compression Fitting Step-by-Step
The assembler first verifies the nut, ferrule, and fitting body for damage and places the nut then the ferrule onto the pipe with the ferrule beveled side toward the fitting.
The pipe is fully inserted into the fitting body, the nut is hand-tightened and the parts aligned.
Final tightening is performed with two wrenches—one to hold the fitting body and one to turn the nut—using the manufacturer’s recommended turns or torque.
Inspecting the fitting parts and orienting the nut and ferrule
Before assembly, each component of the compression fitting should be inspected for damage, cleanliness, and correct sizing: the nut must thread smoothly without burrs, the ferrule should be free of dents and correctly chamfered, and the body bore must be clear of debris.
Next, orient the ferrule with its tapered face toward the fitting body and confirm the nut’s chamfer faces outward for proper engagement during tightening.
Sliding nut and ferrule onto the pipe
Slide the nut onto the pipe followed by the ferrule so the tapered side of the ferrule faces the fitting body; the nut’s threads should face outward to allow later engagement.
The installer positions the ferrule about 1/8–1/4 inch from the pipe end, keeping it square and undamaged.
Hands should push components snugly without forcing, ensuring alignment before proceeding.
Inserting pipe into fitting body to the correct depth
Insert the prepared pipe into the fitting body until it seats firmly against the internal stop, ensuring the ferrule remains about 1/8–1/4 inch from the pipe end and square to the fitting.
Verify alignment visually and by touch, confirming the pipe is fully seated without gaps.
Maintain steady pressure to prevent backing out, then inspect for burrs or misalignment before proceeding to the next step.
Hand-tightening the nut and initial alignment
With the pipe held fully seated in the fitting and the ferrule positioned correctly, the installer brings the compression nut up over the ferrule and threads it onto the fitting body by hand.
They snug the nut until it meets resistance, ensuring the pipe remains fully inserted and the ferrule stays centered.
The assembly is checked visually for straight alignment before any wrenching.
Final tightening technique with two wrenches and torque guidance
Begin tightening using two wrenches: one holds the fitting body steady while the other turns the compression nut.
The operator snugly applies a quarter to half turn past hand-tight to seat the ferrule, preventing overtight. Maintain alignment, feel for resistance.
If available, follow manufacturer torque specs (typically 10–20 ft·lb).
Recheck after pressurizing for leaks and retighten minimally if needed.
Testing the Connection
After assembly, the water should be turned on slowly while the joint is observed for any signs of leakage.
Minor drips can often be corrected by slight retightening or reseating the nut and ferrule, while persistent leaks may require disassembly and inspection of components.
For assurance, a brief pressure test at or above normal operating pressure helps confirm reliability before returning the system to regular use.
Slowly turning the water back on and checking for leaks
Slowly open the main shutoff or the fixture valve a quarter turn to reintroduce water pressure, watching the joint closely for any signs of seepage.
Maintain visual contact for several minutes, feeling around the nut and pipe for moisture. If dry, fully restore pressure gradually.
Observe again under normal flow conditions and note any persistent dampness before considering the repair complete.
How to identify and fix common minor leaks
Once the supply is restored and the fitting shows no immediate seepage, attention shifts to testing the connection for minor leaks.
The installer inspects joints, feels for dampness, and uses a dry tissue to reveal tiny drips. If found, the nut is tightened slightly or the ferrule repositioned and retested.
Persistent weeps require disassembly, cleaning, and reinstalling the compression components.
Pressure testing tips for reliability
Begin pressure testing by isolating the new compression joint and supplying water at normal system pressure.
Then observe the fitting and nearby connections for at least 10–15 minutes; this duration helps reveal small leaks that may not appear immediately.
Afterward, cycle pressure (increase mildly, then return to normal) and recheck.
Use a clean towel to detect dampness and re-tighten or replace components if any seepage appears.
Troubleshooting Common Problems
Common failures after testing include leaks at the nut, which often result from loose fittings, damaged ferrules, or improper pipe seating. These issues can usually be fixed by retightening to spec, reseating the pipe, or replacing the ferrule.
Over-tightening can crush the ferrule or deform the pipe; correcting this may require replacing the ferrule and repairing or trimming the pipe end.
Misaligned or corrosion-damaged pipe ends often necessitate cleaning, cutting back to sound metal, and, when damage is extensive, replacing the ferrule or the entire fitting.
Leaks at the nut’ causes and fixes
Leaks at the nut on a compression fitting typically indicate an issue with alignment, seating, or hardware condition rather than a failing pipe.
Common causes include a misaligned ferrule, an unevenly cut pipe, debris under the ferrule, or a damaged nut/ferrule.
Fixes: realign and square the pipe, clean mating surfaces, replace dented ferrules or nuts, and hand-tighten then wrench to specified turn.
Over-tightening damage and how to remedy it
Over-tightening a compression fitting can crush the ferrule, deform the pipe, or strip threads, producing leaks and making future repairs difficult; recognizing and reversing this damage quickly prevents escalation.
Inspect the ferrule and nut: replace crushed ferrules, cut back deformed pipe to fresh copper, deburr, and refit with a new ferrule and nut.
Replace stripped nuts or fittings; test for leaks.
Misaligned or corrosion-damaged pipe ends
Misaligned or corrosion-damaged pipe ends prevent a compression fitting from seating properly and are a frequent cause of persistent leaks; diagnosing the issue early saves time and materials.
Inspect ends for pitting, grooves, bends, or uneven cuts. Use a pipe cutter for a square cut and emery cloth or a deburring tool to remove corrosion and burrs.
Re-check alignment before assembly.
When to replace a ferrule or the entire fitting
Assess the ferrule and fitting for visible damage or deformation before attempting further repairs.
If the ferrule is cracked, flattened, excessively scored, or has lost its taper, replace it.
Replace the entire fitting when threads are stripped, bodies corroded, or sealing faces compromised.
Always use matching materials and sizes; test under low pressure after replacement to confirm a reliable, leak-free connection.
Tips for Long-Term Durability
To guarantee long-term durability, installers should follow best practices such as proper pipe deburring, correct nut torque, and use of the appropriate ferrule for the application.
Compatibility with different pipe wall thicknesses and materials should be verified before assembly to prevent mismatches that cause leaks.
A simple maintenance schedule with periodic inspections for corrosion, movement, and slow seepage will catch issues early.
Best practices for installation to prevent future leaks
Begin by guaranteeing the pipe ends are square, clean, and free of burrs before fitting the nut and ferrule; proper preparation of the mating surfaces is the single most important step to prevent leaks and guarantee long-term durability.
Tighten nuts to manufacturer torque, avoid overtightening, support piping to prevent stress, inspect ferrule alignment, test under pressure, and recheck joints after initial use for seepage.
Compatibility tips for different pipe thicknesses and materials
Different pipe wall thicknesses and materials require matching ferrules, nuts, and installation techniques to secure a reliable seal and long-term durability.
Select ferrules sized for thin-walled, standard, or heavy-duty tubing; use adapters or connector fittings when joining dissimilar metals; prefer brass or stainless compression components to resist galvanic corrosion; and verify proper nut torque and alignment to prevent deformation and leaks over time.
Maintenance schedule and inspection cues
A simple, regular maintenance schedule helps detect early wear and prevent leaks in compression fittings on copper piping.
Inspect fittings quarterly for corrosion, looseness, moisture, and thermal movement.
Tighten nuts to manufacturer torque if slightly loose, replace olives or fittings showing pitting or cracks.
After any repair, pressure-test the line.
Record dates, findings, and actions to track trends and plan replacements.
Alternatives and When to Choose Them
The article briefly contrasts compression fittings with soldered joints and push-fit connectors, noting differences in skill required, reliability, and suitability for pressure or concealed installations.
It also outlines scenarios—such as complex layouts, hazardous materials, or lack of tools—when a professional plumber is the safer choice.
Readers are encouraged to weigh room for future access, code requirements, and personal confidence before selecting an alternative.
Comparison of compression vs. soldered vs. push-fit fittings ()
While each connection type—compression, soldered, and push-fit—serves the same basic purpose of joining copper pipe, they differ significantly in installation method, durability, and suitability for various situations. Compression: easy, moderate sealing, good for repairs. Soldered: permanent, high durability, requires heat. Push-fit: fastest, tool-free, ideal for tight spaces.
| Type | Speed | Reliability |
|---|---|---|
| Compression | Medium | Good |
| Soldered | Low | Excellent |
When to call a professional plumber
Deciding whether to install a compression fitting oneself or call a professional depends on skill level, scope of the job, and risk tolerance.
Homeowners should hire a plumber for leaks involving concealed piping, multiple connections, high water pressure, or code compliance.
Call also when tools, confidence, or time are lacking.
Professionals guarantee proper seal, prevent damage, and provide warranties for complex or risky jobs.
Quick Checklist Before You Start ()
Before beginning the compression fitting procedure, a brief checklist guarantees the job proceeds smoothly and safely.
- Materials and tools check
- Safety steps confirmed
- Final measurements and pipe prep completed
The reader should verify each item is addressed before proceeding.
Materials and tools check
To guarantee a smooth installation, gather the essential materials and tools at the worksite so nothing interrupts the job.
Required items include the correct-size compression fitting, ferrule, and nut; clean copper pipe; pipe cutter; deburring tool; adjustable wrench or two wrenches; tape measure and marker; and a cloth for cleanup.
Verify fit and part compatibility before beginning.
Safety steps confirmed
Verify that all safety precautions are in place before cutting or handling the pipe:
wear safety glasses and gloves,
shut off and depressurize the water supply,
and make certain the work area is dry and well-lit.
Verify gas or electrical hazards are absent,
keep a bucket and towels ready for residual water,
guarantee ventilation if soldering nearby,
and confirm a clear escape path and stable ladder if elevated.
Final measurements and pipe prep completed
Measure twice and mark once: guarantee the final length and alignment of the copper pipe match the fitting specifications and the fixture locations, accounting for the ferrule and nut depth.
Deburr cut ends, remove burs and sharp edges, and clean with emery or a brush until bright.
Slide nut and ferrule onto the pipe in correct order.
Recheck orientation and clearance before assembly.
Conclusion
After following the painstakingly simple steps, the reader will likely marvel at how a few rings and a nut transformed unruly copper into obedient plumbing. Ironically, the most dramatic moment is tightening a hand that is, by design, meant to be invisible until it leaks. In short, compression fittings reward basic care and common sense—qualities more elusive than plumbing skills—so a modest investment of time prevents both drips and future regret.