How to Relight a Hot Water Heater Safely: Step-by-Step Guide for Gas and Electric Units
To safely relight a hot water heater, first determine whether you have a gas or electric unit. For gas units, turn off the gas supply, check for gas odors, wait five minutes, and then follow the pilot lighting instructions to ensure a stable blue flame. For electric units, cut power at the circuit breaker, use a multimeter to confirm no voltage, reset any high-limit switches, and then restore power. Additional guidance includes troubleshooting tips, maintenance advice, and when to seek professional help.
How to Relight a Hot Water Heater Safely: Quick Overview
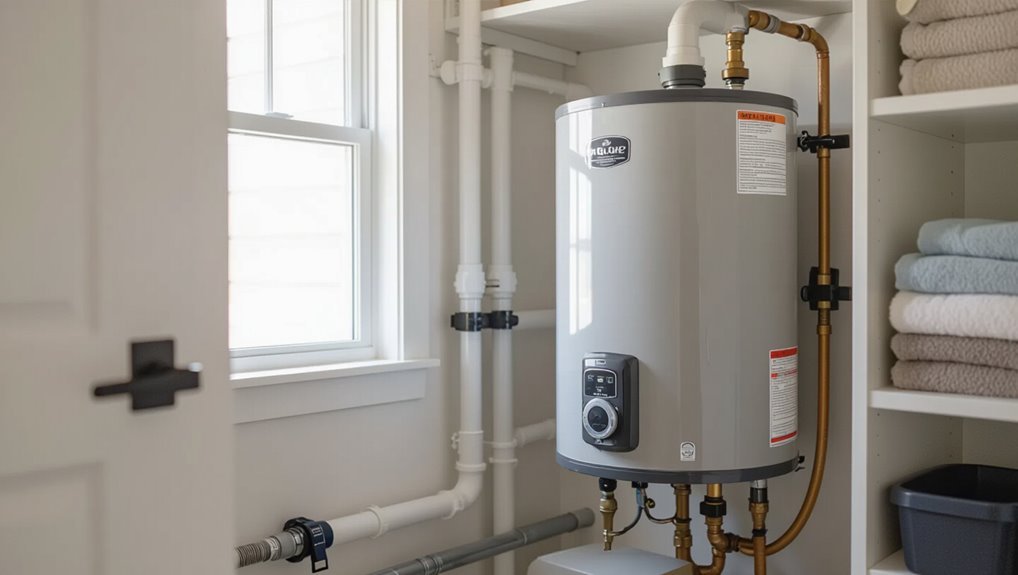
The overview distinguishes routine relighting—such as after a temporary pilot outage—from situations that require a professional, like persistent gas smells, repeated failures, or suspected internal damage.
It also summarizes a brief safety checklist to follow before attempting relighting, including shutting off gas and power, ventilating the area, and inspecting for leaks or corrosion.
Readers are encouraged to stop and call a qualified technician if any unsafe conditions are present or if relighting does not proceed normally.
When you should relight your water heater and when to call a professional
Although relighting a gas water heater is a routine task for many homeowners, it should be attempted only when the cause of the outage is straightforward and safe to handle.
If pilot light issues, simple tripped switches, or known interruptions occur, follow instructions for how to relight a hot water heater.
Call a professional for persistent leaks, gas smells, ignition failures, or complex diagnostics.
Quick safety checklist before you begin
Safety comes first: before attempting to relight a gas water heater, confirm the area is free of gas odor, verify adequate ventilation, and shut off any nearby pilot lights or open flames.
Check that gas and power supplies are accessible and labeled, guarantee tools and a flashlight are ready, wear safety gloves and eye protection, and have an emergency shutoff plan and phone nearby.
Understanding Your Water Heater Type and Components
Before attempting to relight a water heater, the reader should identify whether the unit is gas or electric, since each type uses different ignition and safety components.
A gas heater’s key parts include the pilot light, thermocouple, gas valve, and burner, while an electric unit uses heating elements, thermostats, and circuit breakers.
Locating the model and serial numbers on the tank or access plate allows access to the correct manual and specifications for safe relighting procedures.
Differences between gas and electric water heaters
When identifying a water heater type, recognizing core differences between gas and electric models clarifies maintenance, relighting, and safety procedures.
Gas heaters use a combustion chamber, burner, and venting system fueled by natural gas or propane, while electric heaters rely on one or two immersion heating elements and thermostats powered by the home’s electrical supply.
Gas units require fuel lines and ventilation; electric units need proper circuit protection and element access.
Major parts of a gas water heater (pilot light, thermocouple, gas valve, burner)
A gas water heater contains several key components that work together to ignite and regulate the burner: the pilot light provides the initial flame, the thermocouple senses that flame and signals the gas valve, the gas valve controls fuel flow, and the burner heats the water in the tank.
Additional parts include the venting system for combustion gases and access panels for maintenance.
Major parts of an electric water heater (heating elements, thermostats, breakers)
Electric water heaters rely on an internal electrical system rather than a pilot flame, with two main heating elements, separate thermostats for upper and lower elements, and safety devices such as circuit breakers and high-limit switches.
The upper and lower elements alternately heat stored water; thermostats control temperature and signal elements; breakers protect against overloads; high-limit switches prevent overheating and require manual reset if tripped.
How to locate model and serial numbers for manuals and specs
Although model and serial numbers may seem like small printed codes, they are the keys to accurate manuals, replacement parts, and manufacturer specifications.
Locate the data plate on the tank’s upper perimeter, front access panel, or burner compartment for gas units. For electric heaters, check the side near the element access.
Record the exact alphanumeric strings, note manufacturing date codes, and photograph for reference.
Preparations and Safety Precautions
Before attempting to relight a hot water heater, the preparatory steps and safety precautions must be addressed to prevent injury and property damage. This includes assembling required tools and PPE, shutting off gas and electricity, ventilating the area, and performing gas-leak checks and lockout procedures.
Clear, methodical adherence to these measures guarantees a safe relighting process or indicates when to call a professional.
Tools and supplies you will need
A small set of tools and a few safety items are essential for relighting a hot water heater: a long-reach lighter or pilot-light tool, a flashlight with fresh batteries, a wrench or pliers for access panels and gas fittings, a non-contact voltage tester, and a carbon monoxide detector, plus work gloves and safety glasses.
- Long-reach lighter
- Flashlight with spare batteries
- Wrench/pliers set
- Non-contact voltage tester
Gas safety steps: shutoff, ventilation, and gas leak checks
Three key safety actions—shutting off the gas, ventilating the area, and checking for leaks—must be completed before attempting to relight a water heater.
The gas supply valve should be closed, windows and doors opened, and any pilot light fully extinguished.
Use a gas detector or soapy-water test at fittings; if odor or bubbles appear, evacuate, call the gas company, and do not relight.
Electrical safety steps: power shutdown and lockout procedures
Caution guides the electrical steps: power must be isolated at the breaker or service disconnect and verified de-energized before any work near the heater’s wiring.
The technician tags and locks the breaker, tests with a known-voltage tester at terminal points, and confirms absence of residual voltage.
Documentation of lockout status and communication with household occupants completes the shutdown procedure before proceeding.
Personal protective equipment and ventilation tips
Personal protective equipment should be selected and worn before any interaction with the heater to prevent burns, electrical injury, and inhalation hazards.
Safety glasses, heat-resistant gloves, long sleeves, and sturdy footwear protect against burns and sparks.
For gas units, verify carbon monoxide detectors are functional and use a fan or open windows to ventilate combustion areas.
Respirators are recommended if fumes persist.
Step-by-Step: Relighting a Gas Water Heater
The following steps guide a safe relighting procedure, beginning with locating the pilot assembly and control knob.
It instructs turning off the gas and waiting the recommended period to allow any accumulated gas to disperse.
Then checking fittings and connections for leaks before proceeding.
A clear, ordered manual lighting sequence is provided along with precautions for using a long-reach lighter or match.
Locating the pilot assembly and control knob
Finding the pilot assembly and control knob is the essential next step before attempting to relight a gas water heater.
The pilot assembly sits near the bottom front behind an access panel or drawer; it includes a small burner, thermocouple, and pilot tube.
The control knob, usually labeled “Pilot/On/Off,” is mounted on the gas control valve.
Identify both before proceeding.
Turning off gas and waiting period (why waiting matters)
With the pilot assembly and control knob identified, attention turns to shutting off the gas and observing a mandatory waiting period before relighting.
The gas supply valve is turned off to stop fuel flow.
Waiting at least five minutes allows accumulated gas to dissipate, reducing explosion risk.
Only after the prescribed pause should relighting procedures resume, following manufacturer instructions.
Checking for gas leaks before relighting
Before attempting to relight the pilot, inspect the heater and surrounding fittings for signs of gas leakage: smell for a rotten-egg odor, listen for hissing near valves and connections, and visually check for damaged hoses, loose fittings, or corrosion.
If odor or sound is present, evacuate the area, shut off the gas at the main valve if safe, and call the gas company or a qualified technician.
Manual pilot lighting procedure (detailed step sequence)
Begin by locating the heater’s pilot access panel and the control knob marked “Pilot” or “Ignition,” ensuring the area remains well ventilated and free of flammable materials.
Turn the knob to “Pilot,” press and hold while depressing the integrated button to allow gas flow.
While holding, observe the pilot opening and release the button after ignition stabilizes.
Return to “On” and replace the panel.
Using a long-reach lighter or match safely
Use a long-reach lighter or extended match to keep hands clear of the pilot opening while relighting the burner.
Position the flame tip near the pilot, not touching metal. Hold steadily, follow manufacturer lighting sequence, and keep face and clothing back.
Keep flammable materials away, work in a ventilated area, and discard used matches safely.
Replace lighter fuel or dispose when worn.
Verifying the pilot stays lit and adjusting thermostat
Confirm the pilot remains lit for several minutes and then set the thermostat to the desired temperature.
Observe the pilot visually, ensuring a steady blue flame without sputtering.
Close access panel and replace any covers.
Gradually raise temperature to recommended setting, avoiding extreme changes.
Monitor for normal burner operation and warmth at fixtures.
Document changes and note time of relight for future reference.
Troubleshooting common gas relight problems
When relighting a gas water heater, a systematic troubleshooting approach helps isolate common failures such as a weak pilot flame, thermocouple issues, clogged burner orifices, or gas supply interruptions.
The technician should inspect each potential cause in sequence, starting with visible flame characteristics, then moving to component checks and supply verification to restore safe, reliable operation.
- Check pilot flame size and color
- Test thermocouple continuity
- Clean burner and orifices
- Verify gas supply and valve operation
Step-by-Step: Restoring Power to an Electric Water Heater
Before restoring power to an electric water heater, the technician confirms the breaker is off and verifies de-energization with a multimeter.
A visual inspection of heating elements and thermostats follows, then the high-limit switch and any reset button are addressed per manufacturer instructions.
Once the circuit breaker is turned back on safely, checks include hot water recovery time and any unusual noises.
Confirming power is off at breaker and testing with a meter
Shut off the circuit breaker serving the water heater and verify the switch is in the OFF position; this step removes the immediate electrocution hazard and allows safe testing.
Using a noncontact voltage tester first, confirm absence of voltage at the heater access panel.
Then use a multimeter set to AC voltage to check terminals and confirm 0 volts.
Record results and leave power off.
Inspecting heating elements and thermostats visually
Proceed to a careful visual inspection of the water heater’s heating elements and thermostats to identify obvious signs of damage, corrosion, leakage, or loose connections.
Examine element terminals for rust, scale, or burnt insulation. Check thermostat housings for moisture, cracks, or displaced wiring.
Note any frayed wires, burnt smells, or mineral buildup. Document findings before proceeding with repairs or component replacement.
Resetting the high-limit switch and reset button procedure
With visible wiring and component issues noted, attention turns to the high-limit switch and reset button—safety devices that often trip when overheating or electrical faults occur.
The technician verifies power is isolated, removes the access panel and insulation, locates the red reset button near the thermostat, presses firmly until it clicks, inspects for damage, replaces faulty parts, then restores covers before reenergizing.
Turning the circuit breaker back on safely
Before restoring power, the technician confirms all panels, insulation, and covers are securely in place and that any replaced components are properly mounted; only then is the breaker re-engaged to energize the heater.
The breaker is switched on firmly to the ON position, watching for tripped indicators.
The technician steps back, monitors electrical panel stability, and verifies no burning smells or sparks before leaving the area.
What to check after power restoration (hot water timing, noises)
After the breaker is engaged and the area is confirmed safe, the technician observes the heater’s behavior to confirm normal operation.
They note expected warm-up time, checking hot taps after 10–30 minutes depending on tank size.
They listen for unfamiliar banging, hissing, or popping and guarantee only faint settling sounds occur.
Any persistent loud noises prompt scheduling of follow-up inspection.
Troubleshooting common electric restoration problems
Begin by systematically verifying the most frequent causes of failed restart attempts: tripped breakers, blown fuses, a locked-out thermostat, or a defective heating element.
Then inspect wiring, reset thermostats, and test elements with a multimeter. If uncertainty persists, shut power and call a qualified technician.
- Check circuit breaker and fuses
- Reset high-limit/thermostat
- Test heating elements
- Inspect wiring connections
Signs of Underlying Problems and When Not to Relight
Persistent pilot outages, a failing thermocouple, repeated tripped breakers, or burned-element symptoms may indicate deeper mechanical or electrical faults that require attention.
Any smell of gas, audible hissing, visible leaks, or the odor of burning electrical insulation warrants immediate shutdown and professional intervention rather than attempting to relight.
If problems recur after basic troubleshooting or if corrosion, leaking, or repeated failures are present, a qualified technician should assess whether repair or replacement is necessary.
Persistent pilot outage causes and thermocouple issues
Recognize that a pilot light that repeatedly goes out often signals a deeper problem rather than a simple nuisance; common causes include a failing thermocouple, blockages or drafts in the pilot tube, a dirty pilot orifice, or issues with the gas control valve.
The thermocouple may fail to sense heat, cutting gas flow. If cleaning or adjustment doesn’t fix it, stop and call a qualified technician.
Odors, hissing, or visible gas leaks immediate actions
If a homeowner detects the smell of gas, hears hissing near the water heater, or sees visible leaks, they should treat the situation as an immediate hazard and avoid attempting to relight the pilot.
Evacuate occupants, avoid sparks or flames, do not operate switches, and shut off the gas only if trained and it can be done safely.
Call the gas company or emergency services.
Electrical smells, tripped breakers, and element failures
After addressing obvious gas hazards, attention should turn to electrical indicators that suggest a water heater should not be relit.
Burnt or plastic smells, scorch marks, or melting near the unit indicate wiring or component failure.
Repeated tripped breakers when the heater cycles, visible arcing, or failed heating elements are signs to keep power off and avoid relighting until inspected and repaired.
When professional service or replacement is recommended
Although minor issues can sometimes be resolved with basic troubleshooting, certain symptoms indicate deeper faults that require professional diagnosis or full replacement.
Persistent gas odor, carbon monoxide alarm activation, unexplained pressure loss, severe corrosion or leaks, repeated pilot or ignition failures, and failed safety controls warrant immediate service and cessation of attempts to relight.
Technicians can assess repairability versus replacement.
Maintenance Tips to Prevent Future Relighting Needs
Routine maintenance greatly reduces the likelihood of needing to relight a water heater.
Recommended actions include scheduled inspections and cleanings, periodic tank flushing to remove sediment, and testing or replacing the anode rod as needed.
Seasonal checks and annual professional tune-ups help catch wear or safety issues before they lead to ignition failures.
Regular inspection and cleaning schedule
Establishing a regular inspection and cleaning schedule helps prevent ignition failures and extends a water heater’s service life.
Inspections focus on burners, vents, pilot assemblies, electrical connections, and corrosion. Cleaning removes debris from accessible components and guarantees proper airflow.
Recommended intervals depend on usage and environment; document dates and findings for tracking.
- Check pilot and burners
- Inspect venting and flue
- Tighten electrical connections
- Remove surface dust and debris
Flushing the tank to remove sediment
Flush the tank periodically to remove sediment that accumulates on the bottom and reduces burner efficiency, heat transfer, and tank capacity.
Draining and flushing prevents overheating, rumbling noises, and premature component failure.
Shut power and cold-water supply, attach a hose to the drain valve, open hot taps, and drain until clear.
Close valves, refill slowly, restore power, and check for leaks.
Testing and replacing the anode rod
After flushing sediment from the tank, attention should turn to the anode rod, a sacrificial metal component that protects the steel tank from corrosion.
Inspect the rod annually by loosening its hex head and removing it. If it is heavily corroded, depleted, or less than ½ inch thick, replace it with a compatible magnesium or aluminum rod to extend tank life and reduce future relighting issues.
Seasonal checks and professional tune-ups
Schedule seasonal checks and professional tune-ups to catch minor issues before they require a relight or costly repair.
A qualified technician inspects burners, thermostats, valves, electrical connections, and venting, flushes sediment, and verifies safety controls.
Routine service extends tank life, improves efficiency, and prevents unexpected failures.
Homeowners should document services, follow recommended intervals, and promptly address any technician recommendations.
Comparison: Gas vs Electric Relight and Restart Risks
Gas and electric water heaters present distinct costs, complexities, failure modes, and safety considerations when relighting or restarting. The following table contrasts key factors to clarify risks and trade-offs for homeowners. This comparison aims to inform safer choices without oversimplifying technical differences.
| Aspect | Gas Heaters | Electric Heaters |
|---|---|---|
| Typical cost to service | Higher (requires gas technician) | Lower (standard electrician) |
| Complexity of restart | More complex (pilot, gas valves) | Simpler (breaker, elements) |
| Common failure modes | Gas leaks, faulty thermocouples, blocked vents | Tripped breakers, failed heating elements |
| Immediate safety risks | Fire, explosion, carbon monoxide | Electrical shock, overheating |
| Precaution emphasis | Venting and leak detection | Lockout/tagout and insulation |
Cost, complexity, common failure modes, and safety differences
Many homeowners face different trade-offs when relighting or restarting a hot water heater: electric units typically cost less to service and pose fewer combustion-related risks, while gas models involve more complex ignition components and higher potential for hazardous failures.
Electric failures usually involve thermostats or elements; gas failures often stem from pilot/igniter, thermocouple, or gas valve faults.
Repairs for gas are pricier and demand stricter safety checks.
Quick Reference Guides and Checklists
The article provides concise, one-page checklists for relighting a gas water heater and for restarting an electric unit, each listing steps, required tools, and safety confirmations.
It also highlights emergency contacts and clear next steps to follow immediately if a leak or gas odor is detected.
These quick-reference guides are designed for fast, accurate action under stress.
One-page gas relight checklist
One clear, single-page checklist provides technicians and homeowners with an ordered sequence of safety checks and actions to relight a gas water heater safely and efficiently.
It summarizes prerequisites, shutdown confirmation, ignition steps, and post-light inspections for quick reference.
Use concise prompts and checkboxes to reduce error and guarantee compliance with local codes.
- Confirm gas supply and odor check
- Venting and combustion air clear
- Follow manufacturer ignition sequence
- Verify flame, pilot, and leak-free connections
One-page electric restart checklist
After completing a gas relight checklist, attention shifts to electric models where procedures differ considerably.
This one-page electric restart checklist gives technicians and homeowners a compact, ordered sequence for safely restoring power to an electric water heater.
- Confirm breaker off and lockout/tagout applied
- Verify water supply and tank integrity visually
- Restore power to thermostats, set to safe temperature
- Observe for proper heating and unusual sounds
Emergency contacts and next steps if you detect a leak
If a leak is detected, immediate isolation and clear communication are essential:
The user should shut off the water supply, turn off power or gas to the heater, evacuate affected areas, and notify building management.
Contact a licensed plumber and, for gas smells, the gas company emergency line.
Document damage, photograph the scene, and keep receipts for repairs and insurance claims.
Common Mistakes to Avoid When Relighting or Restarting
Many people attempt relighting with unsafe lighting techniques or improvised DIY fixes that increase fire and explosion risk.
Technicians caution against misdiagnosing electrical issues as gas problems, which can lead to improper and dangerous remedies.
Failure to check ventilation and carbon monoxide safeguards is a common oversight with potentially lethal consequences.
Unsafe lighting practices and DIY errors
Incorrect procedures and overconfident DIY attempts are frequent causes of accidents when relighting a hot water heater.
The article highlights risky behaviors and prevents hazards by advising caution, proper tools, and when to stop and call a professional.
- Ignoring smell of gas and proceeding
- Using open flames to test pilot
- Skipping ventilation checks
- Bypassing safety switches or controls
Misdiagnosing electrical vs gas problems
How can one tell whether a cold tank is the result of an electrical failure or a gas issue?
Technicians recommend checking visible indicators: pilot light status, burner operation, and gas supply for gas units; circuit breaker position, fuse condition, and power to elements for electric units.
Avoid assuming causes; perform basic, safe checks before relighting or calling a qualified professional.
Overlooking ventilation and carbon monoxide risks
Because combustion appliances can produce deadly carbon monoxide, neglecting ventilation when relighting or restarting a gas water heater creates a serious hazard.
The operator should guarantee adequate air supply, verify venting paths are clear, and confirm exhaust systems function.
Installing and testing CO detectors before restarting provides essential warning.
If combustion smells or detectors alarm, shut down the unit and call a qualified technician immediately.
Conclusion
In sum, relighting or restarting a water heater demands cautious, methodical action to avoid leaks, gas buildup, or electrical hazards. Studies indicate that improper DIY attempts contribute to roughly 15% of residential water-heater–related service calls, underscoring the value of following manufacturer steps or calling a professional when uncertain. Adhering to safety checks, clear ventilation, and regular maintenance minimizes risk and prolongs appliance life, making careful procedure essential.