How to Cut a Cast Iron Pipe: Easy Steps & Tools Guide
To effectively cut a cast iron pipe, follow these key steps:
- Preparation: Shut off and drain the line to prevent any leaks.
- Secure the Pipe: Use padded clamps to hold the pipe firmly in place.
- Mark the Cut: Clearly mark a perpendicular cut line for accuracy.
- Dust Control: Utilize a NIOSH respirator to protect against dust inhalation.
- Choose the Right Tool: For clean cuts, use a diamond wheel on an angle grinder or a carbide-grit blade in a reciprocating saw. A hacksaw or manual cutter is suitable for tight spaces.
- Finishing Touches: Deburr the cut edge, inspect it for integrity, and fit with appropriate couplings.
By following these steps, you can ensure a safe and efficient cutting process for cast iron pipes.
What This Guide Helps You Do: Safely Cut and Replace Cast‑Iron Pipe

This guide explains how to cut out damaged cast‑iron pipe and install a replacement safely, outlining required tools, safety precautions, and step‑by‑step techniques for clean, secure joints.
It focuses on evaluating damage, choosing cutters or saws, and preparing the work area with bracing and ventilation.
Personal protective equipment, dust control, and lead‑ash precautions receive emphasis.
Procedures cover marking cut lines, supporting adjacent pipe, making straight cuts, deburring, and fitting hub or rubber coupling connections.
Guidance includes leak testing and proper disposal of cast‑iron fragments.
The intent is practical, safety‑centered instruction for reliable repairs without unnecessary complication.
When to Cut Cast‑Iron Pipe vs Replace the Whole Section
Decision-making about whether to cut out a portion of cast‑iron pipe or replace an entire section rests primarily on the extent of damage, and on the comparative cost and time implications of repair versus replacement.
Small, localized cracks or corrosion often justify cutting and patching, while widespread deterioration or multiple weak joints typically favor full‑section replacement.
Evaluating inspection findings against labor, materials, and downtime estimates will determine the most practical option.
Extent Of Damage
Assessment of damage determines whether a localized cut or a full-section replacement is appropriate: small, isolated cracks, pinholes, or a single joint failure can usually be repaired by cutting out the affected segment and installing a new short length or repair coupling, while widespread corrosion, multiple failing joints, or fractures that compromise structural integrity require replacing the entire run between reliable junctions. A visual inspection, probing with a screwdriver, and targeted leak tests establish extent. If adjacent sections show thinning, delamination, or multiple leaks, opt for full replacement to prevent repeated failures. Table summarizes typical indicators.
| Indicator | Action |
|---|---|
| Single pinhole | Cut & repair |
| Local crack | Replace segment |
| Multiple joints failing | Full replacement |
| Severe corrosion/fragility | Full replacement |
Cost And Time
In weighing whether to cut out a damaged section of cast‑iron pipe or replace the entire run, cost and time considerations hinge on the scope of repairs, access difficulty, and long‑term risk of recurrence. Cutting and patching is typically faster and cheaper for localized cracks or breaks if fittings and bedding are sound; labor, disposal, and temporary water shutoff costs remain lower.
Full replacement demands more time, higher material and labor costs, and potential wall or floor repairs but reduces future leak risk and maintenance. Decision-makers should compare immediate budget and downtime against projected lifespan and potential downstream expenses.
Safety Gear You Must Wear When Cutting Cast Iron
Proper personal protective equipment is essential when cutting cast iron to guard against flying fragments and dust.
Workers should use impact-rated eye and face protection, a respirator rated for silica and metal dust, and durable gloves with cut resistance.
Protective clothing that covers exposed skin and resists abrasion completes the basic safety ensemble.
Eye And Face Protection
When cutting cast iron, operators must wear impact-rated safety glasses with side shields plus a full-face shield to protect against high-velocity chips and fine dust.
The combination prevents eye penetration from shards and guards the face from larger fragments and sparks.
Safety glasses should meet ANSI Z87.1 or equivalent; the face shield must be compatible with eyewear and free of cracks.
Make certain secure fit and clear visibility; replace scratched or compromised lenses.
Inspect and maintain shields, keeping them clean.
Use adjustable straps or helmets for prolonged work.
Train personnel on correct donning and storage to maintain protective integrity.
Respiratory Protection Needed
Why is respiratory protection essential during cast iron cutting?
Particulate dust, silica, and metal fumes generate hazardous airborne contaminants when abrasive cutting or grinding cast iron.
A properly fitted respirator reduces inhalation risk, preventing short- and long-term respiratory damage.
For common cutting tasks, use a NIOSH-approved N95 or P100 particulate respirator; for operations producing fumes or heavy dust, select a half- or full-face respirator with appropriate P100 cartridges and organic/vapor cartridges if cutting involves coatings or lubricants.
Secure fit testing, routine seal checks, and cartridge changes per manufacturer guidance.
Always follow workplace regulations and exposure limits to protect lung health.
Protective Clothing And Gloves
After addressing respiratory protection to guard against airborne hazards, attention shifts to protective clothing and gloves that shield skin from sparks, hot metal, sharp edges, and abrasive debris generated while cutting cast iron.
Workers should wear flame-resistant long sleeves, heavy-duty work pants, and a leather or Kevlar apron to protect torso and legs. Closed-toe leather boots with steel toes prevent foot injuries.
Use cut-resistant gloves with heat-resistant outer layers; pair with disposable liners if contamination is a concern.
Make sure garments fit without restricting movement. Inspect gear for damage before use, replace compromised items, and launder contaminated clothing separately.
Prepare the Pipe and Work Area Before Cutting
Before any cutting begins, the area and pipe must be secured and inspected for hazards: clear surrounding space, shut off water and drain the line, check for nearby electrical lines or gas, and mark the cut location.
The pipe should be supported to prevent movement; use pipe stands or clamps that contact only the pipe ends, avoiding stress on fittings.
Remove adjacent fixtures and fragile items.
Ventilate enclosed spaces and set up adequate lighting.
Place a fire extinguisher nearby if using power tools.
Lay down drop cloths to collect dust and fragments.
Make certain others are kept at a safe distance.
Marking the Cut Line for a Straight Cast‑Iron Cut
For a straight, clean cast-iron cut, the cut line must be precisely marked and clearly visible from every working angle. The technician uses layout tools and consistent technique to guarantee accuracy before cutting.
First, measure twice from a fixed reference and rotate the pipe, checking alignment. Second, choose a marking method that withstands handling and sparks. Third, verify the line with a square or template to confirm perpendicularity.
Recommended practices:
- Use a permanent marker or soapstone and scribe over the mark for durability.
- Wrap a tape as a guide and transfer marks around the circumference.
- Recheck measurements and sight the line from opposite sides.
Secure Cast‑Iron Pipe to Prevent Movement
With the cut line established, the pipe must be firmly immobilized to prevent shifting during cutting; any movement can cause jagged edges, binding of the blade, or unsafe kickback.
The workpiece should be supported on stable blocks or a pipe cradle to distribute weight and prevent roll.
Use a heavy-duty pipe vise, clamp, or chain clamp rated for cast iron; pad contact points with wood or rubber to avoid marring.
Tighten gradually while checking the cut line remains visible and accessible.
For sections in place, brace the surrounding structure or use straps to prevent rotation.
Recheck stability before starting the cut.
How to Choose the Right Cutting Tool for Pipe Diameter and Location
When selecting a cutting tool, match its type and size to both the pipe diameter and the installation location to guarantee a safe, accurate cut.
Consider reach, power, and accessibility; larger diameters need more robust, longer‑reach tools, while confined spaces demand compact or angled options.
Material thickness and surrounding fixtures influence tool choice to minimize vibration and collateral damage.
Prioritize tools that allow steady control and suitable blade or abrasive specifications for cast iron.
Evaluate noise, dust control, and available power sources before deciding.
- Accessibility: clearance, angle, and distance constraints
- Diameter: tool capacity and cutting speed
- Environment: ventilation, noise, and nearby fittings
Best Hand Tools for Cutting Cast Iron (Hacksaw, Pipe Cutter, Chisel)
After selecting a tool suited to the pipe diameter and workspace constraints, the next step is to evaluate which hand tool will deliver the required control and finish on cast iron: hacksaw, manual pipe cutter, or cold chisel.
A hacksaw with a bi-metal or carbide-grit blade offers versatility for occasional cuts and tight spaces; steady strokes and clamping minimize vibration.
A manual pipe cutter with tungsten-wheel scoring yields cleaner, concentric cuts on thin-walled sections and reduces debris, but requires access around the circumference.
A cold chisel and hammer suit splitting or removing fittings; work slowly, score first, and wear eye and hand protection to control shards.
Best Power Tools for Cutting Cast Iron (Angle Grinder, Reciprocating Saw)
The section compares two power options for cutting cast iron: angle grinders and reciprocating saws.
It outlines angle grinder essentials such as wheel selection, RPM control, and safe cutting technique.
It then presents reciprocating saw tips including blade type, stroke speed, and support to minimize vibration and breakage.
Angle Grinder Essentials
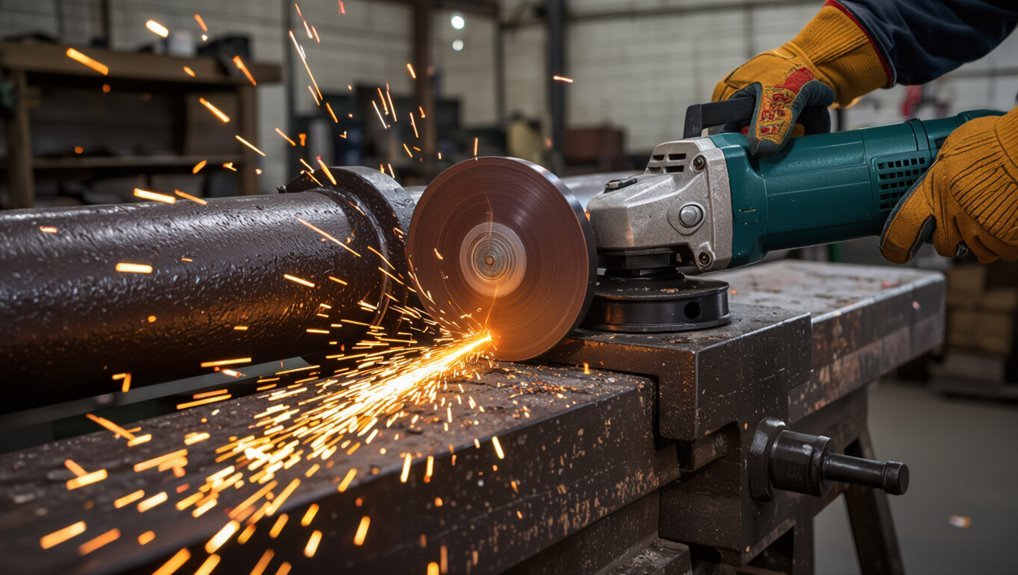
An angle grinder stands out as a primary choice for cutting cast iron, offering high speed and control when fitted with the correct abrasive or diamond blade.
Proper setup, steady hands, and attention to blade type reduce chatter and heat.
Safety gear and workpiece support are nonnegotiable.
- Use a reinforced diamond or thin metal-cutting abrasive wheel rated for cast iron.
- Secure the pipe with a vice or clamps; support prevents binding and kickback.
- Wear eye, ear, respiratory protection and gloves; allow cooling pauses to avoid overheating the blade and workpiece.
Reciprocating Saw Tips
Following the angle grinder section, attention turns to reciprocating saws as an alternative for cutting cast iron when access is limited or removal requires plunge cuts. The tool suits confined spaces and irregular cuts; use bi-metal or carbide-grit blades rated for cast iron. Secure the pipe, mark the cut, and start slowly to establish a groove. Apply steady pressure, let the blade do the work, and pause to clear debris and cool the blade. Wear hearing, eye, and dust protection. Expect slower cuts than grinders but improved reach and safety around nearby fixtures.
| Blade Type | Best Use |
|---|---|
| Bi-metal | General cuts |
| Carbide-grit | Abrasive, long life |
Specialty Cutting Blades and Wheels (Carbide, Diamond, Abrasive)
When precision, speed, or prolonged durability is required, specialty cutting blades and wheels—carbide-tipped, diamond, and bonded abrasive—offer distinct advantages for cutting cast iron; each type balances cutting rate, edge life, heat tolerance, and cost differently.
- Carbide-tipped blades: efficient on thick sections, resist wear, and shed heat well but require steady feed and moderate cost.
- Diamond wheels: exceptional life and clean cuts, ideal for surface finish and minimal chipping; higher upfront expense and specific mounting needs.
- Bonded abrasive: economical and versatile for rough cuts or removal; shorter life and greater heat generation, often used where finish is secondary.
Step‑by‑Step: Cut Cast‑Iron Pipe With an Angle Grinder
The section outlines required safety gear and preparation steps before starting an angle grinder on cast iron, emphasizing eye, ear, and respiratory protection and secure workholding.
It then describes precise marking and clamping methods to guarantee an accurate cut line and stable pipe during grinding.
Finally, it covers cutting technique, wheel selection, and finishing touches to smooth the edge and remove burrs.
Safety Gear And Prep
Before any cutting begins, a thorough assembly of personal protective equipment and workspace preparation is essential to control hazards from sparks, flying fragments, dust, and loud noise.
The operator checks respirator fit, hearing protection, flame‑resistant clothing, and impact‑rated face shield.
The area is cleared of combustibles and bystanders; ventilation is confirmed.
Tools and wheel condition are inspected; emergency shutoff and fire extinguisher are nearby.
Attention focuses on preventing inhalation and eye or skin injury.
- Use NIOSH‑approved respirator, safety goggles under face shield, and hearing protection.
- Wear cut‑resistant gloves and long sleeves; avoid loose clothing.
- Assure good lighting, stable footing, and clear egress.
Marking And Clamping
A measured layout line and secure clamping make the difference between a straight, safe cut and a ruined pipe.
A straightedge and permanent marker establish the cut line around the circumference; scribe the mark twice for visibility. Align the mark with any fittings to maintain orientation.
Choose clamps or a pipe vise rated for cast iron; avoid over-tightening, which can fracture the pipe. Pad contact points with scrap wood to distribute pressure and prevent marring.
Make certain the pipe sits level and cannot roll. Recheck the line after clamping. Confirm access for the grinder and clear surrounding obstructions before proceeding.
Cutting Technique And Finish
Begin cutting with deliberate, steady strokes and a clear plan for descent into the pipe wall: maintain a consistent angle and light, controlled pressure so the grinder’s wheel removes material without binding or producing deep gouges.
The operator advances methodically, pausing to assess heat and progress, keeping sparks directed away.
Final breakthrough is approached by reducing pressure to avoid chipping; supports prevent collapse.
Debris is cleared and the edge inspected for cracks.
Finish with a flap wheel to smooth burs, then deburr inside with a round file.
Recommended sequence:
- steady passes, check alignment
- minimal pressure, cool frequently
- finish smoothing, inspect for imperfections
Step‑by‑Step: Cut Cast‑Iron Pipe With a Reciprocating Saw
Using a reciprocating saw to cut cast‑iron pipe requires steady control, the right blade, and proper safety measures to guarantee a clean cut without cracking the pipe.
Secure the pipe with a pipe vise or heavy clamps, mark the cut line, and clear the area.
Fit a carbide‑grit or demolition blade rated for cast iron. Start the saw at low speed to score the mark, then increase speed with steady downward pressure; avoid twisting.
Cool the blade occasionally and pause to remove dust.
Finish by deburring the edge with a file or grinder, inspect for cracks, and clean the worksite.
Step‑by‑Step: Cut Cast‑Iron Pipe With a Manual Chain Pipe Cutter
With steady hands and the correct chain cutter, the operator can score and sever cast‑iron pipe without power tools.
The process proceeds methodically: measure and mark the cut, wrap the chain so cutters align with the mark, and tighten the chain evenly.
Rotate the tool around the pipe, tightening incrementally until the pipe separates.
Support the pipe to prevent sudden drops and wear gloves and eye protection.
- Position the cutter squarely and check alignment.
- Tighten in small increments while rotating for an even groove.
- Clean burrs and inspect the cut for fit before installation.
Technique favors patience over force.
Make a Clean Saddle or Offset Cut in Cast Iron
After scoring and severing a straight section, creating a saddle or offset cut requires a different approach: the operator must mark the exact curvature and depth where the new pipe will seat, then remove material precisely to maintain structural integrity.
A compass or pipe template guarantees accurate layout.
Use a carbide grinder, rotary tool with a diamond wheel, or angle grinder with plunge technique to remove material incrementally. Keep cuts shallow, checking fit frequently to avoid overcutting.
Deburr edges and smooth the saddle to promote a snug joint and proper sealing.
Wear eye, respiratory, and hand protection; control dust and hot fragments throughout.
Cutting Cast‑Iron Pipe Inside Walls and Tight Spaces
In confined spaces such as wall cavities or between joists, cutting cast‑iron pipe demands compact tools, precise layout, and strict dust control to guarantee structural damage and health hazards.
A technician assesses access, marks cut lines clearly, and verifies surrounding wiring or framing before proceeding. Selection favors mini reciprocating saws, hacksaw with a slim blade, or ratcheting pipe cutters sized for cast iron.
Support and bracing prevent pipe movement; small scrap wedges protect finishes. Clean, measured cuts ease joining and sealing. Attention to clearance, cutting angle, and safe tool handling guarantees efficient work without enlarging openings.
- Choose compact, appropriate tools
- Brace and protect surroundings
- Verify clearances and cut angles
Control Dust & Vibration When Cutting Cast Iron
When cutting cast iron in confined areas, effective dust and vibration control is essential to protect workers and nearby finishes.
Workers should use a local exhaust vacuum with a HEPA filter attached to the cutting tool to capture airborne particles at source. Wet cutting where feasible suppresses dust but requires water containment and electrical safety.
Vibration-reducing gloves and anti-vibration tool mounts minimize hand-arm exposure; limit continuous operation and schedule breaks.
Secure the pipe with padded clamps to reduce movement and transmitted vibration. Seal nearby openings and cover surfaces with plastic sheeting to prevent contamination of adjacent spaces.
Remove Burrs and Clean the Cut Edge
Deburr the cut edge using appropriate tools—a bench grinder, hand file, or carbide scraper—to remove sharp edges, slag, and micro-fractures that can impede fit-up or promote corrosion.
The operator inspects the rim for irregularities, working evenly around the circumference to preserve roundness and wall thickness.
Cleaning removes particulate and oil before any finishing steps.
- Remove raised burrs and loose scale with steady, light passes to avoid gouging.
- Smooth the inner and outer faces to eliminate stress concentrators and assure seating.
- Wipe with a solvent-soaked rag, then dry and recheck for sharp spots or cracks.
Rejoining Cast‑Iron Pipe: Seals, Couplings, and Best Practices
After aligning the prepared ends, attention turns to selecting a sealing method and coupling that match the pipe’s size, condition, and service requirements.
Mechanical couplings with stainless steel bands and elastomeric gaskets offer rapid, reliable joints for repair or replacement, accommodating minor misalignment and vibration.
Fernco-style flexible couplings suit cast iron to other materials; guarantee gasket compatibility with conveyed media.
For permanent work, compression-style or shielded couplings provide stronger, code-compliant connections.
Apply lubricant sparingly to ease assembly, torque bolts evenly, and verify alignment and slope.
Pressure-test the joint and inspect for leaks before backfilling or restoring service.
Temporary Caps and Plugs to Stop Leaks During Work
Temporary caps provide a fast, tool-light method to stop flow from a cut cast‑iron line while work proceeds.
Reusable rubber plugs offer a versatile, pressure-rated option for sealing open ends and can be removed and reinstalled as needed.
Selection should match pipe diameter and expected pressure to guarantee a reliable temporary seal.
Quick Temporary Pipe Caps
When a section of cast iron must be opened for cutting or fitting, quick temporary pipe caps and plugs provide an immediate, reliable way to stop flow and protect the system during work.
These caps fit over the pipe end or insert into the bore, sealing pressure briefly while technicians cut, grind, or fit new sections. Selection depends on diameter, pressure and available access.
Common choices include:
- Threaded screw-on caps for metal pipe ends offering fast install and secure hold.
- Expansion plugs that wedge inside for non-threaded sections.
- Push-fit caps for low-pressure, easy-release temporary sealing.
Always verify seating and monitor for leaks.
Reusable Rubber Plugs
While quick caps and expansion plugs handle many short-term needs, reusable rubber plugs offer a versatile, durable option for stopping leaks or isolating sections during cutting and fitting.
They are available in various diameters and shoulder styles to match cast iron internal bore or hub connections.
Proper selection requires measuring pipe ID and choosing a plug rated for expected pressure and temperature.
Installation uses a tapered insert or mechanical expander to create a reliable seal without deforming the pipe.
After work, plugs cleanly remove and store compactly for reuse.
Regular inspection for cuts or hardening guarantees continued effectiveness and safety.
Common Mistakes That Damage Cast Iron When Cutting
Frequently, attempted repairs or upgrades to cast iron piping are undermined by avoidable errors that cause cracking, chipping, or corrosion.
Practitioners often rush, use improper tools, or skip preparation, producing fragile edges and weakened joints.
Common mistakes include incorrect cutting speed, inadequate support, and improper blade choice; each increases fracture risk or creates rough surfaces that corrode faster.
Prevention relies on correct equipment, steady technique, and cleaning debris.
Attention to these factors preserves pipe integrity and future sealing.
Key pitfalls to avoid:
- Using abrasive blades meant for softer metals
- Failing to clamp and support the pipe securely
- Cutting too quickly without cooling or clearing chips
Troubleshoot Cutting Issues and Free Stuck Pipe Sections
Addressing cutting problems and freeing stuck cast iron sections requires methodical assessment of the cause—binding, corrosion, or tooling error—before applying force.
Inspect the cut for undercutting, blade glazing, or misalignment. Tighten or reposition clamps, replace dull blades or wheels, and verify correct cutting speeds.
For corrosion-welded joints, apply penetrating oil and allow dwell time; tap lightly with a mallet to shock-loosen deposits.
When thermal cutting created fused edges, score around the circumference and use gradual pry with a pipe wrench or crowbar, protecting mating surfaces.
Prioritize incremental actions to avoid cracking; stop and reassess if resistance persists.
Cost, Time, and Effort Comparison by Cutting Method
A comparison of cutting methods highlights differences in cost per tool, time to complete the job, and the effort and skill required.
Each method—manual saws, reciprocating saws, angle grinders, or specialized cutters—carries distinct upfront and operating costs that affect overall expense.
Time and labor vary as well, with some approaches faster but requiring greater operator skill or physical effort.
Cost Per Tool
Comparing the cost per tool for cutting cast iron requires evaluating not just purchase price but also time investment, consumables, and the physical effort each method demands; these factors determine the true per-cut cost and suitability for a job.
A concise per-tool assessment highlights upfront cost, blade or disc lifespan, and reusable vs. disposable components. Choices balance capital outlay against recurring expense and operator fatigue.
- Diamond wheel: high upfront, long life, low replacement frequency.
- Reciprocating saw with carbide blade: moderate cost, frequent blades, higher operator effort.
- Manual hacksaw: minimal purchase price, high labor time, cheap consumables.
Time To Complete
When planning a cut, the time to complete varies widely by method: power tools like diamond wheel saws and abrasive grinders finish individual cast-iron pipe sections in minutes, reciprocating saws take longer and require blade changes, and manual hacksaws demand the most time and sustained effort. Each method’s cost, cut speed, and setup affect total duration. Faster tools reduce labor time but add expense; slower methods lower tool cost but increase project time. Choose based on job size, access, and budget.
| Method | Typical Time |
|---|---|
| Diamond wheel saw | 5–15 min |
| Abrasive grinder | 10–20 min |
| Reciprocating saw | 20–40 min |
| Hacksaw | 30–90 min |
Effort And Skill
Evaluate skill, time, and cost together to choose the right cutting method: higher-powered tools reduce labor and speed up cuts but require more operator skill, PPE, and upfront expense, while manual options lower equipment cost but demand greater physical effort and longer work time.
The choice depends on project scale, access, and operator experience. Compare anticipated labor hours, tool rental or purchase, and safety training before deciding.
Typical trade-offs include:
- Power saws/reciprocating saws: fast, higher cost, skilled operation, PPE essential.
- Angle grinder with diamond blade: moderate speed, skill and steady control required.
- Hacksaw/chisel: low cost, slow, physically demanding.
When to Call a Pro Instead of DIY Cutting
How should a homeowner decide whether to call a professional rather than attempt cutting a cast iron pipe?
When leaks are active, structural supports or load-bearing components are involved, or the pipe is buried in a slab, a professional should be engaged.
Complex fittings, corroded sections that may fragment, proximity to electrical, gas, or HVAC systems, or unknown asbestos-containing materials also warrant expert handling.
Limited access, lack of specialized tools, or no experience with sealing and rejoining cast iron justify hiring a licensed plumber.
Professionals provide diagnostic certainty, code-compliant repairs, and insurance-backed liability coverage that DIY work cannot match.
Quick Checklist: Tools, Safety, and Steps for a Safe Cut
What tools, precautions, and sequential steps are essential before a blade ever meets cast iron? A concise checklist guarantees safety and efficiency: verify pipe location, secure work area, and select appropriate cutting tools.
Inspect pipe for water, corrosion, or fittings that affect technique. Confirm power tools are grounded and abrasive wheels rated for cast iron.
Use appropriate PPE and a stable support or vise. Follow manufacturer tool limits and local codes.
- Personal protective equipment: eye, ear, respiratory protection, heavy gloves.
- Tools: angle grinder with masonry wheel, reciprocating saw with carbide blade, pipe vise or clamps.
- Steps: isolate, drain, mark, clamp, cut, deburr.
Conclusion
Cutting a cast‑iron pipe can feel both precise and perilous: the right tools bring control, while sparks and shards remind one of risk. A careful DIYer balances caution with competence, trading time and effort for savings; an overwhelmed homeowner trades stress for a pro’s certainty. With proper gear, clear markings and patience, a clean cut is achievable — but knowing when to stop and call help is the wisest cut of all.