How to Change Pipes Under Kitchen Sink: Easy DIY Guide
Key Takeaway: How to Change Pipes Under Your Kitchen Sink
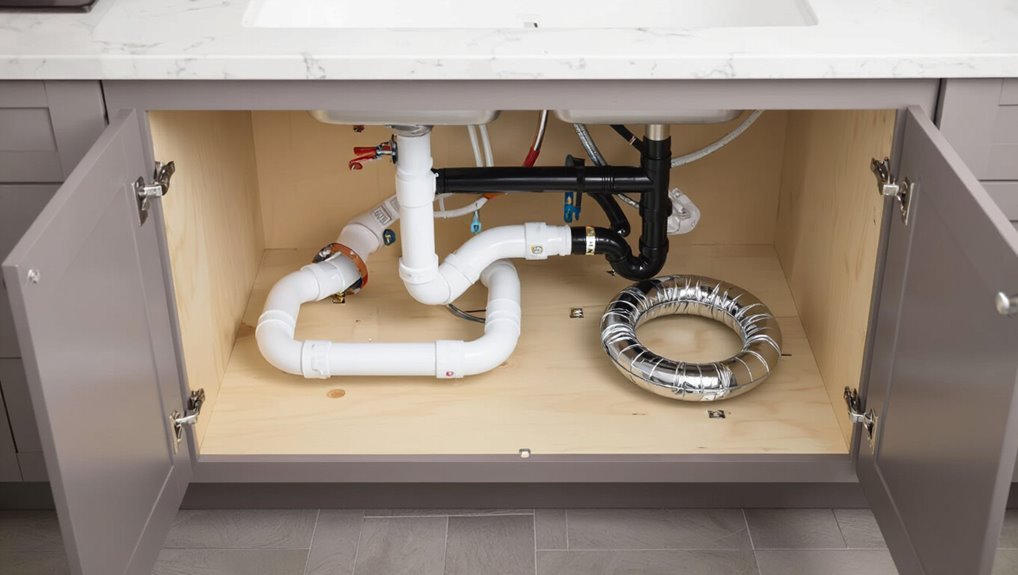
To change the pipes under your kitchen sink, follow this concise guide:
- Shut Off Water: Turn off the water supply at both the sink and the main valve. Open a faucet to relieve pressure in the lines.
- Prepare the Area: Clear the cabinet space under the sink and place a bucket under the P-trap to catch any water.
- Safety First: Wear eye protection and gloves to safeguard against debris and sharp edges.
- Remove Old Pipes: Loosen the slip nuts and detach the P-trap and tailpiece from the sink.
- Measure and Fit: Measure the pipe material and diameters of the existing pipes. Dry-fit the replacement parts to ensure compatibility.
- Install New Pipes: Connect the new pipes using compression fittings or solvent cement as needed.
- Tighten and Test: Tighten the nuts hand-tight and check for leaks by turning the water back on.
- Follow Local Codes: Ensure your installation complies with local plumbing codes.
This guide provides a straightforward approach to replacing sink pipes effectively and safely.
When to Replace Sink Pipes (Not Repair)
When visible corrosion, recurring leaks, persistent clogs despite repeated clearing, or foul odors indicate underlying damage, replacing the sink pipes is a more reliable choice than continuing repairs.
Signs warranting replacement include brittle or flaking metal, repeated joint failures, and chronic blockages originating within trap or waste lines.
Frequent temporary fixes that mask deeper degradation suggest systemic wear or improper original installation.
Replacement also addresses health risks from mold, sewage backflow, and contaminated water.
Choosing new piping can improve flow, reduce future labor costs, and enable upgrades to more durable materials.
Professional assessment is advised when damage extends beyond accessible sections.
Quick Pre‑Job Safety Checklist
Before beginning work on under‑sink pipes, the homeowner must shut off the water supply to prevent flooding.
They should put on protective eyewear and gloves to guard against debris and contaminants.
The workspace must be cleared and well lit to allow safe, efficient access to the plumbing.
Turn Off Water Supply
With the home’s main and local shutoffs identified, the worker locates and closes the appropriate valves to isolate both the cold and hot lines feeding the sink.
After turning valves, the worker opens faucet handles to relieve trapped pressure and drains remaining water into a bucket.
Verification follows: no flow from faucet and dry connections at supply tails.
If valves leak or won’t fully close, the worker notes need for replacement or uses main shutoff.
All actions are deliberate, recorded, and communicated to occupants before proceeding.
- Confirm valve positions visually and by feel
- Open faucet to bleed lines
- Catch residual water with a bucket
- Test for leaks after closure
Protective Eyewear And Gloves
Typically, the worker dons ANSI-rated safety glasses and chemical-resistant gloves before touching plumbing under the sink. Eye protection prevents splashes from cleaners, rust, or debris; gloves protect skin from solvents, sharp edges, and contaminants. Fit and condition are checked; torn gloves or scratched lenses are replaced. Disposable nitrile or thicker neoprene are chosen based on chemical exposure; impact-resistant goggles are used when grinding or hammering is planned. The checklist is brief, visual, and actionable to guarantee readiness.
| Item | Purpose | Condition |
|---|---|---|
| Safety glasses | Splash/impact protection | Scratch-free |
| Gloves | Chemical/cut barrier | Intact |
| Replacement | On-hand spares | Accessible |
Clear Workspace And Lighting
Under the sink area and surrounding floor must be cleared of tools, household items, and trip hazards to allow unobstructed access and safe movement. The workspace should be organized: nearby cabinets emptied, loose rugs removed, and a clear path to exits maintained. Portable lighting must be positioned to eliminate shadows inside the cabinet and beneath pipes; a headlamp keeps hands free. Electrical cords should be routed away from wet zones. Before starting, verify adequate ventilation and that a phone or helper is reachable in case of emergency.
- Remove clutter and secure loose mats
- Use bright, adjustable task lighting
- Keep cords and hoses out of work area
- Guarantee clear access to exits and phone
Estimate Labor and Material Costs
A clear estimate begins by projecting the labor time required for removing and replacing the sink pipes, including any troubleshooting.
Next, a concise material cost breakdown lists pipes, fittings, seals, and necessary tools with individual prices.
Finally, a modest unexpected expense buffer is recommended to cover hidden issues or last‑minute replacements.
Labor Time Estimate
Several factors determine the labor time estimate for replacing the kitchen sink plumbing: the complexity of the existing setup, accessibility of pipes and shutoffs, condition of fittings, and whether additional tasks (cutting counter, replacing trap primer, or rerouting drain/vent) are required.
A professional typically assesses site specifics, lists required steps, and assigns hourly rates. Simple P-trap and tailpiece swaps often take 0.5–1.5 hours, while full drain and supply replacement can require 2–5 hours. Unforeseen corrosion or tight spaces extend time. Accurate estimates account for inspection, disassembly, installation, leak testing, and cleanup.
- Quick repairs: 30–90 minutes
- Full replacement: 2–5 hours
- Inspection and prep: 15–30 minutes
- Contingency for complications: +30–120 minutes
Material Cost Breakdown
Having outlined typical labor times and contingencies, the cost breakdown turns to materials and how they influence the total estimate.
Costs vary by pipe type (PVC, ABS, copper, PEX), fittings, trap assemblies, slip nuts, gaskets, and sealant.
Basic PVC kits and traps commonly cost $15–40; PEX supply and fittings range $30–80; copper parts run higher, $50–150.
Additional items include mounting brackets, replacement escutcheons, and tubing cutters ($5–25 each).
Small hardware stores mark up parts slightly; buying a kit can reduce per-piece cost.
Accurate estimates list quantities, unit prices, and a modest parts contingency for potential replacements.
Unexpected Expense Buffer
Contingency planning quantifies the financial cushion set aside for unforeseen labor and material needs when replacing kitchen sink pipes. It guides realistic budgeting by adding a percentage of estimated parts and hourly labor to cover unexpected fittings, damaged connectors, or longer-than-expected repair time. Recommended buffers typically range from 10% to 30% depending on complexity and skill level.
This prevents mid-project stalls and avoids rushed, costly decisions.
- Allocate a percentage based on project complexity (10–30%).
- Include extra tools and small parts in the buffer.
- Factor potential professional call-out fees.
- Reassess buffer after initial teardown.
Tools and Materials You’ll Need
What tools and materials are required depends on the pipe type and the repair scope; at minimum, a basin wrench, adjustable pliers, a bucket, replacement P-trap or tailpiece, slip-joint washers, plumber’s tape, and appropriate sealant are needed. The homeowner should also have gloves, rags, a flashlight, and a utility knife. Small parts and fasteners should be organized before starting. Safety glasses and a basic understanding of shutoff valves prevent mistakes. The list excludes selecting pipe materials or fittings specifics, which are covered later.
| Tool | Purpose | Note |
|---|---|---|
| Basin wrench | Nut removal | Long reach |
| Pliers | Grip | Adjustable |
| Bucket | Catch water | Essential |
| Plumber’s tape | Seal threads | PTFE tape |
Choose the Right Replacement Pipes and Fittings
After clearing the work area and assembling the basic tools, the next step is selecting replacement pipes and fittings that match the existing system and the scope of the repair.
The person inspects pipe material (PVC, ABS, copper, or PEX), diameter, connection types (threaded, slip-joint, compression), and accessory needs like trap adapters or escutcheons.
Measurements are taken for accurate lengths.
Compatibility with sink tailpiece and drain system is confirmed to prevent leaks or misalignment.
Quality and ease of installation guide choices; prefabricated kits can simplify work for common configurations.
- Match material and diameter
- Choose correct connection type
- Include trap and adapter parts
- Measure for fit and length
Check Local Plumbing Codes for Sink Replacements
Before beginning any sink replacement, the homeowner should confirm local permit requirements to make certain the work is authorized.
They should also verify that chosen pipes and fittings meet applicable code standards and approved materials lists.
Checking these regulations up front prevents costly rework and potential violations.
Local Permit Requirements
When replacing a kitchen sink, homeowners should confirm local plumbing and building codes to determine whether a permit is required, since requirements can vary by municipality and by the scope of work (for example, simple faucet swaps often differ from full sink and trap replacements or changes to drain/waste lines).
Authorities may require permits for altered waste lines, structural changes, or work affecting multiple units. Failure to obtain permits can result in fines or complications when selling the property. It is prudent to consult the local building department or a licensed plumber before starting.
- Check permit thresholds and fees
- Ask about inspection scheduling
- Verify licensed-worker rules
- Keep permit documentation
Code-Compliant Materials
In replacing kitchen sink plumbing, homeowners and contractors must select materials that meet local plumbing codes and standards to guarantee safety, durability, and inspection approval.
Materials commonly approved include ABS, PVC, copper, and lead-free brass; each has permitted uses, temperature limits, and connection types.
Fixture traps, tailpieces, and supply lines require certified components and proper joint methods (solvent weld, compression, solder, or approved push-fit).
Seals, hangers, and escutcheons must also conform.
Before purchasing, verify municipal code, water authority rules, and any manufacturer restrictions.
Using noncompliant parts risks failed inspections, leaks, and costly rework.
Shut Off Water and Relieve Pressure
With the main water valve located and the appropriate shutoff turned, the supply to the sink must be fully stopped and residual pressure relieved to prevent sprays or leaks during work.
The technician verifies both hot and cold valves are closed, then opens the faucet to drain remaining water.
A bucket under the trap catches drips; a towel protects the cabinet floor.
If valves leak when closed, noting their condition helps decide replacement.
For homes with separate service, the main may need closure and brief system draining.
Always use gloves and eye protection when releasing pressure.
- Confirm both hot and cold shutoffs
- Open faucet to drain lines
- Catch water with bucket/towel
- Note leaking or faulty valves
Clear the Cabinet for Full Access
Having relieved pressure and drained the lines, the technician clears the cabinet to create unobstructed access to the pipes and fittings.
Remaining items—cleaning supplies, trash bins, and loose tools—are removed and set aside to protect them and prevent tripping.
A flashlight is positioned for steady illumination; a small tray holds fasteners and slipped washers.
Protective padding shields stored items left in place.
The floor beneath the sink is covered with an absorbent mat to catch drips.
Clear sightlines allow inspection of pipe alignment, shutoff valves, and mounting points, enabling efficient, safe progression to disassembly.
Remove the P‑Trap : Step by Step
The technician first identifies the curved P‑trap beneath the sink to confirm its orientation and connections.
After locating it, the water supply is turned off to prevent spills during removal.
Finally, the trap is loosened at the slip nuts, emptied into a bucket, and fully detached for replacement.
Locate The P‑Trap
Beneath the sink, the P‑trap is the curved section of pipe directly below the tailpiece that connects the basin drain to the waste line. It usually appears as a U‑ or S‑shaped bend made of metal or plastic, positioned between the sink tailpiece and the horizontal drain pipe. Visual inspection and simple reach tests confirm its location. Identify mounting nuts, slip joints, and the trap arm leading to the wall.
- Note material: PVC, ABS, or chrome-plated metal.
- Observe orientation: U‑bend toward wall or floor.
- Check for accessible slip nuts.
- Confirm trap leads to main waste line.
Shut Off Water Supply
With the P‑trap identified and its slip nuts located, attention turns to shutting off the water supply before removing the trap.
First, locate the shutoff valves beneath the sink—usually small quarter‑turn valves on the hot and cold lines. Turn each valve clockwise until fully closed; if valves are stiff, use an adjustable wrench gently.
Confirm closure by turning the faucet on briefly until flow stops and remaining water drains. If no local valves exist, shut off the home’s main water supply.
Keep a bucket and towel handy to catch residual water after valves are closed. Proceed only when flow is verified stopped.
Disconnect And Remove
Loosen the slip nuts on the P‑trap using a pair of channel‑lock pliers or a basin wrench, working from the bottom up to avoid strain on the drain fittings.
Place a bucket beneath the trap to catch residual water, then carefully unscrew the nuts until the trap can be tilted free.
Inspect washers and threads for damage, and note orientation for reassembly.
If corrosion resists, apply penetrating oil and wait briefly before retrying.
- Remove the trap slowly to avoid splashing.
- Keep parts organized for reinstall.
- Replace worn washers and gaskets.
- Clean mating surfaces before fitting new pipes.
Free a Corroded or Stuck P‑Trap
If the P‑trap is corroded or seized, begin by shutting off the water supply and placing a bucket beneath the trap to catch residue, then try to break the seal using penetrating oil applied to the slip nuts and a strap wrench or adjustable pliers to turn them gently.
If nuts remain immobile, apply penetrating oil, wait 10–15 minutes, then tap fittings lightly with a rubber mallet to relieve corrosion. For metal traps, heat applied briefly with a hair dryer may expand metal; avoid open flame. Protect nearby finishes.
Once loosened, work back and forth, gradually increasing leverage until the trap can be removed for cleaning or replacement.
Disconnect the Sink Tailpiece and Strainer
Before loosening any fittings, the water supply to the sink should be shut off to prevent spills.
Next, the tailpiece nut beneath the strainer is located and unscrewed with the appropriate wrench or pliers.
Care is taken to support the tailpiece while removing the nut so the strainer and connected pieces can be separated cleanly.
Turn Off Water Supply
Shut off the water supply to the sink by closing the shutoff valves beneath the cabinet or the main house valve if individual stops are not present; verify the supply is off by turning the faucet on and observing that no water flows.
The person assures residual pressure is released by opening both hot and cold handles briefly.
They place a bucket under the P-trap to catch drips.
They wear gloves and clear the cabinet area for access and lighting.
Confirming dryness prevents surprises when disconnecting fittings and reduces mess during tailpiece and strainer work.
- Confirm valve position visually and by faucet test
- Open faucet to bleed lines
- Place bucket under work area
- Clear and light the cabinet
Remove Tailpiece Nut
With the water confirmed off and the faucet handles opened to bleed the lines, attention turns to the tailpiece nut beneath the sink. The tailpiece nut secures the sink tailpiece to the strainer; it is typically plastic or metal and may be hand-tightened.
Position a bucket to catch residual water, then loosen the nut by hand or with channel-lock pliers, turning counterclockwise. Apply steady pressure to avoid damaging the tailpiece.
Once loose, slide the nut and washer down and disconnect the tailpiece from the strainer. Inspect washers and threads for wear, cleaning debris before proceeding with replacement or further disassembly.
Remove a Garbage Disposal Safely
When disconnecting a garbage disposal, the technician first cuts power at the circuit breaker and confirms the unit is dead using a noncontact tester.
The disposal is then supported from below, electrical connections are opened at the junction box, and the drain and dishwasher fittings are loosened.
The mounting ring is rotated to release the unit from the sink flange, allowing careful lowering.
Any water in the chamber is drained and trapped debris removed with gloves.
- Verify power off with a tester
- Support unit before unfastening
- Disconnect wiring and caps
- Rotate mounting ring to remove
Remove Old Supply Lines Without Leaks
Begin by turning off the water supply valves under the sink and opening the faucet to relieve pressure and drain remaining water; this prevents spills when lines are disconnected.
The technician places a bucket beneath connections and inspects supply lines for compression fittings, nuts, or quick-connect couplings.
Using an adjustable wrench, the technician loosens nuts while holding the valve body to prevent stress.
For quick-connects, a firm press and pull releases the line. Any trapped water drains into the bucket.
After removal, the technician checks valve threads and seats for damage, replacing faulty washers or ferrules before installing new lines.
Measure and Mark New Pipe Lengths
After the old supply lines are removed and valve fittings inspected, the technician measures for replacement pipe lengths to assure proper fit and avoid excess bends.
Measurements account for connection points, trap geometry, and slight clearance for fittings. A tape measure and marker assure repeatable cuts.
Reference alignment with wall studs and cabinet panels to prevent stress on joints. Confirm accessibility for future maintenance before finalizing marks.
- Measure twice: valve to fitting, trap to drain stub.
- Note required overlap for coupling or compression nuts.
- Mark pipe with clear, contrasting lines perpendicular to axis.
- Record each length before cutting.
Cut PVC/ABS Drain Pipe Cleanly
Cutting PVC or ABS drain pipe cleanly requires steady control and the right blade to guarantee square ends that seat properly in fittings.
A fine-toothed hacksaw or a PVC tubing cutter produces the cleanest cuts; secure the pipe in a vise or clamp with padding to prevent crushing.
Mark the cut line clearly, cut slowly with even strokes, and avoid twisting the blade.
After cutting, remove burrs and shaving with a utility knife or deburring tool, then lightly chamfer the outside edge to ease insertion.
Clean the cut surfaces of dust and oil before proceeding to the next joining step.
Join PVC Drain Pipe With Solvent Cement
With the pipe ends cleaned, chamfered, and free of burrs from the previous step, the joint can be assembled using PVC solvent cement.
The process requires fitting dry first to confirm alignment, then applying primer to both socket and spigot, followed by a uniform coat of solvent cement.
Insert the spigot fully with a quarter-turn twist to evenly distribute cement, hold for the manufacturer’s recommended set time, and wipe excess.
Allow full cure before testing with water.
- Confirm dry fit and correct orientation
- Use primer where specified
- Apply cement evenly; twist on insertion
- Respect set and cure times
Connect ABS or PVC With Slip Joints
When connecting ABS or PVC with slip joints, the installer selects slip nuts sized to match the pipe diameter and thread type.
Pipe sections are aligned squarely to prevent binding and guarantee a smooth seal.
Waterproof washers are seated and compressed evenly before the nuts are tightened to secure a leak-free joint.
Choosing Proper Slip Nuts
Selecting the correct slip nuts is essential for reliably connecting ABS or PVC drain fittings using slip-joint assemblies. The person replacing sink plumbing must choose nuts sized to the pipe and tailpiece, preferring plastic for PVC/ABS to avoid corrosion and metal for durability where specified.
Threads should match coarse pipe threads used on slip joints, and the nut must compress the washer evenly without cracking. Inspect for molded markings indicating size (1-1/4″, 1-1/2″) and material. Tighten by hand then quarter-turn with pliers; avoid over-tightening which can deform fittings.
- Confirm pipe diameter and tailpiece size
- Match nut material to pipe type
- Check thread compatibility and condition
- Verify washer fit before final tightening
Aligning Pipe Sections
Position each slip-joint section so the tailpiece, trap arm, and trap bend form a straight, continuous path without forcing angles that stress fittings. The installer aligns pipe ends, sliding slip nuts and sleeves just enough for smooth engagement. Check axial alignment and depth so the washer seats correctly (without discussing washer installation). Adjust lengths by trimming pipe, then recheck fit. Tighten nuts finger‑tight first, then slightly more with pliers while preventing rotation. Test dry for leaks and observe for misalignment under load. Use minimal movement after final tightening to avoid stressing joints.
| Step | Action | Checkpoint |
|---|---|---|
| 1 | Align ends | Straight path |
| 2 | Slide nuts | Proper engagement |
| 3 | Trim if needed | Correct depth |
| 4 | Tighten | No stress |
Securing Waterproof Washers
Before tightening slip nuts, the installer confirms each waterproof washer is correctly seated between the pipe shoulder and the nut so the sealing face is flush and concentric with the pipe axis.
The installer inspects washers for tears, hardening, or debris, replacing any defective pieces.
Slip joints are hand-started, aligned, then snugged evenly to avoid eccentric compression. Over-tightening is avoided to prevent distortion; a quarter to half turn past finger-tight is typical.
After assembly, the connection is tested under normal water pressure and observed for leaks, adjusting nut tension or reseating the washer if necessary.
- Inspect washers for damage before use
- make certain concentric seating
- Tighten evenly; avoid over-torquing
- Test and adjust after pressurizing
Install a Metal P‑Trap (Brass or Chrome)
Offering durability and a cleaner finish than plastic, a metal P‑trap (brass or chrome) requires the same basic alignment and sealing steps but demands attention to thread engagement and torque to avoid stripping plated threads or deforming soft metal.
The installer fits the trap arm and curved section, hand-threading nuts onto minimal Teflon tape or compression washers as specified.
Tighten progressively with a wrench, stopping when snug and leak-free; avoid over‑torque.
Make certain slip joints seat fully and that ferrules are straight.
Inspect plated surfaces for damage, replace damaged pieces, and test by running water while checking all joints for slow leaks.
Attach the Sink Tailpiece and Align the Trap
The installer threads the tailpiece onto the sink drain and tightens the slip nut to secure it in place.
Next, the trap is positioned beneath the tailpiece and adjusted so the inlet and outlet align without strain.
Finally, all trap nuts are tightened hand‑snug, then given a quarter turn with a wrench to guarantee a leak‑free connection.
Securely Fasten Tailpiece
Securely fastening the tailpiece guarantees a watertight link between the sink drain and the trap, preventing leaks and misalignment.
The installer inspects the tailpiece threads and slip nut, confirms the gasket seats evenly, then slides the nut and washer onto the tailpiece. The tailpiece is inserted into the drain outlet; the nut is hand-tightened until snug. A quarter-turn with a wrench finishes tightening—avoiding over-torquing to prevent cracking or distorting seals.
Finally, a brief leak test with a bucket under the trap verifies tightness; any drip prompts slight re-tightening or gasket repositioning.
- Inspect threads and gasket seating
- Hand-tighten nut then wrench quarter-turn
- Avoid over-tightening to protect seals
- Perform a brief leak test and adjust as needed
Align And Tighten Trap
Attach the sink tailpiece to the trap by sliding the trap nut and washer onto the tailpiece, then fitting the trap inlet over the tailpiece outlet so the washer seats evenly.
Rotate the nut finger-tight, keeping components aligned; use a wrench only for final snugging to avoid cracking plastic.
Position the trap so its outlet aligns with the wall drain stub, adjusting slip joints to make certain a straight, gently sloping line without tension.
Confirm washers remain seated and threads engage evenly.
Tighten nuts securely but without overforce.
Run water and inspect for leaks, retightening slightly if small drips appear.
Install Braided Stainless Supply Lines
Begin by measuring the distance from the shutoff valves to the faucet tails to select appropriately sized braided stainless supply lines. The installer verifies fittings match faucet tail and valve thread sizes, inspects included rubber washers, and hand-starts connections to avoid cross-threading.
Flexible lines are routed without sharp bends or kinks, maintaining gentle curves and clearance from hot pipes and cabinet edges. Torque is applied with a wrench to manufacturer torque specs, avoiding overtightening. Final checks include ensuring no rubbing points and confirming lines lie flat and supported, ready for the subsequent connection to shut‑offs.
- Verify thread sizes and washer presence
- Hand-start fittings to prevent cross-threading
- Maintain gentle curves; avoid kinks
- Apply correct torque; avoid overtightening
Connect Flexible Supply Lines to Shut‑Offs
Before connecting the new braided lines, the water supply must be shut off at the existing shut‑off valves.
Each flexible line should be threaded onto the corresponding shut‑off fitting and hand‑tightened, then finished with a quarter‑turn using an adjustable wrench.
After connections are made, the valves are slowly opened and tubes inspected for leaks.
Turn Off Water Valves
Shut the water at the individual shut‑off valves under the sink to isolate the fixture and prevent leaks while connecting flexible supply lines. The person verifies both hot and cold are closed, then opens a nearby faucet to relieve line pressure. Visual inspection confirms valves fully seated and dry; a towel is placed to catch drips. If a valve is stiff or leaks, it is noted for replacement before proceeding.
- Confirm both hot and cold shut‑offs are clockwise to close.
- Open faucet to bleed residual water.
- Inspect valves and fittings for corrosion or seepage.
- Keep a bucket and towel ready for minor drips.
Attach Flexible Lines
With both shut‑offs confirmed closed and the supply lines bled, the installer threads each flexible line onto its corresponding shut‑off valve, hand‑tightening the nut until the ferrule seats against the valve stem; a short final turn with an adjustable wrench guarantees a secure seal without over‑torquing.
The installer aligns the other end to the faucet tailpiece or P-trap inlet, ensuring the hose follows a smooth curve to avoid kinks.
After installation, fittings are checked for correct seating and the system is pressurized briefly to observe for drips. Any leak prompts a gentle retighten or replacement of the washer or ferrule.
Tighten Fittings Correctly (Don’t Overtighten)
Tighten fittings until they are snug and leak-free, but stop before applying excessive torque that can crack threads, deform compression rings, or strip nuts.
A firm hand and proper tools prevent damage; use an adjustable wrench or basin wrench sized to the nut. Apply steady, even pressure and stop when resistance increases and leaks cease.
For compression fittings, hold the fitting body with one wrench while turning the nut with another to avoid twisting pipe.
After tightening, run water and inspect for drips; retighten minimally if needed.
- Use correct wrench size
- Avoid sudden forceful turns
- Support the fitting body
- Check under pressure
Seal Threaded Drain Fittings (Tape & Sealant)
How should threaded drain fittings be sealed to prevent leaks and corrosion? The installer wraps male threads with PTFE (plumber’s) tape clockwise three to five turns, smoothing overlaps to seat evenly.
For metal-to-metal sealing or damaged threads, a compatible pipe joint compound is applied thinly on tape or alone, avoiding excess that can enter the trap. Plastic fittings require tape only; some plastics mandate non-petroleum sealants.
After applying tape or compound, threads are engaged and hand-started, then tightened to specified torque. Excess sealant is wiped away and joints inspected visually for proper seating before proceeding to trap assembly.
Test the Drain for Leaks and Hold
Begin by restoring water to the sink and running it long enough to fill the trap and pressurize the drain lines, observing all joints and fittings for visible drips or seepage.
The installer watches for slow drains, gurgles, or pooling beneath the sink. If no leaks appear, the trap is left filled and rechecked after several minutes and again after a short period of dry time to guarantee seals seat.
Any seepage is tightened or re-sealed, then retested. Confirm that connections hold under both flowing and standing water before finishing.
- Check for steady drip points
- Inspect slip‑joint nuts
- Test with paper towel
- Monitor for odor
Test Supply Lines and Shut‑Off Valves
Next, the installer routinely cycles the shut‑off valves and inspects the supply lines for tightness, leaks, and wear. They open and close each valve several times, observing for stiffness or seepage. Flexible hoses, compression fittings, and ferrules receive close inspection; any corrosion, bulging, or moisture prompts replacement. After pressurizing the lines, fittings are checked with a dry tissue and a small paper towel for micro‑leaks. Finally, valves are left fully operational and accessible. The table below summarizes typical observations and immediate actions.
| Component | Observation | Action |
|---|---|---|
| Valve handle | Stiff | Lubricate/replace |
| Fitting | Wet | Tighten/replace |
| Hose | Bulge | Replace |
| Ferrule | Corroded | Replace |
| Valve body | Drip | Repair/replace |
Fix Slow Drainage After Replacement
Often the most common cause of slow drainage after replacing pipes under a kitchen sink is residual debris or misaligned fittings that restrict flow.
A technician or homeowner should inspect trap alignment, run water while checking joints for leaks, and clear any packing debris left from cutting or soldering.
A plunger or hand auger can dislodge blockages; avoid chemical cleaners that may damage seals.
Make sure venting isn’t obstructed and that the P-trap slope promotes gravity flow.
If problems persist, recheck connections for compression ring misplacement or partially closed shutoffs and consider consulting a plumber.
- Inspect P-trap alignment and slope
- Clear trapped debris or solder residue
- Use plunger or hand auger carefully
- Verify fittings and shutoff positions
Prevent Sink Odors After Replacement
Regularly checking seals and trap alignment helps prevent sink odors after pipe replacement by eliminating common sources of gasses and buildup.
After installation, inspecting slip nuts, washers, and flange gaskets for tightness and correct seating reduces leaks and sewer gas escape.
Ensuring the P-trap holds water and is properly pitched prevents dry traps and backflow of odors.
Flushing the drain with hot water and a mild enzymatic cleaner clears organic residue without harming pipes.
Venting should remain unobstructed; obvious blockages in the vent stack or air admittance valve warrant professional assessment.
Routine brief inspections prevent recurring smells and preserve sanitary conditions.
Reroute or Shorten Drain Pipes for Fit
When space constraints or misaligned fittings prevent a direct connection, rerouting or shortening drain pipes allows the assembly to fit cleanly under the sink while maintaining proper slope and trap configuration.
The installer assesses existing runs, measures needed lengths, and plans offsets to preserve 1/4″ per foot slope.
Cuts are made square, deburred, and joined with appropriate fittings or couplings; solvent welds or compression joints are used per material.
Care guarantees the P-trap remains accessible and venting is not compromised.
Test for leaks and adjust as needed before finalizing supports and insulation.
- Measure twice, cut once
- Maintain slope and trap alignment
- Use correct fittings for material
- Pressure-test after assembly
Replace a Damaged Sink Flange or Strainer
Remove the old flange or strainer carefully to prevent damage to the sink and surrounding plumbing; this begins by disconnecting the drain tailpiece, loosening the locknut beneath the sink, and breaking any sealant using a putty knife or plumber’s wrench.
Inspect the sink hole for corrosion or debris and clean thoroughly.
Fit the new flange or strainer with plumber’s putty or a modern rubber gasket, aligning it squarely.
From below, reinstall the rubber gasket, friction washer, and locknut, tightening evenly to compress the seal without over-torquing.
Reattach the tailpiece, test for leaks, and tighten fittings as needed.
Maintain Your New Sink Plumbing Long‑Term
Occasionally inspecting the new sink plumbing helps prevent minor issues from becoming costly repairs.
Regular checks focus on joints, seals, and visible corrosion.
Flushing with hot water and a mild cleanser clears buildup.
Tightening slip nuts and reapplying plumber’s tape where small leaks appear maintains integrity.
Record dates of maintenance for trend spotting.
- Check for dampness and water stains under the sink monthly.
- Run hot water and a tablespoon of baking soda weekly to reduce clogs.
- Tighten loose fittings every few months; avoid overtightening.
- Replace worn washers or seals promptly to prevent escalation.
When to Call a Professional Plumber
If persistent leaks, foul odors, or recurrent clogs occur despite basic maintenance, a professional plumber should be contacted promptly. A plumber assesses hidden damage, sewer-line issues, and incorrect installations that DIY fixes cannot safely resolve.
Complex tasks—replacing corroded supply lines, repairing compromised drain assemblies, locating slow leaks behind cabinets, or addressing water pressure anomalies—require licensed tools and expertise. Emergency situations like significant flooding, gas line proximity, or suspected sewage backup demand immediate professional response.
Hiring a plumber guarantees compliance with local codes, reliable diagnostics, and warranty-backed repairs. Obtain estimates, verify credentials, and prioritize timely intervention to prevent greater damage and higher costs.
Green Upgrades and Code‑Compliant Options
After deciding when professional help is necessary, homeowners can consider green upgrades and code‑compliant options that reduce water use, improve safety, and extend the life of under‑sink plumbing.
Choices should match local codes and focus on durable, water‑saving components. Selecting low‑flow faucets, lead‑free fittings, and corrosion‑resistant materials prevents failures and meets regulations.
Proper venting and trap design maintain drainage and odor control while complying with standards. Documentation of parts and permits guarantees inspections go smoothly and preserves resale value.
- Install low‑flow aerators and WaterSense‑rated faucets
- Use lead‑free, NSF/ANSI‑certified fittings
- Prefer PEX or stainless for corrosion resistance
- Verify trap/vent configuration meets local code
Clean Up and Restore the Cabinet Area
When the plumbing work is complete, the cabinet area should be cleaned, dried, and restored to a functional state to prevent odors, mold, and further damage.
Remove tools, debris, and any remaining fittings, then vacuum loose dirt and wipe surfaces with a mild detergent.
Inspect for damp insulation, soft wood, or stains; replace damaged shelf liners and seal exposed plywood with a water-resistant finish.
Reinstall or replace lost clips, brackets, and cabinet hardware.
Make sure trap and connections are accessible and unobstructed.
Store cleaning supplies away from plumbing joints.
Finally, run the sink and recheck for leaks before closing the cabinet.
Conclusion
When the project is complete, the kitchen sink’s new piping should function like a reliable heartbeat—steady and unnoticed. The homeowner has weighed replacement versus repair, followed safety steps, estimated costs, gathered tools and correct fittings, and considered long‑term maintenance and code or green options. If complications surfaced, a professional was engaged. Remaining debris is cleared and the cabinet restored, leaving a safe, durable plumbing setup ready for everyday use.