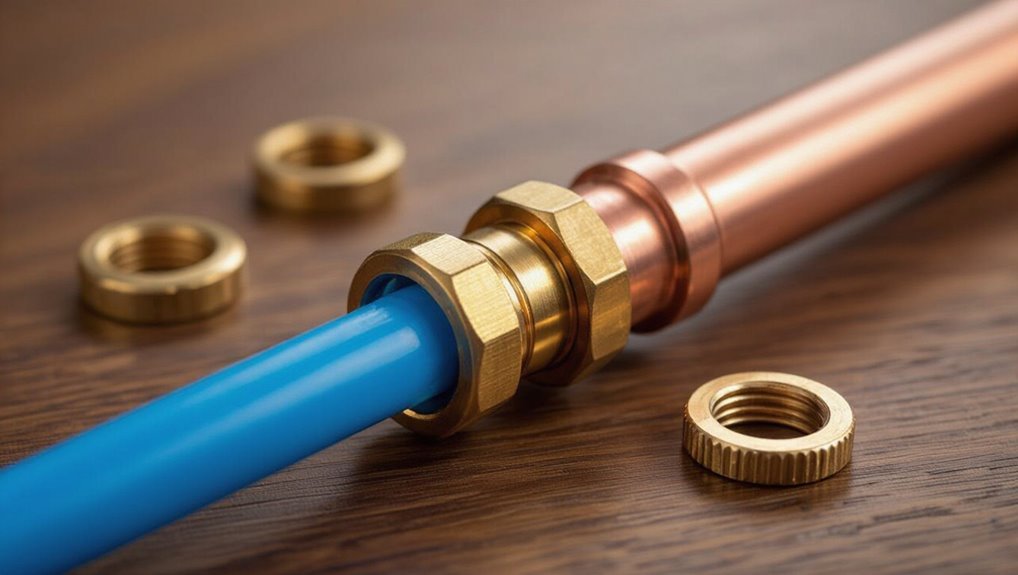
PEX to Copper Pipe: Easy Connector Guide for DIY Plumbing Projects
To effectively connect PEX to copper pipes for your DIY plumbing projects, consider these top connector options: push-fit, crimp (or clamp) rings, and compression adapters.
Key Takeaways:
- Push-fit connectors: Ideal for quick installations and tight spaces.
- Crimp rings: Provide durable, permanent seals for long-lasting connections.
- Compression adapters: Allow for reworkable joints, making them useful for adjustments.
Required Tools:
- Pipe cutter
- Deburrer
- Crimper or clamp tool
- Pressure-test gear
Steps to Follow:
- Prepare the pipes (cut and deburr).
- Ensure correct insertion depths.
- Conduct leak testing and apply corrosion protection.
For further details, including step-by-step procedures, troubleshooting tips, and cost/skill comparisons, continue reading.
Best Connector Types for PEX-to-Copper (Quick Guide)

When joining PEX to copper, choosing the appropriate connector type depends on pipe size, system pressure, permanence, and installation speed; common options include crimp rings, clamp (Cinch) rings, push-fit fittings, and compression fittings.
Crimp rings offer a permanent, low-cost mechanical seal requiring a crimp tool and gauge.
Clamp (Cinch) rings provide similar permanence with a ratcheting clamp tool and are often faster.
Push-fit fittings enable tool-free, reversible connections suited to repairs and tight spaces.
Compression fittings create threaded seals on copper fittings and can join PEX with the right adapter, useful where disassembly may be needed.
How to Choose: Push-Fit vs Crimp vs Compression
The choice between push-fit, crimp, and compression fittings hinges on trade-offs of speed and long-term performance.
Push-fit excels for quick, tool-free installations, while crimp and compression methods are often chosen for their greater durability when properly executed.
Evaluating project tempo, access, and expected service conditions will determine the most appropriate option.
Push-Fit: Speed And Ease
Often chosen for retrofit and emergency work, push-fit fittings offer speed and simplicity by allowing PEX to connect to copper without solder, clamps, or special tools.
They seal via an internal O‑ring and stainless steel teeth, enabling quick installs and easy disassembly for adjustments.
Ideal where access is limited, they reduce leak risk from installation error and require minimal experience.
Considerations include compatibility with pipe size and local code acceptance; they work well for temporary fixes or time‑sensitive projects.
Lifespan and chemical compatibility should be checked against application requirements.
- Rapid installation in tight spaces
- Tool‑free connection and reuse
- Verify size and code compliance
Crimp Vs Compression: Durability
Generally, durability differences among crimp, compression, and push‑fit connections come down to material interfaces and installation quality.
Crimp fittings rely on a permanent mechanical deformation of the ring; when properly crimped with the correct tool and gauge, they resist vibration and thermal cycling well but are less forgiving of mistakes.
Compression fittings use a ferrule compressed against tubing; they can be retightened and tolerate minor misalignment, yet over‑tightening risks deformation and leaks.
Push‑fit connectors use internal O‑rings and grip mechanisms; they offer durable, maintenance‑free seals if installed on clean, correctly sized pipe, but O‑ring damage shortens service life.
Tools and Materials for PEX-to-Copper Connections
Before starting a PEX-to-copper connection, assemble a compact kit of specific tools and reliable materials to guarantee a clean, secure joint.
The list should include quality connectors sized to the tubing, compatible fittings (crimp, clamp, or press), and appropriate seals.
Essential tools minimize errors: a dependable crimping or pressing tool, tubing cutter, and deburring implement.
Safety and testing items round out the kit: gloves, marker, and pressure gauge.
Selecting certified components and a calibrated tool confirms longevity.
Keep spare rings and compression nuts on hand to handle unexpected fittings or minor repairs.
- Connectors and seals
- Crimp/press tool and cutter
- Safety and testing items
Prepare Copper and PEX for a Reliable Joint
Prepare both pipes with care to make certain a durable PEX-to-copper joint: measure and mark the copper and PEX to the correct insertion depths, cut each squarely with a proper tubing cutter, and remove all burrs and sharp edges from the copper with a deburring tool or fine file.
Next, clean the copper with a cloth or emery to remove oxidation and oil. Inspect PEX ends for nicking; trim if necessary to expose a smooth bead. Verify pipe roundness and remove any deformities. Lightly chamfer PEX and copper edges to ease insertion. Dry-fit components to confirm alignment and depth before final assembly.
Install a Push-Fit Connector (Step-by-Step)
The installer first measures and marks the PEX and copper to guarantee proper insertion depth.
Next, both pipe ends are deburred and wiped clean to remove burrs and contaminants.
Finally, the push-fit connector is pushed onto each pipe until seated and then checked for a secure hold.
Measure And Mark
With the pipe cut to length and ends deburred, the installer measures and marks the insertion depth on the PEX and copper to make certain the push-fit connector seats fully; accurate marking prevents leaks and simplifies alignment during assembly.
The installer uses the connector’s published depth, measures from the pipe end, and marks both pipes with a visible line.
A secondary check compares both marks to make certain equal insertion and consistent seating.
Care is taken to keep marks clear but not to score the tubing.
Final visual alignment confirms readiness before the connector is pushed on.
- Refer to connector depth chart.
- Measure and mark both pipes.
- Verify marks align.
Deburr And Clean
Before joining the tubing, make sure all cut ends are deburred and surfaces are clean so the push-fit O-rings can seal properly.
Remove burrs on copper with a reamer or file, rotating to smooth the ID and eliminate sharp edges.
Trim PEX with a tubing cutter, then inspect for unevenness.
Wipe both PEX and copper ends with a clean cloth; use a cloth dampened with isopropyl alcohol if oily residue is present.
Remove any metal shavings or plastic particles.
Verify both pipe ends are dry and free of nicks, scratches, or irregularities that could compromise the O-ring seal.
Push And Secure
Push the PEX and copper straight into the push-fit connector until each pipe bottoms out against the internal stop. The installer verifies alignment, ensures no twisting, and confirms the connector’s retaining ring fully engages.
A light pull test checks security; no movement indicates a proper seal. Mark insertion depth on both pipes for future reference.
Avoid lubricants that can contaminate the O-ring and do not re-use connectors removed after installation. If leaks appear, drain the system, cut back to fresh pipe, re-square the ends, and install a new push-fit.
- Align pipes squarely
- Insert to stop
- Perform pull test
Make a Crimped PEX-to-Copper Connection (Step-by-Step)
Begin by assembling the necessary tools and materials: a length of PEX, a copper stub-out or fitting, a PEX crimp ring, crimping tool sized to the ring, a tubing cutter, and a deburring tool.
Cut PEX squarely to length, then deburr and chamfer the copper end.
Slide the crimp ring onto the PEX, insert the copper stub-out fully, ensuring proper overlap.
Position the ring 1/8–1/4 inch from the PEX end.
Compress the ring with the crimping tool until the tool indicates a full crimp.
Remove tool, inspect the crimp for uniform compression, and perform a pressure test to confirm a leak-free joint.
Use a Compression Adapter With Copper (Step-By-Step)
When connecting PEX to existing copper lines using a compression adapter, the installer prepares the copper stub and PEX, guarantees the adapter’s ferrule and nut match the pipe sizes, and verifies the connection type (threaded compression vs. compression-to-barb) before assembly.
The installer slips the ferrule and nut onto copper, inserts copper fully into the adapter, then tightens the nut hand‑tight plus one wrench turn to compress the ferrule.
For compression‑to‑barb adapters, the PEX slides over the barb, a clamp is positioned, and the nut secures the copper side only.
- Clean and deburr copper.
- Position ferrule, tighten nut.
- Slide PEX onto barb and clamp.
Test for Leaks and Protect the Joint
After the compression adapter and PEX barb are tightened and clamped, the joint must be checked for leaks and protected against mechanical damage and corrosion.
The installer pressurizes the line, inspects the connection for drips, and monitors pressure for several minutes. Any seepage requires re-tightening or reassembly.
Once watertight, apply pipe insulation or a foam sleeve to shield against impact and temperature loss.
Use dielectric tape or an approved corrosion inhibitor where dissimilar metals contact, and secure piping with clamps to prevent movement.
Label the repair and document the pressure test results for future reference and code compliance.
Cost, Time, and DIY Difficulty: Which Method Fits You
Which option makes the most sense depends on budget, schedule, and skill level. The homeowner compares materials, tools, and potential labor. Crimp and clamp fittings cost less, install quickly, and suit beginners. Expansion fittings are cleaner, slightly pricier, and need a dedicated tool. Soldered copper adapters demand skill, time, and safety precautions; they may lower parts cost but can require a pro.
- Crimp/clamp: low cost, fast, beginner-friendly.
- Expansion: moderate cost, neat finish, tool required.
- Soldered: low parts cost, high skill/time, possible contractor needed.
Conclusion
Choosing the right PEX-to-copper connector affects longevity and ease of repair; push-fit, crimp, and compression each suit different skills and budgets. Curiously, around 60% of DIY plumbing failures stem from improper joint preparation rather than connector choice, so careful deburring, cleaning, and alignment matter most. With proper prep and the method matching the homeowner’s tools and comfort level, reliable, leak-free connections between PEX and copper are readily achievable.