Can I Bury PEX Pipe? Safe Installation Tips & Code Guidelines
Yes, PEX pipe can be buried in many installations, provided that the installer adheres to manufacturer instructions and local plumbing codes.
Key Takeaways:
- Follow Guidelines: Always comply with manufacturer and local code requirements.
- Protective Measures: Use conduit, tracer tape, and suitable backfill to safeguard against soil chemistry, sharp stones, and mechanical stress.
- Depth & Freeze Protection: Minimum cover depths and freeze protection requirements vary by jurisdiction.
- Underground Fittings: Ensure fittings are rated for underground use.
- Permits Required: Obtain necessary permits and perform utility locates before installation.
By taking these precautions, you can help ensure the longevity and safety of your PEX piping installation.
Can You Bury PEX Pipe?
Can PEX be buried directly in the ground? The writing explains that burying PEX is possible but condition-dependent.
Soil composition, chemical contamination, and mechanical stresses affect longevity. Codes frequently require protective measures: conduit, tracer tape, or minimum cover depths to guard against puncture and UV exposure during installation.
Temperature extremes and potential freeze conditions dictate burial depth or insulation. Direct burial of PEX-A, PEX-B, or PEX-C may be permitted when manufacturer guidelines and local plumbing codes are met; adhesive fittings and crimps must be suitable for subsurface use.
Backfill should be free of sharp stones and compacted gently. Electrical grounding interactions and proximity to other utilities require coordination.
Documentation of the route aids future maintenance and compliance verification.
Short Answer and Safety Summary
In most typical installations, burying PEX pipe is acceptable provided the material, fittings, and installation methods comply with manufacturer instructions and local codes.
The short answer: PEX can be buried when rated for underground use, protected from UV, installed with appropriate bedding and separation from sharp objects, and when approved fittings and connections are used.
Safety summary: avoid direct contact with soil contaminants, maintain required cover depth, use conduit or sleeves where passing through concrete or paving, and prevent backflow or freeze risks with proper slope and insulation where needed.
Verify chemical compatibility and avoid stray electrical currents.
Always consult product documentation and local authority having jurisdiction to confirm allowable burial practices and inspection requirements.
When to Bury PEX vs Run Above Ground
Decisions about burying PEX or running it above ground hinge on below-grade durability, the need for future access, and local climate conditions.
Buried installations require attention to material protection and frost depth to prevent freeze damage and soil-related degradation.
Above-ground runs simplify repairs and inspections but may demand insulation or heat tracing in cold regions.
Below-Grade Durability Concerns
Below-grade installations pose distinct durability concerns that determine whether PEX should be buried or routed above ground.
Soil composition, shifting loads, and moisture exposure directly affect PEX longevity; abrasive or rocky soils can abrade sheathing and fittings, while saturated, acidic soils accelerate degradation of protective layers.
Freeze–thaw cycles and groundwater movement impose cyclic stresses that may fatigue tubing if burial depth and insulation are inadequate.
Chemical exposure from fertilizers, petroleum products, or stray current can compromise PEX and metal fittings, so barrier materials and corrosion-resistant connectors are essential.
Mechanical protection—sleeves, conduit, or crushed-stone bedding—mitigates puncture and point loads from construction activity.
Where conditions present elevated abrasion, chemical or load risks, routing above ground or within protected chasework often proves the more durable choice.
Accessibility For Repairs
Site conditions and longevity concerns naturally lead to evaluating how easily lines can be accessed for repair. Decisions to bury PEX versus routing above ground hinge on expected maintenance frequency, proximity to serviceable areas, and consequences of failure.
Buried runs reduce exposure but complicate repairs; exposed runs are easier to inspect and replace. Consider trade-offs:
- Anticipated access — frequent valves, joints, or service points favor above-ground routing.
- Emergency repair speed — buried lines lengthen response and excavation time.
- Isolation strategy — use accessible shutoffs and manifold placement to limit buried run depth.
- Future modifications — plan stub-outs, access boxes, or conduit to avoid full excavation.
Final installation choices should prioritize serviceability while complying with local code and manufacturer guidance.
Climate And Frost Depth
Climate and local frost depth determine whether PEX should be buried or routed above ground: in regions with deep or frequent freezing, burying below the frost line or using proper insulation and heat tracing prevents freeze damage, while in mild climates or protected spaces above-ground runs may be acceptable provided they are shielded from direct exposure.
Contractors assess local frost maps, soil type, and microclimates to set burial depth. When burial below frost line is impractical, continuous heat tape with thermostat control, rigid foam insulation, or enclosing PEX in conditioned chases mitigates freezing risk.
Code may mandate minimum depths or protection methods; adherence guarantees longevity. Decisions balance freeze risk, accessibility, installation cost, and compliance with local plumbing regulations.
Local Building Codes and Permits for Buried PEX
Before burying PEX, the installer should verify local permit requirements and whether the municipality requires a permit for underground plumbing work.
Relevant code references and standards—such as local amendments to the IPC/UPC, ASTM specifications, and manufacturer installation guidelines—must be consulted to guarantee compliance.
The installer should also schedule required inspections in advance to coordinate trenching and backfilling with local authorities.
Permit Requirements Localities
Because buried PEX alters subsurface piping and can affect utilities and drainage, local building departments typically require permits and inspections before burial.
Jurisdictions vary on application procedures, fees, and required documentation; installers should contact the local permitting office early to confirm submission deadlines and plot or plan requirements.
Inspections commonly verify depth, separation from other utilities, protective sleeving, and tracer wire or marking. Failure to obtain permits can lead to remediation orders, fines, or denial of insurance claims.
- Confirm local permitting office and submission process.
- Provide site plans showing routing, depth, and crossings.
- Schedule rough-in and final inspections; keep records.
- Verify any excavation, notification, or utility-locate requirements prior to work.
Code References And Standards
When installing buried PEX, adherence to applicable building codes, plumbing standards, and material specifications is essential to guarantee safety, durability, and regulatory approval.
Installers should reference the International Plumbing Code (IPC) or the Uniform Plumbing Code (UPC) as adopted locally, plus ASTM standards (e.g., ASTM F876/F877) and CSA/NSF certifications for potable water use.
Local amendments can dictate minimum cover depth, backfill materials, and separation from electrical or sewer lines. Temperature ratings, UV exposure limits, and allowed fittings must match listed product data.
Project documentation should cite the exact code editions and product listings used. Compliance with these references reduces inspection issues and long-term failures while ensuring installations meet jurisdictional legal requirements.
Inspection Scheduling Requirements
Local authorities typically require scheduled inspections at key stages of a buried PEX installation—permit issuance, trench preparation and bedding, pre-cover pressure testing, and final backfill—so contractors must coordinate timing and documentation with the permitting agency to avoid work delays or rework.
Inspectors confirm compliance with pipe type, depth, separation from other utilities, bedding material, coverings, detectable warning tape, and tracer wire or conduit where required.
Failure to schedule or pass inspections can necessitate excavation, replacement, or permit penalty.
- Confirm permit scope and required inspection milestones with the local authority.
- Provide plans, product data, and installer credentials at permit issuance.
- Schedule trench and pre-cover pressure tests; document results for inspector review.
- Obtain final approval before permanent backfill and project handover.
Minimum Burial Depths Required by Code
While specific depths vary by jurisdiction and application, building codes set minimum burial depths for PEX that balance protection from surface loads and freezing with accessibility for repairs. The codes typically specify deeper burial for supply lines under driveways, vehicular areas, or where heavy equipment travels, and shallower depths for non-traffic lawn installations. Local amendments and water service size influence the required cover; installers must consult municipal plumbing or electrical codes and utility locators before trenching. Exceptions may allow insulation, conduit, or mechanical protection to reduce depth. Documentation of installed depth at inspection supports compliance and future maintenance planning.
| Area type | Typical depth | Protection option |
|---|---|---|
| Lawn | 12–18 in | Sand bedding |
| Driveway | 18–24 in | Concrete sleeve |
| Garden bed | 8–12 in | Insulation wrap |
| Sidewalk | 18 in | Metal conduit |
| Service line | 24 in+ | Tracer wire |
Frost-Depth Rules and Cold-Weather Protection
The section reviews how minimum burial depths relate to local frost-line requirements and code compliance.
It notes the use of frost line maps to determine required depths and the role of insulation and electric heat trace where deeper burial is impractical.
Guidance focuses on matching installation methods to local frost conditions to prevent freezing and maintain system integrity.
Minimum Burial Depths
Minimum burial depth for PEX piping is governed by frost-line considerations and applicable codes, typically requiring pipes to be placed below the regional frost depth or provided with approved insulation or heat-tracing when shallower placement is unavoidable.
Local codes set minimum depths; installers must verify municipal or state requirements before trenching. When burial deeper than frost depth is impractical, listed insulation methods, conduit systems, or electric trace tape designed for buried use may be used to prevent freezing.
Bedding and backfill materials influence thermal performance and should meet code. Surface loads and potential future excavation also inform depth choices. Routine inspection of as-built depths and marking reduces accidental disturbance.
- Verify local code depth requirements and permit conditions.
- Use approved insulation or heat tracing if above frost depth.
- Select suitable bedding/backfill to reduce thermal transfer.
- Mark and document pipe depth for future reference.
Frost Line Mapping
Frost line mapping defines the expected depth of seasonal ground freezing across a region and establishes the baseline for where PEX piping must be buried or require protection. Authorities use historical data, soil type, and climate to set local frost depths; installers consult maps or code tables to determine minimum burial or mitigation measures. Where mapped frost depth exceeds practical burial, alternative protections are required to prevent freeze damage to PEX lines. Documentation of local frost depth on plans and job records guarantees compliance and long-term performance.
| Region | Typical Frost Depth | Action Required |
|---|---|---|
| Zone A | 12 in (300 mm) | Standard burial |
| Zone B | 36 in (900 mm) | Deeper burial or protection |
| Zone C | 60 in (1500 mm) | Protection methods mandated |
Insulation And Heat Trace
When ground conditions or code requirements prevent burying PEX below the mapped frost depth, installers must rely on insulation and electrically powered heat tracing to maintain liquid integrity and prevent freezing.
Insulation choice, thickness, and continuous coverage reduce thermal loss; closed-cell foam and rigid board are common.
Heat trace cables must match pipe material, be UL-listed for wet locations, and installed per manufacturer instructions with thermostat control and ground-fault protection.
Joint and penetration sealing preserve thermal continuity. Regular inspection and accessible service loops minimize failures.
Documentation of system design and energy controls satisfies inspectors and aids maintenance.
- Select compatible insulation type and R-value for local frost depth.
- Use UL-listed heat trace with thermostat and GFCI.
- Seal fittings and connections thoroughly.
- Provide access and labeling for inspection.
PEX Types Overview: A, B, C
Although all three common PEX types—A, B, and C—serve the same basic purpose of conveying water in residential and commercial systems, they differ in manufacturing method, flexibility, repairability, and fitting compatibility. PEX-A is made by peroxide crosslinking, offering high flexibility and good cold-weather resilience; it expands for barb and expansion fittings and is generally easier to repair. PEX-B uses silane or irradiation crosslinking, is stiffer, resists chlorine better, and commonly requires crimp or clamp fittings. PEX-C is produced by electron beam crosslinking, sits between A and B in properties, and is less common. Selection depends on installer preference, local code acceptance, and fitting systems in use.
| Type | Crosslinking | Typical Use |
|---|---|---|
| A | Peroxide | Flexible installs |
| B | Silane/IR | Stiffer runs |
PEX-A vs PEX-B vs PEX-C: Underground Durability
When comparing PEX-A, PEX-B, and PEX-C for underground use, material flexibility and chemical resistance are primary considerations.
PEX-A’s high flexibility can ease installation and reduce joint stress, while PEX-B and PEX-C are stiffer but often more resistant to certain soil chemicals.
Selecting the appropriate type depends on expected ground conditions and long-term exposure to contaminants.
PEX Material Flexibility
PEX-A, PEX-B, and PEX-C differ in manufacturing method and molecular structure, which affects flexibility and performance in buried applications; PEX-A, produced by the Engel method, is the most flexible and resists kinking, while PEX-B and PEX-C are stiffer and can be more sensitive to sharp bends and repeated handling during installation.
- Flexibility: PEX-A permits tighter bends and fewer fittings, reducing leak points in underground runs.
- Handling: Stiffer PEX-B and PEX-C require care to avoid permanent deformation when pulled around corners or through conduit.
- Thermal movement: More flexible PEX accommodates thermal expansion with less stress at joints.
- Installation speed: Flexibility of PEX-A can shorten labor time and simplify trenching layouts, though protection and bedding remain essential for all types.
Chemical Resistance Differences
Chemical compatibility is a key factor in selecting PEX for buried applications, because soil chemistry and groundwater can vary widely and different PEX types exhibit distinct resistance to chemicals and additives.
PEX-A, produced by peroxide crosslinking, generally shows the best ductility and recovery from stress, and offers good resistance to many common soil contaminants and residual construction chemicals.
PEX-B, made by silane or irradiation methods, is stiffer and may be more susceptible to certain oxidizing agents but performs well against hydrocarbons and many soluble salts.
PEX-C, less commonly used, typically has lower crosslink density and somewhat reduced chemical resistance.
Site-specific testing or manufacturer data should guide selection; where aggressive soils or contaminants exist, protective conduit or barrier layers are prudent.
Jacketed vs Bare PEX: When to Use Each
How does one decide between jacketed and bare PEX for a project?
Jacketed PEX offers an added outer poly jacket that protects against physical damage, sunlight, and some chemical exposures; it is preferred where the pipe will be exposed in trenches temporarily, pulled through rough conduit, or where code requires an identification jacket.
Bare PEX is lighter, more flexible, and often used inside walls or in protected conduits where abrasion and UV are not concerns.
Factors to weigh include expected physical abrasion, UV exposure, ease of routing, and local code requirements.
Practical considerations:
- Select jacketed when abrasion, sunlight, or mandated marking is likely.
- Choose bare for tight spaces and indoor runs.
- Consider handling and installation speed.
- Confirm local code compliance.
Selecting PEX Size for Buried Water Lines
Choosing the correct PEX diameter for buried water lines hinges on balancing flow needs, pressure loss, and practical installation constraints.
Selection typically follows local code and anticipated demand: 3/4-inch PEX often serves short runs or single fixtures, while 1-inch or larger may be specified for mains or supply to multiple fixtures.
Soil conditions, available trench space, and connection types influence size choices; larger diameters are more forgiving during installation and reduce friction-related issues without addressing long-run hydraulics here.
Compatibility with fittings, manifolds, and service entry points must be verified to avoid adapters that create restrictions.
Where future expansion is possible, upsizing can provide flexibility.
Contractors should document chosen sizes and ascertain compliance with applicable plumbing codes and materials standards.
Pressure and Flow Considerations for Long Runs
Because long PEX runs increase cumulative friction losses, designers must evaluate pressure drop and available flow before finalizing pipe size and layout.
Hydraulic calculations determine whether larger diameter PEX, parallel runs, or pressure-boosting equipment is required to meet fixture demand. Considerations include initial system pressure, elevation change, and fitting count, each adding head loss.
Temperature and flow velocity limits influence allowable sizing to prevent noise and erosion. For buried runs, accessibility for future modifications affects choices.
- Calculate total dynamic head from fittings, length, and elevation.
- Select pipe size to maintain acceptable velocity and pressure at fixtures.
- Use manifolds or parallel lines where single-run losses are excessive.
- Consider booster pumps only after confirming piping options and controls.
Soil Types That Affect Buried PEX Lifespan
Soil composition greatly influences the longevity of buried PEX, with clay and other expansive soils posing risks through seasonal heaving and pressure on the pipe.
Conversely, sandy and rocky soils can abrade the outer jacket and create uneven support that concentrates stress.
Proper bedding, protective wrap, and allowance for movement mitigate these distinct soil-related threats.
Clay And Expansive Soils
When buried in clay or other expansive soils, PEX piping faces stresses from seasonal swelling and shrinking that can shift joints and distort lines. Installers must anticipate ground movement and provide allowances for longitudinal and lateral expansion, proper bedding, and flexible jointing to protect system integrity.
The material’s flexibility helps but does not eliminate risk from repeated heave and settlement. Risk mitigation focuses on accommodating movement, minimizing concentrated loads, and preventing abrasive contact with clay particles and occasional trapped moisture.
Attention to trench design, change points, and inspection access reduces failure likelihood. Typical recommendations emphasize controlled backfill and stress-relief measures rather than relying solely on pipe toughness.
- Use compliant bedding and sand or screened fill
- Provide expansion loops or slack
- Protect fittings with sleeves
- Allow inspection access
Sandy And Rocky Soils
Sandy and rocky ground imposes different risks on buried PEX than clay: coarse particles can abrade the outer jacket and concentrated stones may create point loads that deform or crack fittings over time.
In sandy soils, trench walls tend to collapse and shift, allowing movement that rubs the tubing; bedding with fine sand or pea gravel and a continuous protective sleeve reduce abrasion and lateral migration.
In rocky terrain, sharp fragments and frost-heave-prone cobbles concentrate stress; a thicker protective conduit, padded spacers at fittings, and removal of large stones from the bedding zone mitigate puncture and point-loading.
Installation crews should inspect and compact bedding uniformly, avoid tight bends near rock, and follow manufacturer recommendations for mechanical protection and minimum cover depth.
Soil Chemistry That Harms PEX (pH, Chlorides)
Groundwater chemistry and certain soluble ions greatly influence the longevity of buried PEX piping: extreme pH levels can accelerate material degradation, while elevated chloride concentrations promote stress corrosion and metal-catalyzed reactions at fittings.
Attention to soil chemistry guides material selection and inspection frequency. Neutral to mildly alkaline soils are generally least aggressive; strongly acidic or highly alkaline environments increase risk of embrittlement, swelling, or accelerated oxidation. Chloride-rich soils, often near marine or de-icing salt exposure, can attack metallic fittings and promote localized failures.
- Assess pH across installation depth to identify aggressive zones.
- Test chloride and sulfate concentrations that may affect connectors.
- Choose PEX types and compatible fittings rated for local chemistry.
- Plan monitoring and periodic inspection where chemistry is borderline.
Using Conduit and Sleeves for Buried PEX
Considerations for sleeve material and conduit burial depth affect protection and longevity of buried PEX.
Appropriate sleeve materials — such as HDPE, PVC, or flexible polyethylene — are selected based on abrasion resistance, chemical compatibility, and ease of repair or replacement.
Burial depth for conduit is determined by local codes and frost lines, balancing mechanical protection against cost and installation practicality.
Sleeve Material Choices
Selecting the right sleeve material is essential for protecting buried PEX from mechanical damage, UV exposure where applicable, and chemical interactions with surrounding soils. Choices should balance durability, flexibility, chemical resistance, and ease of installation.
Common options include rigid PVC, HDPE conduit, polyethylene split-loom, and corrugated polyethylene sleeves; each offers different abrasion resistance and jointing methods. Compatibility with PEX thermal expansion and contraction is important to avoid stress points.
Sealed connections at building entries reduce moisture and contaminant ingress. Where soil is acidic or contains contaminants, select materials with proven chemical resistance. Local code and manufacturer recommendations guide acceptable materials; verification prevents warranty voiding.
Proper sleeve selection extends system life and simplifies future replacements.
- Rigid PVC conduit — durable, easy to glue
- HDPE — flexible, high impact resistance
- Split-loom polyethylene — quick install, limited protection
- Corrugated polyethylene — good crush resistance
Conduit Burial Depth
Determining the proper burial depth for conduit or sleeves protecting buried PEX requires balancing frost protection, mechanical safety, and local code requirements to prevent damage from surface loads and frost heave. Guidance varies: residential water lines often require deeper burial in cold climates, while protection under driveways or paved surfaces may require additional cover or rigid conduit. The installer should consult local codes and use sleeves where soil disturbance or future excavation is likely. Mechanical protection, continuous slope, and accessible change points reduce risk. Marking and mapping buried runs aids future work. Typical considerations are summarized below.
| Location type | Minimum cover | Reason |
|---|---|---|
| Lawn/landscape | 12–24 in | Frost & minor loads |
| Driveway | 24–36 in | Heavy loads |
| Roadway | 36+ in | Traffic & frost |
Sleeving Under Concrete and Asphalt
When PEX runs beneath concrete slabs or asphalt driveways, it should be sleeved with a continuous, durable conduit to protect the tubing from abrasive materials, differential movement, and future replacement needs.
Sleeving simplifies repairs and minimizes direct contact with corrosive aggregates or paving compounds. Conduit must be continuous through the slab or pavement edge, sealed at penetrations to prevent water and debris migration.
Proper slope and drainage consideration prevents standing water inside the sleeve. Separation from sharp objects and rebar reduces puncture risk. Expansion joints require flexible connections.
- Use impervious, crush-resistant conduit sized for easy PEX withdrawal.
- Maintain continuous sleeve length through all pavement layers.
- Seal ends and connections against moisture and debris.
- Provide slight slope for drainage and access.
Protective Conduit: Benefits and Limitations
Although often overlooked in plumbing plans, protective conduit for PEX provides a controlled pathway that simplifies installation, shields tubing from mechanical damage and chemical exposure, and enables future replacement without disturbing surrounding structures.
Conduit commonly used includes HDPE, PVC, or metal sleeves chosen to match soil chemistry and load conditions. Benefits include abrasion resistance, UV protection for temporary exposure, and easier leak location and pipe extraction.
Limitations involve added cost, potential for water collection if not drained or sloped, thermal expansion differences between conduit and PEX, and reduced heat dissipation for hot-water runs.
Connections where conduit ends must be sealed and exposed junctions protected to prevent crushing, kinking, or annular gaps that invite contamination.
Trench Prep: Depth, Width, and Bedding Specs
The section outlines required trench depths for frost protection and local code compliance, noting variations by climate and service type.
It then covers recommended bedding materials and backfill methods to prevent pipe damage and allow proper compaction.
Finally, it specifies minimum trench widths and clearances needed for safe installation and future access.
Trench Depth Requirements
Correct trench depth is a primary determinant of PEX pipe longevity and system performance. Site-specific factors dictate required cover: local frost lines, anticipated surface loads, and utility clearance.
Minimum burial depths often follow code or utility provider rules; frost protection commonly requires placing pipe below the regional frost line. Where vehicular loads exist, additional cover or protection may be mandated.
Shallow installations risk freeze damage, mechanical stress, and inspection failures.
- Verify local code and utility requirements before trenching.
- Match burial depth to regional frost line for freeze prevention.
- Increase cover or use protective conduit under driveways and heavy loads.
- Maintain clearances from other utilities and surface structures for access and safety.
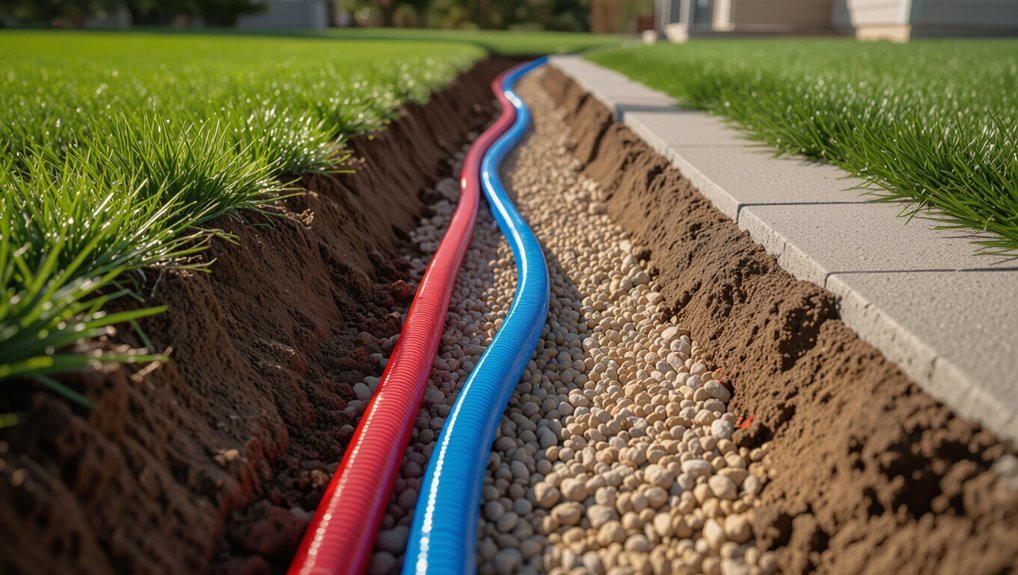
Bedding And Backfill
Properly prepared bedding and backfill create a stable, protective envelope for PEX pipe, controlling settlement, preventing point loads, and ensuring uniform support along the barrel.
Bedding should consist of clean, granular material—sand or fine crushed stone—free of large rocks and debris. A minimum bedding layer of 4 inches beneath the pipe is typical; manufacturers or local code may specify greater depth.
After placement, initial tamping stabilizes the pipe without inducing distortion. Backfill must be placed in controlled lifts, compacted to reduce future settling, and kept away from sharp objects or frozen clods.
Native soil containing rocks or organic matter should be screened or separated. Final cover restores grade and provides the designed protective thickness above the pipe as required by code.
Trench Width Clearance
Following the bedding and backfill guidelines, trench width clearance determines room for installing, aligning, and compacting PEX pipe without damaging the bedding layer. Proper width prevents lateral soil pressure on the pipe, allows tools and hands-on adjustments, and guarantees uniform compaction beside the bedding.
Clearance should match pipe diameter, insulation, and required side fill; overly narrow trenches risk bedding displacement, while overly wide ones increase backfill settlement. Inspection access and code-required separation from utilities also influence width decisions.
Installers should measure before laying pipe and maintain consistent clearance along the run.
- Allow minimum side clearance equal to pipe outer diameter plus bedding allowance.
- Increase width for insulation or protective conduit.
- Maintain stable working room for compaction tools.
- Verify clearance against local codes and utility proximity.
Bedding: Sand, Gravel, or Native Soil
Bedding choice—sand, gravel, or undisturbed native soil—directly affects PEX pipe support, protection, and long-term performance.
Sand provides uniform, forgiving support and reduces point loads; it compacts easily around the pipe and minimizes voids that could permit movement.
Gravel offers excellent drainage and resists frost heave but may concentrate stresses unless angular rock is avoided or a sand cushion is used beneath the pipe.
Undisturbed native soil can be acceptable when free of sharp stones, debris, and excessive organic material, but variability in compaction and moisture content increases risk.
Installers should remove large rocks, root masses, and frozen clods regardless of bedding choice.
Bedding depth should follow local code and manufacturer recommendations to guarantee consistent bearing and to prevent deformation during and after backfilling.
Backfill Materials That Protect PEX Pipe
Several common backfill materials—sand, pea gravel, crushed stone, and properly screened native fill—offer varying protection levels for PEX pipe and should be chosen to balance cushioning, drainage, and compaction characteristics.
Selection depends on site drainage, expected loads, and ease of compaction. Sand provides uniform support and resists point loading; pea gravel aids drainage but may shift under load; crushed stone offers structural stability with good drainage when angular; screened native fill can be economical if free of debris and organics.
Proper placement in layers and light compaction reduces settlement risk. Bedding and warning tape remain complementary measures.
Consider compatibility with local codes and manufacturer recommendations when specifying backfill materials to guarantee long-term pipe protection and performance.
Avoiding Rocks, Roots, and Sharp Objects
The installer should begin by excavating a clear trench line free of rocks and roots to prevent contact with the PEX tubing.
A uniform protective bedding layer of sand or fine gravel is recommended to cushion the pipe and fill voids.
Attention to these steps reduces puncture and abrasion risks during backfill and long-term service.
Digging Clear Trench Lines
A clean trench run minimizes damage and simplifies PEX pipe placement, so the installer should remove rocks, roots, and sharp debris to create a smooth, consistent channel.
Trench lines must be straight and uniform in depth to prevent kinks, stress points, and uneven cover. Hand tools or mechanical trenchers can be used, with careful supervision near utilities and tree roots.
Inspect and clear the bottom and sides before laying pipe, disposing of sharp fragments and cutting obstructive roots flush with the trench wall.
- Mark the route and locate utilities prior to excavation.
- Excavate to consistent depth and width, avoiding abrupt changes.
- Remove stones larger than pea gravel and any protruding roots.
- Routinely inspect and clean the trench before fitting PEX.
Protective Bedding Layer
After clearing the trench of rocks and roots, installers should place a protective bedding layer to cushion PEX tubing and prevent contact with sharp objects.
A 2–4 inch layer of clean, fine sand or screened soil provides uniform support, eliminates point loads, and reduces stress on the pipe. Coarse gravel, large stones, and woody debris must be kept well away from the pipe zone; these can puncture, abrade, or kink tubing during backfill or settlement.
Where sharp fragments are unavoidable, a geotextile fabric or a continuous length of protective conduit sleeve should be used as an added barrier.
Bedding should be graded smooth, free of clumps, and compacted lightly to maintain pipe alignment while allowing slight movement for thermal expansion.
Thermal Expansion and Contraction Underground
Many buried PEX runs expand and contract with seasonal ground temperature shifts, affecting alignment, joint stress, and anchoring. The material’s notable coefficient of thermal expansion causes measurable length changes when soil temperatures vary; designers account for movement to prevent undue stress on fittings and supports.
Proper installation allows controlled movement and prevents buckling or joint fatigue.
- Provide slack loops or gentle curves to absorb linear movement without sharp bends.
- Use compatible expansion joints or flexible connectors where codes permit to isolate stress from rigid fittings.
- Anchor at strategic intervals to limit cumulative drift while permitting localized movement.
- Monitor burial depth and soil composition because conductive soils transmit temperature changes differently, altering expected expansion amounts.
UV Exposure Risks at Exposed PEX Ends
Exposed PEX ends are vulnerable to ultraviolet light, which can cause surface degradation and reduced long-term performance.
Installers should protect cut ends immediately with UV-resistant caps or wrap to prevent sunlight damage during storage and while work is ongoing.
Proper capping and temporary shielding preserve pipe integrity until final fittings are installed.
Sunlight Degradation Risks
While PEX offers excellent durability indoors, direct sunlight causes ultraviolet (UV) radiation to break down its polymer chains, leading to brittleness, discoloration, and reduced service life at open ends left unprotected.
Sunlight degradation is concentrated where pipe ends, fittings, or exposed runs receive repeated solar exposure; failure often appears as surface cracking, loss of flexibility, and microfissures that progress under pressure cycles.
UV impact varies by PEX type and pigmenting; some formulations resist longer but none are immune without shielding.
Inspection of exposed ends after installation or during maintenance is prudent.
Consider sun exposure when staging materials on site and when routing aboveground segments.
- Visible signs: chalking, whitening, cracks
- Performance: reduced tensile strength, embrittlement
- Timeframe: weeks to years depending on exposure
- Risk factors: pigment, temperature, intensity
Protection And Capping
Because unshielded PEX ends absorb UV damage rapidly, protecting and capping exposed cut or fitting points is essential to preserve flexibility and service life. Caps, plugs, or temporary coverings block sunlight and prevent particulate ingress during storage, transport, and open-work periods.
UV-stabilized end caps designed for PEX provide a snug seal without crushing the tubing, while adhesive UV tape rated for plastics offers short-term protection where caps are impractical. For long-term outdoor exposures prior to burial, opaque wrap or conduit sleeves combined with caps reduces photodegradation risk.
Inspect capped ends before final connections; discard sections showing brittleness, discoloration, or cracking. Documentation of protection methods and replacement schedules aids code compliance and guarantees durable, leak-free joints once buried.
Connecting Buried PEX to Above-Ground Fixtures
When converting buried PEX to above-ground fixtures, guarantee a protected, accessible riser assembly that prevents abrasion, thermal stress, and water infiltration.
The changeover should use rigid conduit or protective sleeve through the grade, with enough slack for movement and a neat termination point above final grade. Insulate and support the riser to avoid freeze damage and maintain slope for drainage away from the structure. Flanges or escutcheons should seal penetration points and allow inspection.
- Route PEX through rigid sleeve extending above grade for abrasion and UV protection.
- Provide gentle bends and secured supports to minimize thermal movement stress.
- Seal riser entries with watertight fittings and corrosion-resistant escutcheons.
- Leave accessible serviceable length and clearly mark location for future maintenance.
Approved Fittings and Joints for Buried PEX
Having secured the riser and termination details, attention turns to the fittings and joints approved for burial with PEX, since the long-term integrity of an underground run depends on compatible, durable connections.
Approved options typically include brass push-fit fittings rated for direct burial, cold-expansion fittings (with compatible rings and nylon sleeves for PEX-A), and crimp or clamp fittings installed with corrosion-resistant copper or stainless fittings where permitted.
Polyethylene insert and compression fittings designed for buried use may be acceptable if listed for that application. All fittings must be lead-free, NSF/ANSI certified, and marked for underground service.
Solvent-weld or PVC fittings are inappropriate unless specifically listed. Joints should be protected with sleeving or wrap where electrochemical or mechanical damage is possible.
How to Pressure-Test PEX Before Backfill
Before backfilling, the entire PEX run should be pressure-tested to verify joint integrity and detect leaks that would be costly to repair once buried.
A dry, air or water pressure test confirms fittings, crimps, and connections hold at code-required pressure for the specified duration. Testing should follow manufacturer and local code limits, using calibrated gauges and isolation valves. Document pressure, duration, and any pressure loss before proceeding to backfill.
- Isolate the run, attach test gauge and pump, and raise to the specified test pressure.
- Hold pressure for the required time (commonly 15–30 minutes for water tests; verify local code).
- Inspect exposed fittings and joints for visible leaks and gauge stability.
- Record results and correct failures; retest after repairs.
Leak Detection Strategies for Buried Runs
Effective leak detection for buried PEX runs relies on combining proactive testing with targeted location methods to minimize excavation and water damage.
Routine pressure monitoring after installation and before backfill establishes a baseline; periodic checks during the first year catch slow leaks.
Acoustic listening equipment detects active leaks by sensing sound transmission along pipe lines, most effective in quiet conditions and when pipes are not deeply insulated.
Tracer gas (nitrogen or helium) introduced under low pressure can highlight leak sites with a sniffer at the surface.
Thermal imaging reveals temperature anomalies from leaking water when ground temperatures contrast sufficiently.
Correlating meter readings, moisture probes, and visual signs of surface wetness narrows search areas, reducing unnecessary digging and disturbance.
Repair Options for Buried PEX Failures
Repair options for buried PEX failures depend on the failure type, access constraints, and system pressure: small pinhole leaks may be repaired with localized clamps or internal sealants if accessible, while larger ruptures typically require cutting out the damaged section and installing a new length of PEX with appropriate fittings or couplers.
Excavation to expose the defect is often necessary; trenchless methods may work where joints or fittings fail. Pressure should be reduced before any intervention and tested after repairs. Corrosion is uncommon but mechanical damage from rocks or tools requires addressing surrounding conditions.
Typical repair choices include:
- External repair clamp or wrap for small external leaks.
- Internal sealant for pinhole leaks when clamp access is limited.
- Sectional replacement with crimped or push-fit couplers.
- Reroute around irreparably damaged segments.
When to Replace Buried PEX vs Repipe Above Ground
When is a buried PEX run replaced in place versus abandoned for an above‑ground repipe depends on access, extent of damage, longevity concerns, and cost: localized failures or isolated sections with intact surrounding pipe are usually cut out and replaced, while pervasive deterioration, multiple inaccessible failures, repeated leaks, or piping routed through hazardous or unstable soil often justify trenchless abandonment and a new above‑ground system.
Decision factors include remaining service life of existing PEX, number and distribution of defects, ease and cost of excavation, and future maintenance access.
If repairs would be frequent or excavation would destabilize structures, an above‑ground repipe with accessible routing and protective insulation is preferred.
Cost comparisons, expected disruption, and code requirements guide the final choice.
Crossing Gas, Sewer, and Electrical Lines Safely
Crossing gas, sewer, and electrical lines with PEX requires strict adherence to spacing, protective measures, and local code to prevent hazardous interactions and allow future access.
Installers must map existing utilities before trenching, maintain required horizontal and vertical clearances, and avoid parallel runs that complicate repairs.
Mechanical protection and sleeving are essential where PEX crosses other services, and accessible inspection points should be provided.
- Maintain code-specified separations and document crossings.
- Use rigid sleeve or conduit at crossing points to protect PEX from abrasion and displacement.
- Provide detectable warning tape above buried PEX when near other utilities.
- Coordinate with utility owners for crossings of gas, sewer, or electrical mains and obtain permits or inspections as required.
Grounding and Bonding Near Buried Water Lines
Although electrical codes generally prohibit relying on plastic PEX piping as a grounding conductor, buried metallic water service and its fittings often serve as a convenient grounding electrode that must be bonded to the electrical system.
Installers should identify metal sections, verify continuity, and attach bonding conductors per local code to prevent potential differences and guarantee safety at service entrances and meter locations.
The installer must avoid attaching bond clamps to plastic risers or PEX; instead, bond to accessible metal near the meter or to the service pipe where continuity is confirmed.
Bonding conductors should be sized and routed to minimize exposure and mechanical damage, fastened with listed connectors, and insulated where required.
Testing for low-resistance continuity completes the procedure and documents compliance.
Permits, Inspections, and Documentation
Following bonding and grounding checks at service entrances, installers must secure the appropriate permits and arrange inspections before and after PEX installation to guarantee code compliance.
Municipal codes, plumbing regulations, and permit timelines vary; installers should consult local authorities to determine required applications, fees, and inspector availability.
Documentation of approved plans, permit numbers, and inspector notes should be kept with project records.
Photographic evidence of burial depth, separation from electrical lines, and sleeve installations supports inspection findings and future maintenance.
- Verify local permit requirements and submit plans.
- Schedule rough‑in inspection prior to covering PEX runs.
- Photograph installations and record measurements for documentation.
- Obtain final inspection sign‑off and retain all permits and reports for the property file.
Mapping Buried PEX for Future Owners
Because buried PEX will be out of sight, installers should create clear, durable maps and records that show pipe routes, depths, connections, and key landmarks so future owners or service professionals can locate and service the lines without unnecessary excavation. The record set should include as-built drawings, GPS coordinates, depth measurements, material notes, and access points. Digital files and printed copies stored with property documents and local building authorities improve long-term traceability. Use standardized symbols, legend, and revision dates. Mark surface references (fences, meters) to aid relocation. Periodic verification after landscaping or construction avoids loss of accuracy.
| Item | Detail |
|---|---|
| Drawing | As-built route |
| Depth | Measured at intervals |
| Coordinates | GPS waypoints |
| Materials | PEX type & fittings |
| Storage | Owner & authority copies |
Cost: Burying PEX vs Copper or HDPE
After documenting buried PEX routes and records, owners and contractors often evaluate long-term costs of different pipe materials for underground runs.
PEX typically offers lower material and labor costs due to flexible rolls and fewer fittings; it resists corrosion and can reduce replacement frequency.
Copper has higher upfront material and excavation costs, plus potential corrosion and theft risk, but offers proven longevity.
HDPE has higher material cost than PEX but excels in durability, joint reliability (electrofusion), and suitability for direct burial with longer expected service life.
Factors such as soil conditions, installation complexity, expected service life, and local labor rates influence total cost comparisons.
- Material cost differences and availability
- Labor and fitting requirements
- Longevity and maintenance expectations
- Site-specific factors (soil, depth, traffic)
Common Installer Mistakes When Burying PEX
Installers commonly make avoidable errors when burying PEX that compromise performance and shorten service life.
Common mistakes include inadequate trench depth or insufficient cover, leaving pipe vulnerable to surface loads and temperature extremes.
Failure to separate PEX from sharp rocks or debris and omitting a protective sand or fine-gravel bedding leads to abrasion and punctures.
Incorrect use of fittings or improper joining techniques underground increases leak risk and complicates repairs.
Running PEX too close to electrical lines or combustible materials can violate codes and create hazards.
Skipping tracer wire or marking makes future locate and maintenance difficult.
Finally, neglecting to allow thermal expansion and contraction or to secure long continuous runs can cause stress, movement, and premature failure.
Pro Tips From Plumbers for Long-Lasting Runs
Mistakes in burying PEX highlight why experienced plumbers follow a handful of practical habits that extend service life and simplify maintenance.
They prioritize routing, protection, and clear documentation to reduce future failures and speed repairs. Key habits focus on minimizing stress, avoiding corrosive contact, and ensuring accessible connection points.
- Use continuous runs and gentle bends; minimize fittings to reduce leak points and strain.
- Slip conduit or protective sleeve over PEX where it passes through sharp or abrasive materials.
- Anchor and support at regular intervals to prevent sagging, kinking, and uneven thermal movement.
- Label and map all buried lines, record depths and routes, and mark access valves for future locating.
These measures create durable, serviceable installations that comply with common best practices.
When Not to Bury PEX: Alternatives and Routing
Although PEX is versatile and durable, there are specific situations where burying it is inadvisable and alternative routing or materials should be chosen. Soil with high chemical contamination, areas prone to repeated excavation, or routes near heavy surface loads favor above-ground routing, conduit protection, or use of metal pipe. Where local codes prohibit burial or require accessible shutoffs, installers should opt for exposed runs or protective chaseways. In seismic zones, rigid supports and flexible conversion fittings reduce damage risk without deep burial.
| Situation | Recommended alternative |
|---|---|
| Contaminated soil | Above-ground or conduit with barrier |
| Frequent digging | Surface routing or protective sleeve |
| Heavy load zones | Rigid metal conduit or reroute |
| Code restrictions | Accessible exposed runs or chaseway |
Maintenance Checklist for Existing Buried PEX
After deciding against burial or choosing protective measures, property owners with existing buried PEX should follow a concise maintenance checklist to preserve performance and detect issues early.
Regular visual inspections of exposed sections and fittings help spot corrosion, UV damage, or rodent activity. Pressure tests at recommended intervals confirm system integrity, and leak detection tools can locate subsurface failures before major damage occurs.
Maintain records of installation depth, fittings, and repair history to guide future work and compliance checks. Guarantee trench drainage and surround material remain stable to prevent shifting or abrasion.
Replace damaged insulation or conduit promptly and consult local code for repair methods and permit requirements.
- Inspect exposed fittings and conduit annually
- Perform pressure/leak tests periodically
- Monitor trench drainage and bedding stability
- Record and document all repairs and tests
Conclusion
Burying PEX is possible and practical when done correctly, but it requires attention to depth, protection, and local codes. Like a river guided into a secure channel, properly routed PEX flows unseen yet reliably—shielded from frost, sunlight, and sharp stones. Installers must follow minimum burial depths, use conduit or sand bedding where required, obtain permits, and avoid shortcuts. When doubts arise, choose aboveground runs or consult a licensed plumber for a durable, code-compliant installation.