How to Install an On-Demand Water Heater: Step-by-Step Guide for Beginners
Installing an on-demand (tankless) water heater can be a straightforward process if you have basic plumbing and electrical or gas skills. This type of water heater heats water only when needed, helping you save space and energy. To ensure a successful installation, follow these key steps: shut off utilities, mount the unit, connect water lines with shutoffs and a relief valve, make gas or electrical connections, install proper venting, and test for leaks and proper ignition. For a detailed step-by-step guide and helpful tips, continue reading.
What an On-Demand (Tankless) Water Heater Is and Why Choose One
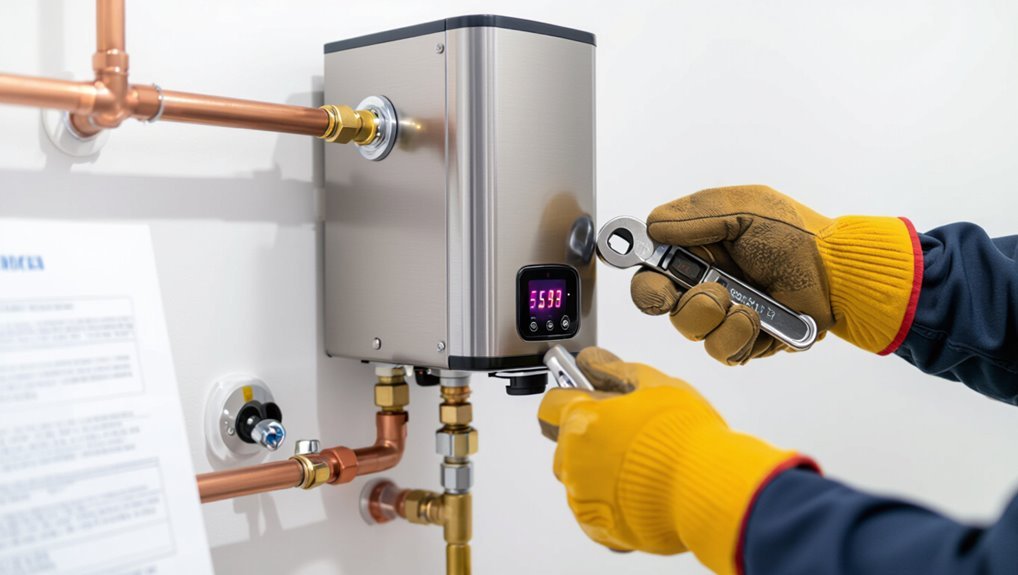
An on-demand (tankless) water heater heats water only as it flows through the unit, using electric elements or a gas/propane burner instead of storing hot water in a tank.
This design typically reduces energy use, saves space, and can offer a longer service life compared with traditional tank heaters.
Systems are commonly electric, natural gas, or propane, each with different installation, venting, and performance considerations.
How on-demand water heaters work
Because it heats water only when a tap or appliance calls for it, an on-demand (tankless) water heater delivers continuous hot water without storing large volumes in a tank.
Flow sensors detect demand, triggering a gas burner or electric element to rapidly heat water as it passes.
Simple controls regulate temperature; sizing and fuel type affect performance.
Installers reference how to install on demand water heater procedures.
Advantages over traditional tank heaters (energy, space, lifespan)
Tankless systems offer clear advantages over conventional storage tanks: they reduce energy use by eliminating standby heat loss, occupy far less physical space since wall-mounted units replace bulky tanks, and typically last longer because fewer components experience constant thermal cycling.
They deliver on-demand hot water with higher overall efficiency, lower long-term operating costs, and reduced waste from corrosion-prone standing water.
Common types: electric vs gas vs propane
Choices among on-demand water heaters—electric, natural gas, or propane—come down to fuel availability, installation constraints, and performance needs.
Electric units are compact, require less ventilation, and suit moderate flow demands.
Gas and propane models deliver higher flow rates and better cold-climate performance but need venting, gas lines, and clearances.
Cost, local codes, and fuel price determine the ideal choice.
Quick Overview: Is DIY Installation Right for You?
The decision to install an on-demand water heater hinges on the homeowner’s plumbing and basic electrical skills, familiarity with local codes and permit requirements, and comfort with safety risks.
If the project involves complex gas lines, significant electrical upgrades, or jurisdictions that require licensed work, hiring a licensed plumber or electrician is advisable.
For simple replacements where local rules allow homeowner work and the installer has the necessary skills, DIY can be feasible.
Required skills and basic plumbing/electrical knowledge
Although some homeowners tackle appliance projects alone, installing an on-demand water heater requires a specific set of skills: competent plumbing (soldering or push-fit fittings, pipe layout, and leak testing), basic electrical work (correct wiring, circuit sizing, and grounding), and familiarity with local codes and permits.
Technicians should assess skill gaps, have proper tools, read manufacturer instructions, and consider professional help for complex gas, electric, or multi-unit systems.
Local code, permits, and safety considerations
Because installation touches plumbing, gas, and electrical systems, compliance with local codes and permits is nonnegotiable: homeowners must verify jurisdictional requirements, obtain necessary permits, and confirm installations meet inspection standards before energizing the unit.
Documentation, approved materials, and proper venting and clearances are required.
Safety protocols—shutoffs, leak tests, bonding, and GFCI protection—must be followed to prevent hazards and guarantee code compliance.
When to hire a licensed plumber or electrician
Many installations are straightforward, but hiring a licensed plumber or electrician becomes essential when tasks involve gas lines, major electrical work, structural modifications, or local permit requirements.
Professionals guarantee code-compliant connections, proper venting, and safe pressure and leak testing that a typical DIYer may not reliably accomplish.
Hire pros for gas connections, new circuit installations, complex venting, nonstandard piping, or when inspections are required to confirm safety and liability coverage.
Tools, Materials, and Pre-Installation Checklist
The installer should prepare a concise list of tools (plumbing, electrical, venting, measuring) and gather required parts and materials such as the unit, fittings, shutoff valves, wiring, and vent components.
A systematic site assessment—checking available space, water supply, gas line routing, venting path, and electrical capacity—must be completed before starting.
Finally, the correct unit size is determined by calculating required flow rate and temperature rise to guarantee adequate performance.
Tools you’ll need (plumbing, electrical, venting, measuring)
A clear inventory of tools and materials is essential before starting an on-demand water heater installation.
Required plumbing tools include pipe cutters, adjustable wrenches, thread sealant, soldering kit or press tools.
Electrical tools: multimeter, wire strippers, screwdrivers, conduit tools.
Venting requires pipe cutter, sealant, and supports.
Measuring tools: tape measure, level, marker.
Safety gear: gloves, goggles, and a gas detector if applicable.
Parts and materials (unit, fittings, shutoff valves, wiring, vent components)
Careful inventorying guarantees the installation proceeds without delays: the on-demand water heater itself (confirming model, BTU or kW rating, and mounting hardware), appropriate supply and outlet fittings (matching pipe materials and sizes), isolation shutoff valves for cold and hot lines, a pressure relief valve and tempering/mixing valve if required by code, and electrical components (proper-gauge conductors, breakers, disconnect, and conduit).
Additional needed items include venting pipe, flashing, sealant, dielectric unions, mounting brackets, threaded adapters, and manufacturer-recommended filters and strainers.
Site assessment checklist (space, water supply, gas line, venting path, electrical capacity)
Preparation starts with a thorough site assessment that verifies available space, water supply capacity, gas line sizing, venting path, and electrical service before any tools or materials are staged.
Inspect mounting location clearance, measure inlet/outlet alignment, confirm cold-water pressure and flow, check gas pipe diameter and shutoff accessibility, plan vent routing to exterior, and verify circuit amperage, breaker availability, and grounding for compliance.
Sizing the unit by flow rate and temperature rise
With site conditions confirmed, the next step determines unit size by calculating required flow rate and temperature rise to meet demand. Measure simultaneous fixture flow (GPM) and inlet temperature; required rise equals desired outlet minus inlet. Select a model whose GPM at that rise meets or exceeds demand.
| Fixture | GPM | Priority |
|---|---|---|
| Shower | 2.5 | High |
| Sink | 1.0 | Medium |
Preparing the Installation Site
Before beginning work, the installer shuts off water, gas, and electrical power and confirms all valves and breakers are secured.
If replacing an existing unit, the old heater is safely drained and removed to expose the mounting surface.
The installer inspects the wall, mounting points, and clearance requirements, then readies the water, gas, and electrical connection locations for the new on-demand unit.
Shutting off water, gas, and power safely
Turn off the main water supply, gas line, and electrical feed to the existing heater before any work begins, verifying each shutdown at the unit and the corresponding service points.
Drain residual water from lines using a nearby faucet, close isolation valves, and label closed valves.
For gas, shut off at the meter or appliance valve and confirm no gas odor.
Lock out electrical breakers.
Removing the old water heater (if replacing)
Disconnecting and remove the old unit carefully to create a safe, level workspace for the new on-demand heater.
Drain remaining water, detach supply and outlet lines, and cap or plug fittings to prevent leaks.
Disconnect gas and electrical connections per prior shutdown.
Remove mounting hardware and any venting.
Inspect area for corrosion, mold, or structural damage and clear debris before proceeding with installation.
Verifying wall, mounting, and clearances
Several checks guarantee the wall and surrounding space are suitable for mounting an on-demand water heater: verify the wall is structurally sound and plumb, confirm studs or approved mounting anchors align with the heater’s bracket locations, and measure clearances to meet the manufacturer’s minimums for service access, ventilation, and combustible materials.
Inspect for moisture, insulation interference, and nearby obstructions; mark bracket positions and confirm level mounting before proceeding.
Preparing water, gas, and electrical connections
Begin by laying out and labeling the water, gas, and electrical routes to guarantee each service can be brought to the heater without obstruction or code violations.
Inspect existing lines, measure distances, and plan shutoff, union, and isolation valve locations.
Specify pipe materials, sizing, and routing.
Confirm venting path, gas shutoff accessibility, proper electrical circuit, conduit, and grounding per local codes before proceeding.
Step-by-Step Installation Process
The installation proceeds through a clear sequence of tasks: mounting the unit securely, connecting cold and hot water lines with shutoff valves and a pressure-relief device, and fitting a condensate drain where required.
For gas models, safe gas supply hookup and careful leak testing are essential.
Finally, the correct type-specific venting or flue system must be installed and inspected.
Mounting the unit securely
Position the on-demand water heater on its mounting bracket to verify fit and clearance before any permanent fastening.
The installer checks wall stud alignment, marks attachment points, and uses appropriate anchors for substrate type.
Leveling is confirmed, fasteners torqued to manufacturer specifications, and vibration isolators added if recommended.
Final inspection guarantees secure attachment and accessible service clearances without connecting plumbing yet.
Connecting cold and hot water lines (including shutoff valves and pressure relief)
Several preparatory steps guarantee correct and safe connections of the cold and hot water lines: verify water supply is shut off, confirm pipe materials and sizes match the heater’s fittings, and gather shutoff valves, pressure-relief device, compatible fittings, and appropriate sealants.
Install dedicated shutoff valves on both lines, attach inlet to cold and outlet to hot with proper fittings, torque to spec, and mount the pressure-relief valve per code.
Installing condensate drain (if applicable)
Begin by confirming whether the specific tankless model produces condensate and locating the designated condensate outlet; if so, gather a compatible trap, PVC or CPVC drain line, a neutralizing kit if required for high-acidity condensate, appropriate fittings, and mounting hardware.
Install a trap to prevent odors, slope the drain for gravity flow, connect securely with solvent weld or approved fittings, mount and test for leaks and proper flow.
Making gas supply connections and leak testing (for gas units)
A qualified technician should verify the gas type, pressure requirements, and local code before making connections. This step includes shutting off the main gas supply, purging air from the line if required, and confirming that the existing piping size and material meet the unit’s maximum BTU demand.
Use approved fittings, thread sealant or tape rated for gas, tighten per torque specs, pressurize, and test all joints with a soap solution or electronic leak detector.
Installing venting or flue system correctly (type-specific)
If the unit is gas-fired, the correct venting or flue system must be installed to match the specific vent type—direct-vent, power-vent, or atmospheric/Category III—observing manufacturer diagrams, clearances, and termination rules.
For electric models, confirm any required air intake or exhaust routing per instructions.
Install approved materials, slope horizontal runs toward exterior, seal joints, maintain required clearances to combustibles, and follow code for penetrations and terminations.
Electrical wiring and grounding (for electric and gas units with electronic controls)
With venting or flue work completed, attention shifts to electrical wiring and grounding for electric units and gas models that use electronic controls.
Follow manufacturer specifications for circuit size, breaker type, and conductor gauge.
Install a dedicated circuit, proper strain relief, and a grounding conductor to the appliance grounding terminal.
Verify tight connections, secure junction boxes, and comply with local electrical codes.
Initial startup: filling, purging air, and powering on
Once electrical and venting connections are confirmed, the initial startup focuses on filling the unit, purging trapped air, and safely powering it on.
Close isolation valves, open cold inlet and hot outlet slowly to fill heat exchanger.
Open nearby faucets to expel air until steady flow appears.
Check for leaks, verify pressure, then restore power following manufacturer startup sequence and observe pilot or ignition.
Configuring temperature, flow, and safety settings
Begin by setting the heater’s primary controls to match the household’s hot water needs and local code requirements.
Then adjust flow sensitivity so the unit activates at designated faucets, balancing minimum flow and steady output.
Program temperature limits, enable anti-scald and frost protection, and verify pressure relief valve settings.
Test hot-water delivery at multiple fixtures and document final settings for future reference.
Testing, Commissioning, and First Use
The installer conducts final checks for gas leaks and any detectable odor before energizing the unit.
They verify reliable ignition, correct flame pattern, and proper venting, then measure outlet water temperature and flow to confirm performance.
Baseline settings and measured values are recorded for future reference and warranty requirements.
Checking for leaks and gas odor
Carefully inspect all water and gas connections for signs of leaks and any detectable gas odor before putting the on‑demand heater into regular service.
Use a soap solution on fittings to reveal bubbles, check flexible lines and valves, and listen for hissing.
If odor or leaks appear, shut off gas, ventilate, and contact a qualified technician.
Do not operate until repairs confirm sealing and safety.
Verifying proper ignition, flame pattern, and venting
After confirming all fittings and lines are sealed and no gas odor is present, the installer proceeds to verify ignition, flame pattern, and venting before regular operation.
The technician observes reliable ignition, steady blue flame with minimal yellow tipping, correct burner alignment, and absence of soot.
Venting is inspected for secure connections, proper draft, and unobstructed exhaust; combustion air supply is confirmed adequate.
Measuring outlet water temperature and flow performance
Begin by running hot water through the outlet at the unit’s maximum rated flow to establish baseline temperature and stability.
Measure outlet temperature with a calibrated probe at steady state, noting response time to reach setpoint.
Simultaneously measure flow rate with a flow meter or timed container.
Check for temperature fluctuation, pressure drop, and noise.
Verify performance across low and high flow settings.
Recording baseline performance and settings
With outlet temperature and flow performance established, the technician documents baseline readings and configuration settings before leaving the site.
Recorded data include inlet/outlet temperatures, flow rates, gas/electrical supply values, pressure, and any safety device statuses.
Firmware version, PID or temperature setpoints, and installed accessories are noted.
Photos and timestamps are added to the report for future commissioning, troubleshooting, and warranty validation.
Common Problems During and After Installation and How to Fix Them
Common problems following installation include failure to ignite or supply hot water, fluctuating temperature or inadequate flow, and visible leaks at fittings.
Other frequent issues involve venting or combustion faults and electrical trips or error codes that interrupt operation.
Each problem has specific checks and remedies—fuel/gas supply, pressure and flow rates, seal and connection tightening, vent integrity, and electrical diagnostics—that should be addressed systematically.
No hot water or unit won’t ignite
Troubleshooting a tankless unit that produces no hot water or fails to ignite requires a systematic check of ignition sources, fuel supply, and safety interlocks.
Technicians should first verify electrical power and gas (or propane) flow.
Then confirm error codes and sensor connections.
Finally, inspect venting, flame rod/igniter condition, and water flow requirements to isolate the fault.
Replace faulty igniter, clear blockages, reset safety switches.
Fluctuating water temperature or low flow
When temperature swings or weak flow appear after installing an on-demand water heater, they typically indicate issues with water delivery, combustion stability, or system settings rather than a single component failure.
Check inlet pressure, clogged filters or flow restrictors, and correct pipe sizing.
Verify minimum flow activation, proper gas supply and venting, and adjust temperature and modulation settings per manufacturer to stabilize output.
Water leaks at fittings
Fluctuating temperatures and low flow can point to issues upstream that also affect joint integrity. Inadequate pressure control, improper pipe sizing, or debris that stresses fittings often lead to leaks.
Inspect fitting types, tighten to manufacturer torque, replace damaged seals, and use correct thread tape or sealant.
Verify water pressure, flush lines to remove debris, and retest for leaks after cycling the unit.
Venting issues and combustion problems
Venting and combustion issues are among the most critical safety and performance concerns with on-demand water heaters, arising from improper vent routing, blocked exhausts, inadequate air supply, or incorrect gas pressure and burner adjustments.
These faults can cause poor combustion, pilot outages, carbon monoxide risk, or reduced efficiency.
Inspect vents for obstructions, verify proper slope and clearances, guarantee fresh-air intake, confirm correct gas pressure, and test combustion with professional instruments.
Electrical trips and error codes
After addressing venting and combustion, attention must turn to electrical trips and error codes, which frequently interrupt service and complicate diagnostics.
The installer should consult the manual for code definitions, check breakers, wiring connections, and grounding.
Inspect sensors, flow switches, and control boards for faults.
Reset procedures and error clearances must be followed; persistent codes require a qualified electrician or authorized service technician.
Maintenance Schedule and Best Practices
A clear maintenance schedule helps preserve efficiency and extend the unit’s lifespan.
Recommended tasks include routine flushing and descaling, cleaning filters and inlet screens, and an annual professional inspection covering combustion, pressure relief, and venting.
Seasonal precautions such as winterizing and freeze protection should also be followed to prevent cold-weather damage.
Routine flushing and descaling frequency
Establishing a regular flushing and descaling schedule preserves efficiency and extends the service life of an on-demand water heater.
Frequency depends on water hardness and usage: soft-water areas may require annual descaling, while hard-water locations often need it every 3–6 months.
Inspect performance and monitor flow/temperature changes; increase frequency if scaling recurs.
Keep records to optimize intervals and warranty compliance.
Filter and inlet screen cleaning
Inspect and clean the inlet screens and any inline filters regularly to prevent debris and sediment from restricting flow or damaging internal components.
Use a soft brush and water to remove buildup; replace damaged screens.
Check after heavy runoff or plumbing work and include filter checks in monthly maintenance for hard-water areas.
Reassemble seals properly and test for leaks and normal flow before restoring full use.
Annual professional inspection checklist
Schedule an annual professional inspection to verify the unit’s safety, efficiency, and warranty compliance.
A certified technician should check combustion, venting, gas connections, and electrical components; test temperature and pressure relief valves; inspect heat exchanger, filters, and flow sensors; flush sediment if needed; confirm correct setpoints and controls; document findings, recommended repairs, and service dates for warranty records and future maintenance planning.
Winterizing and freeze protection tips
Alongside annual professional inspections, preparing an on-demand water heater for freezing temperatures protects performance and prevents costly damage.
Drain external lines, insulate pipes and the unit, and install heat tape where needed.
Maintain a minimum ambient temperature in unheated spaces, consider a remote freeze sensor with auto-shutdown, and verify pressure relief valve function.
Schedule pre-winter system checks.
Safety, Codes, and Warranty Considerations
The section outlines key safety features to test regularly—such as pressure relief valves, flame sensors, and anti-scald devices—to guarantee reliable operation.
It also summarizes common local code requirements to confirm before installation, including venting, clearance, and seismic or gas-line rules.
Finally, it explains how installation choices can affect warranty coverage and which documents and receipts should be retained for claims.
Important safety features to test regularly
How often should the safety components of an on-demand water heater be tested to guarantee reliable operation and compliance?
Inspect and test pressure relief valves, overheating sensors, flame failure devices, and gas leak detectors at least annually; check venting and combustion air pathways for obstructions.
Perform functional tests after maintenance or power/gas interruptions.
Document results and promptly replace any failing components to maintain safety and warranty conditions.
Common local code requirements to confirm before installation
Before installation begins, local building, plumbing, gas, and electrical codes must be verified to guarantee appliance placement, venting, combustion air, clearances, and gas line sizing meet jurisdictional requirements.
This includes confirming permit needs, approved vent materials and terminations, earthquake or seismic strapping mandates, and any setback or condensation drainage rules.
Inspectors may require specific gas shutoff locations, electrical circuit sizing, pressure relief routing, and accessible service clearances.
How installation affects warranty and documentation to keep
Although installations that follow manufacturer instructions and local codes are more likely to retain full warranty coverage, deviations—such as improper venting, incorrect gas line sizing, or use of unapproved parts—can void warranties and shift service liability to the owner or installer.
Maintain purchase receipts, installation invoices, serial numbers, permits, and inspection reports.
Submit required registration promptly and document any professional work with signed contractor statements.
Cost, Energy Savings, and Return on Investment
A breakdown of upfront costs—unit price, installation labor, and any required plumbing or electrical modifications—frames the initial investment for an on-demand water heater.
Estimated energy savings and illustrative payback scenarios help compare expected operating-cost reductions against that investment.
Long-term savings depend on factors such as household hot-water demand, fuel prices, unit efficiency, maintenance, and local incentives.
Typical installation cost breakdown (unit, labor, modifications)
When comparing upfront expenses, buyers should separate the tankless unit price, professional labor, and any necessary home modifications to get an accurate picture of total installation cost.
Typical tankless units range widely by capacity and brand. Labor varies with complexity and regional rates.
Modifications—venting, gas line upgrades, electrical work, permits—add distinct line items and can substantially affect final invoices.
Estimated energy savings and payback scenarios
Efficiency analysis frames the decision to install an on-demand water heater by quantifying reduced energy use, altered utility bills, and the timeframe needed to recoup upfront costs. Typical scenarios show modest annual savings; payback often ranges from 3–12 years depending on usage and fuel price.
| Scenario | Payback (years) |
|---|---|
| Low use | 8–12 |
| Moderate use | 4–7 |
| High use | 3–5 |
Factors that influence long-term savings
Having outlined typical payback ranges across usage profiles, the discussion now shifts to the factors that determine long-term savings from an on-demand water heater.
Key variables include upfront cost, installation complexity, fuel type and local energy rates, usage patterns, maintenance needs, unit efficiency, and lifespan.
Accurate estimation of annual energy savings and replacement risk clarifies return on investment and payback timing.
Comparison: DIY vs Professional Installation
The section compares the risks and benefits of installing an on-demand water heater personally versus hiring a professional, noting where inexperience can lead to safety hazards, code violations, or reduced efficiency.
It outlines scenarios—complex gas lines, electrical upgrades, or permits—where professional installation is strongly recommended.
It also gives concise criteria for selecting a qualified installer, such as licensing, insurance, references, and clear written estimates.
Risks and benefits of DIY installation
While opting to install an on-demand water heater oneself can lower upfront costs and offer hands-on control, it also introduces measurable risks in safety, code compliance, and long-term performance. Homeowners should weigh potential savings against the likelihood of improper gas or electrical connections, voided warranties, and missed permits, all of which can lead to higher expenses or hazards down the line.
Benefits include cost savings, scheduling flexibility, and skill development, while risks encompass safety hazards, inspection failures, reduced efficiency, and potential liability.
When professional installation is strongly recommended
Because incorrect hookup or sizing can create immediate hazards and long-term costs, professional installation is strongly recommended for homeowners facing complex fuel, venting, or permit requirements.
Professionals should also be consulted when electrical capacity, gas line upgrades, or structural modifications are required, or when local codes, warranties, or insurance demand certified work.
Complex retrofit situations exceed typical DIY scope.
How to choose a qualified installer
Who is best suited to install an on-demand water heater depends on project complexity, local regulations, and the homeowner’s skill level.
A qualified installer should be licensed, insured, experienced with tankless units, and familiar with local codes.
Consider cost, warranty, and risk when choosing between DIY and pro.
- Licensing
- Insurance
- Experience
- Code compliance
Practical Tips and Common Mistakes to Avoid
The section highlights common pitfalls such as improper sizing and poor placement that compromise performance and access.
It also addresses venting and clearance oversights plus errors in electrical and gas connections that create safety and code issues.
Practical tips for smoother installation and long-term reliability are offered to prevent these mistakes and reduce callbacks.
Sizing and placement pitfalls
When sizing and placing an on-demand water heater, careful calculation of flow rates and realistic assessment of installation space prevent performance problems and costly rework.
Installers must match unit capacity to peak simultaneous fixtures, account for incoming water temperature, and plan mounting height for service access.
Avoid cramped locations, undersized supply lines, and ignoring local code requirements that affect placement and connection feasibility.
Venting and clearance oversights
After confirming correct sizing and adequate service access, attention must shift to venting and clearances. Improper exhaust routing or tight mounting spaces are among the most common causes of performance issues and safety failures.
Inspect required clearances to combustibles, maintain recommended vent slope and length, avoid obstructions, and allow service access. Document local code venting materials and terminate vents where specified to prevent backdrafting.
Electrical and gas connection mistakes
Carefully verify all electrical and gas connections before powering or firing the unit, as incorrect wiring, undersized conductors, loose fittings, or improper gas line sizing are frequent causes of failures and safety hazards.
Technicians should confirm correct polarity, grounding, breaker capacity, torque on terminals, leak-free gas joints, and adequate pressure.
Avoid makeshift fittings, shared circuits, and bypassing required safety devices; document final measurements.
Tips for smoother installation and long-term reliability
Having confirmed safe and correct electrical and gas hookups, installers can focus on practical steps that streamline the remainder of the job and extend the heater’s service life.
Regular maintenance, correct venting, and proper water treatment reduce failures.
Follow these concise actions:
- Flush system annually.
- Install sediment filter.
- Verify vent clearance.
- Tighten fittings and check for leaks.
Conclusion
An on-demand water heater saves space, cuts energy use, and delivers endless hot water; installing one demands careful planning, correct tools, and code compliance. Weigh risks against rewards, secure permits when required, and follow manufacturer steps precisely. DIY brings savings and satisfaction; professional installation offers speed and guaranteed compliance. Choose wisely, prepare thoroughly, and act safely—measure twice, connect once, and verify performance to guarantee lasting efficiency, safety, and peace of mind.