How to Stop Water Heater From Leaking: Quick Fixes and When to Call a Pro
If your water heater is leaking, immediately shut off the power (turn off the breaker for electric heaters or the gas valve for gas units) and close the cold-water supply. To prevent flooding, drain the tank through the drain valve. Next, inspect the fittings, temperature and pressure (T&P) valve, drain valve, and tank seam. Tighten any loose connections, replace faulty valves, or use a temporary epoxy patch for small leaks. However, if you notice corrosion, bulging, persistent pooling, or any gas-related issues, it’s best to call a licensed technician. For further guidance on diagnostics, repair options, costs, and safety steps, continue reading.
What to Do Immediately When Your Water Heater Is Leaking
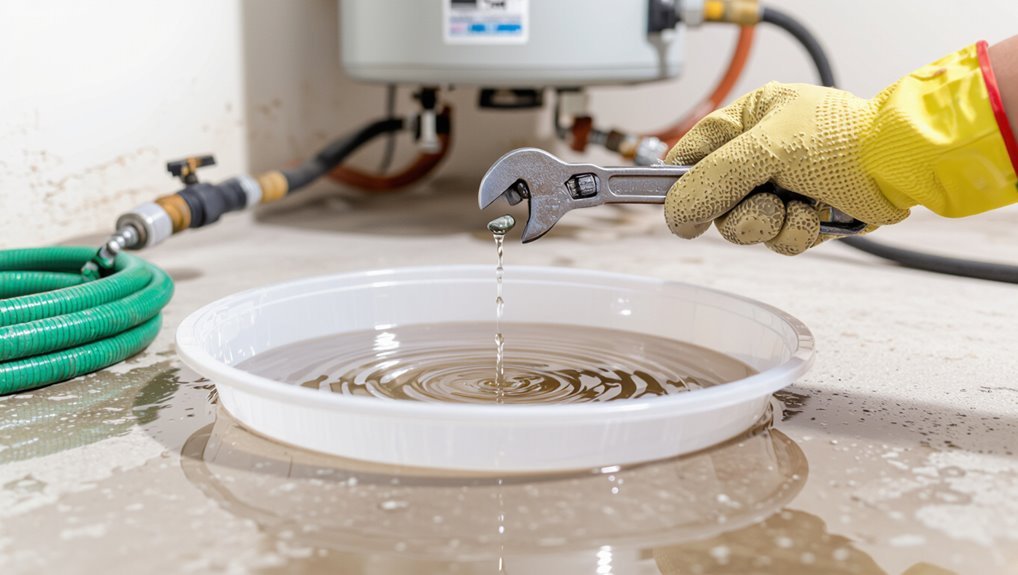
When a water heater begins leaking, immediate steps focus on safety and limiting damage.
First, the power source should be shut off—turn off the circuit breaker for electric units or close the gas valve for gas units.
Then the cold-water supply to the tank must be closed.
If standing water or continued leaking is a risk, the tank should be drained quickly and safely using the drain valve and a hose to a suitable drain.
How to shut off power safely (electric and gas units)
If a leak is discovered, the immediate priority is cutting power to the water heater to prevent electrical hazards or combustion risks.
For electric units, switch off the dedicated breaker at the panel.
For gas units, turn the pilot/control knob to “off” and shut the gas valve if trained.
Document actions, warn occupants, and contact a licensed technician to address how to stop water heater from leaking.
How to turn off the water supply to the heater
Locate and close the cold-water shutoff valve feeding the tank to stop incoming water and limit further leakage.
Afterward, confirm flow has stopped by opening a hot faucet nearby; if water continues, shut off the home’s main water supply.
Note valve types—gate, ball, or wheel—and turn appropriately.
If frozen, corroded, or inaccessible, contact a plumber to avoid damage.
How to drain the tank quickly and safely
With the water supply closed and a nearby hot faucet opened to relieve pressure, the next step is to drain the tank quickly and safely to minimize flooding and scald risk.
Attach a garden hose to the drain valve, route it to a floor drain or outside, open the valve slowly, and monitor flow.
Close the valve when empty; purge remaining pressure before servicing.
Quick Fixes You Can Try Yourself
Several simple repairs can stop common leaks without calling a plumber.
Tasks include tightening loose fittings, replacing a faulty pressure relief valve, and repairing drain valves or hoses.
For small tank-side leaks or corroded pipes, epoxy patches, leak-repair kits, or temporary fittings can provide short-term relief.
Tightening loose connections and fittings
Start by turning off the water supply and power to the heater to guarantee safety before attempting any adjustments.
Then inspect visible pipe joints, inlet/outlet fittings and drain valve for moisture.
Use an adjustable wrench to snug loose connectors—avoid overtightening.
Replace damaged washers or thread tape on threaded joints.
After tightening, restore supply and power, inspect for continued leakage, and repeat if necessary.
Replacing a leaking pressure relief valve
If tightening fittings does not stop a persistent drip near the tank’s top or a noticeable discharge from the side pipe, the pressure relief valve may be failing and should be replaced.
Shut off power and water, drain below the valve level, remove old valve with appropriate wrench, install a compatible replacement with plumber’s tape, restore water, check for leaks, and restore power once confirmed watertight.
Fixing minor leaks at drain valve or hose
Inspect the drain valve and attached hose to determine the leak’s source—common causes include a loose hose connection, a worn washer, or a slightly open valve.
Tighten fittings with an adjustable wrench, replace a degraded rubber washer, and fully close the valve.
If the valve itself drips after tightening or replacement, stop attempts and schedule a professional to replace the valve safely.
Sealing small tank-side leaks with epoxy or leak repair kits
Once the drain valve and hose have been ruled out as the source, attention can turn to small weeps or pinhole leaks on the tank body itself.
Clean and dry the area, sand lightly, then apply a marine-grade epoxy or a tank-specific leak repair kit per instructions.
These temporary seals can stop minor leaks but require monitoring and eventual professional evaluation since tank corrosion may worsen.
Temporary patches for corroded pipes and fittings
When corrosion causes slow drips at exposed pipe joints or fittings, homeowners can apply several temporary patches to limit water loss until a proper repair is made.
Options include wrapping with specialized plumber’s tape, using epoxy putty shaped and cured per instructions, clamping a rubber patch with a hose clamp, or installing a repair coupling.
These are short-term measures; replacement or professional service is recommended.
Identifying the Source of the Leak
A systematic inspection of the heater should focus on common leak points: inlet and outlet fittings, the temperature-and-pressure (T&P) valve, the drain valve, and the tank seam.
The observer should distinguish condensation—typically light, transient and on the exterior—from a true leak that produces steady drips or pooling.
Rust, bulging, or weeping at the tank seam are clear signs the tank itself is failing and likely requires replacement.
Inspecting common leak points: inlet/outlet connections, T&P valve, drain valve, tank seam
Many homeowners can locate the source of a water heater leak by systematically inspecting the most common failure points: inlet/outlet connections, the temperature-and-pressure (T&P) relief valve, the drain valve, and the tank seam.
Check pipe fittings and unions for corrosion or loose nuts. Test the T&P for weepage. Tighten or replace the drain valve, and examine the tank seam for rust or slow seepage indicating tank failure.
How to tell if the leak is from condensation vs. a true leak
After checking the usual failure points—pipes, T&P valve, drain valve, and tank seam, homeowners should distinguish condensation from a true leak to decide on repair urgency.
Condensation forms thin, intermittent moisture when warm tank meets cool air; it stops as humidity drops.
A true leak produces steady drips, pooling, or worsening wetness and traces back to fittings or the tank surface, requiring repair.
Signs the tank itself is failing
When rust, bubbling paint, or visible cracks appear on the outer shell, the tank itself is likely the leak source rather than a fitting or valve.
Other signs include persistent pooling beneath the tank, a steady drip from the tank bottom, metallic taste or discoloration in hot water, and corrosion around welds.
These indicate internal failure and usually require tank replacement by a professional.
When to Replace Parts vs. Replace the Whole Water Heater
Decision-making hinges on the unit’s age, estimated remaining lifespan, and a clear comparison of repair costs versus replacement expense.
Technicians commonly repair accessible components such as valves, dip tubes, and heating elements when those parts are the proven source of leakage.
Replacement becomes necessary when tank corrosion, visible seam leaks, or widespread deterioration threaten reliability and safety.
Lifespan indicators and cost considerations
Aging signs such as persistent rust, frequent minor leaks, or a sudden drop in heating efficiency signal that a water heater may be nearing the end of its useful life.
Weighing repair costs against replacement price helps determine the most economical course.
Consider unit age, estimated future repairs, energy efficiency losses, warranty status, and local labor/materials costs to decide whether replacement yields better long-term value than repeated fixes.
Evaluating repairable components (valves, dip tube, heating elements)
Several common water heater failures—faulty valves, a deteriorated dip tube, or burned-out heating elements—are often isolated and cost-effective to fix rather than indicators that the entire tank must be replaced.
Technicians assess leak origin, component condition, age, and repair cost versus remaining service life.
Replace valves, dip tube, or elements when localized damage exists; consider full replacement only if multiple major components fail.
When tank corrosion or seam leaks mean replacement
When rust is clearly visible on the tank exterior or water collects at a seam, the leak is usually structural and signals the need for replacement rather than part-level repair.
Corroded tanks or failed welded seams cannot be reliably patched. Continued use risks flooding and contamination.
Replacement offers restored efficiency, warranty coverage, and safer operation; consult a licensed technician for sizing and safe disposal.
How to Diagnose Specific Leak Scenarios
A quick, systematic check of where a heater is leaking helps identify the correct fix and whether a professional is needed.
The following common scenarios cover valve, connection, drain, and tank-origin leaks plus intermittent dripping tied to operation. Each point will be explained with signs to look for and simple tests to confirm the source.
- T&P valve discharge or weep symptoms
- Leaks at cold/hot inlet or outlet plumbing fittings
- Dripping from the drain valve or loose hose connection
- Seams or bottom-plate leaks and intermittent only-when-running drips
Leaking from the temperature and pressure relief (T&P) valve
Inspect the temperature and pressure relief (T&P) valve for signs of dripping or discharge along its discharge pipe, since this valve is designed to release water when internal pressure or temperature exceeds safe limits.
Persistent leakage suggests a faulty valve, excessive tank pressure/temperature, or debris preventing a proper seal.
Test/reset cautiously; replace the valve if it continues to leak or shows corrosion.
Leaking at inlet or outlet plumbing connections
Diagnose leaks at the inlet and outlet connections by checking the fittings, unions, and short lengths of pipe where the water supply attaches to the tank.
Inspect for loose nuts, corroded threads, cracked fittings, or degraded compression rings.
Tighten or replace leaking components, use appropriate thread sealant or new gaskets, and confirm water is shut off before repairs.
Test after reassembly for remaining seepage.
Dripping from the drain valve
Check the drain valve for signs of dripping by running a visual inspection along the bottom side of the tank and the valve body, noting any steady drops, slow weeps, or residue that indicate past leaks.
Tighten the valve handle, replace a worn washer or packing, or fully drain and swap the valve if corrosion or persistent seepage remains; call a pro for inaccessible or damaged fittings.
Leaking from the bottom of the tank or seams
When a water heater leaks from the bottom or along its seams, the source is often structural failure—corrosion, seam weld degradation, or a compromised inner tank—rather than a loose fitting.
The first step is a calm, systematic visual and tactile assessment around the tank base and seam lines to note active drips, rust-colored staining, bulges, or wetness that indicate internal leakage.
If present, replacement is usually required.
Intermittent dripping only when heater runs
A homeowner noticing water only while the heater is firing should focus on components that change pressure, temperature, or movement during operation—common culprits include the temperature and pressure (T&P) relief valve, thermal expansion effects, condensate from high-efficiency models, or loose fittings that shift with heat.
Inspect the T&P for drips, check nearby joints, review expansion tank function, and watch for condensate runoff; replace or tighten as needed.
Tools, Materials, and Safety Gear You’ll Need
A concise list of essential hand and power tools, from pipe wrenches and adjustable pliers to a multimeter and pipe cutter, prepares a homeowner for most water heater repairs.
Recommended replacement parts—such as sacrificial anode rods, pressure-relief valves, threaded fittings, and appropriate dielectric unions—should match the unit’s fuel type and piping material.
Clear safety precautions for working with gas burners, live electrical components, and hot water (including shutoffs, lockouts, gas leak checks, and heat-resistant gloves/eye protection) are emphasized before any work begins.
Essential tools for DIY water heater repair
Several essential tools, materials, and safety items are required before attempting a DIY water heater repair to guarantee the job is effective and safe.
A concise toolkit, correct materials, and protective gear reduce risks and improve outcomes.
- Adjustable wrench, pipe wrench, pliers
- Teflon tape, pipe sealant, replacement valves
- Multimeter, thermometer
- Gloves, safety glasses, fire extinguisher
Recommended replacement parts and fitting types
Recommended replacement parts and fitting types should match the water heater’s model, fuel type, and plumbing materials to guarantee proper function and code compliance.
Common parts include replacement anode rods, thermostats, heating elements, temperature-pressure relief valves, drain valves, and sacrificial anodes.
Use compatible fittings: NPT brass, dielectric unions, copper sweat, or approved CPVC/Pex adapters. Prefer OEM or certified equivalents.
Safety precautions for gas, electric, and hot water handling
Why begin with safety gear before touching a water heater? Protective gloves, eye protection, and heat-resistant clothing prevent burns and scalds.
For gas units, shut the gas, ventilate, and have a detector; avoid open flames.
For electric models, turn off the breaker and verify with a tester.
Always depressurize and cool the tank, and keep a fire extinguisher nearby.
Step-by-Step Guide: Replacing a Pressure Relief Valve
The section outlines the necessary parts and preparatory steps to replace a water heater pressure relief valve, including shutting off power and water and gathering replacement fittings.
It then presents clear removal and installation instructions, covering how to drain the tank, remove the old valve, and secure the new one with proper sealing.
Finally, it describes how to test the new valve for correct operation and check for leaks before restoring normal service.
Parts and preparation
Before beginning the replacement, gather the correct temperature and pressure (T&P) relief valve specified for the water heater model, pipe thread sealant rated for potable water, a pressure-rated discharge elbow, adjustable wrench, slip-joint pliers, a bucket, and appropriate safety gear such as gloves and eye protection.
Also confirm water and power/gas shutoffs, measure existing valve thread size, have towels, and a flashlight ready.
Detailed removal and installation steps
Begin by confirming the water and power/gas are shut off and the tank has cooled; this guarantees a safe, dry workspace before any valve work begins.
Drain enough water to below the relief valve.
Remove the old valve with a wrench, clean threads, apply plumber’s tape, install the new valve hand-tight then wrench-secure, reconnect discharge piping, refill tank and restore power/gas.
Testing the new valve for proper operation
Verify the new pressure relief valve functions correctly by conducting a systematic test that checks for proper opening, resealing, and leak-free connections.
The technician slowly raises tank pressure (per manufacturer guidance), observes valve discharge, confirms immediate resealing when pressure drops, inspects joints for drips, and verifies the discharge pipe directs water safely.
Document results and retest if any anomalies or persistent leaks appear.
Step-by-Step Guide: Fixing a Leaking Drain Valve
The procedure begins with fully draining the tank and removing the faulty drain valve to gain safe access.
Next, the guide compares repairing the existing valve (cleaning or reseating) versus replacing it with a new, properly rated unit.
After reinstallation, a controlled leak test and visual inspection confirm the repair before returning the heater to service.
Draining the tank and removing the valve
Shutting off the water supply and cooling the heater precede any work on the drain valve: this prevents pressure buildup and scalding.
Next, attach a garden hose to the drain, open a hot faucet to break vacuum, and open the valve to drain.
Once empty, close valve, disconnect hose, use a wrench to remove the valve for inspection or replacement, keeping fittings and threads protected.
Replacing vs. repairing the valve
With the drain valve removed and threads inspected, the next decision is whether to repair the existing valve or replace it entirely.
Repair suits minor issues: cleaning threads, replacing a rubber washer or packing, or tightening connections.
Replacement is advised for corrosion, cracked bodies, persistent leaks, or outdated brass.
Consider cost, labor, and long-term reliability when choosing between repair and replacement.
Leak test after reinstallation
Begin by restoring normal water supply and power to the heater.
Then observe the drain valve area for any signs of leakage.
Open and close the valve once to verify proper seating.
Check fittings and surrounding pipework for dampness.
Monitor for at least 30 minutes, then recheck after several hours.
If any seepage appears, tighten, reseal, or call a professional.
Preventive Maintenance to Avoid Future Leaks
A concise preventive maintenance plan helps minimize the risk of future water heater leaks by outlining a regular inspection checklist and schedule.
Routine tasks should include flushing sediment to prevent corrosion and overheating, testing and exercising the temperature-and-pressure valve, and following guidelines for anode rod replacement.
Consistent adherence to these steps extends tank life and reduces emergency repairs.
Regular inspection checklist and schedule
Regular inspections provide a simple, effective framework to catch early signs of deterioration and prevent leaks before they start.
A concise checklist and schedule guide routine checks, prioritize risks, and prompt timely repairs to extend heater life.
- Inspect visible pipes, fittings, and valves monthly.
- Check T&P valve and drain lines quarterly.
- Monitor for corrosion or moisture biannually.
- Schedule professional annual inspection.
Flushing sediment to reduce corrosion and overheating
Flushing sediment from a water heater removes the mineral and debris buildup that traps heat against the tank bottom, accelerates corrosion, and reduces efficiency.
Doing so on a scheduled basis prevents overheating, lowers rupture risk, and extends the unit’s service life.
Regularly draining several gallons or performing a full flush clears deposits, restores efficiency, reduces stress on components, and helps detect early leaks before they worsen.
Testing and exercising the T&P valve
Inspecting the temperature-and-pressure (T&P) relief valve periodically guarantees it will open if the tank overheats or overpressurizes, preventing catastrophic failure.
Technicians or informed owners should lift the lever to verify water discharges briefly and reseats fully; if it sticks, leaks, or stays open, replace the valve.
Record test dates and inspect discharge piping for corrosion to maintain safe operation.
Anode rod replacement guidelines
After testing the T&P valve, attention should shift to the sacrificial anode rod, a corrosion-resistant component designed to protect the tank lining by attracting corrosive elements.
Inspect annually, replacing when more than 50% consumed or heavily pitted.
Use proper replacement length and material (magnesium or aluminum/zinc) compatible with local water chemistry.
Tighten securely and check for leaks after reinstalling.
Cost Estimates and When to Call a Professional
Typical DIY fixes for a leaking water heater, such as replacing valves or gaskets, usually cost a modest amount for parts and tools.
Hiring a professional can incur hourly rates and service fees that vary by region.
Clear signs to call a licensed plumber or HVAC technician include persistent leaks, gas smells, electrical issues, or widespread corrosion and water damage.
Before hiring, homeowners should ask about licensing, insurance, written estimates, warranty coverage, and expected timelines.
Typical DIY repair costs vs. professional service rates
Cost is a key factor when deciding whether to attempt a water heater repair or hire a professional. Typical DIY parts range $10–$150; labor is free but skill-limited. Professional service fees typically run $100–$400 plus parts; emergency or complex jobs cost more. Consider time, warranty loss, and safety when choosing.
| Repair type | Typical cost |
|---|---|
| Flush/valve | $10–$50 |
| Anode rod | $20–$60 |
| Thermostat | $30–$150 |
| Professional call | $100–$400 |
| Emergency service | $200+ |
Clear signs you should call a licensed plumber or HVAC technician
When should a homeowner stop DIY attempts and call a licensed plumber or HVAC technician?
Persistent leaks after basic fixes, major leaks from tank seams or fittings, rusty water or sediment buildup, loss of hot water or pressure, tripped electrical breakers or gas-smell suspicion, visible corrosion or bulging tank, and recurring leaks tied to pressure relief valve issues all warrant professional assessment and likely repair or replacement.
Questions to ask a contractor before hiring
How should a homeowner vet a contractor for water-heater work to guarantee fair pricing and timely intervention?
A homeowner should request itemized written estimates, ask about licensing, insurance, and warranty terms, verify past customer references, confirm emergency response times, and clarify permit responsibilities.
Compare multiple bids, beware unusually low offers, and document all agreements before work begins to avoid disputes and unexpected costs.
Long-Term Upgrades to Reduce Leak Risk
Long-term upgrades can greatly lower the chance of future water heater leaks and associated damage.
Options include switching to tankless or indirect systems, adding leak detectors with automatic shutoff valves, and replacing aging pipes or installing pressure-reduction valves.
Each choice carries different costs and maintenance needs that should be weighed against expected longevity and risk reduction.
Benefits of tankless or indirect water heaters
Though requiring a larger upfront investment, replacing a conventional storage tank with a tankless or indirect water heater substantially reduces the risk of catastrophic leaks by eliminating or isolating the large-volume tank that is the usual failure point.
These systems offer longer service life, fewer corrosion concerns, reduced standby heat loss, and smaller footprint.
Maintenance is generally simpler, lowering long-term repair frequency and leak probability.
Installing leak detection and automatic shutoff devices
After replacing a tank with a tankless or indirect system to remove the primary failure point, homeowners can further reduce leak risk by adding leak detection and automatic shutoff devices.
These systems sense moisture or rapid flow, alert users, and shut the main or appliance valve to prevent flooding.
Professional installation guarantees correct sensor placement, reliable power/communication, and integration with existing plumbing and smart-home systems.
Upgrading plumbing materials and pressure-reduction valves
Upgrading the plumbing that supplies and connects a water heater can considerably lower the chance of future leaks by replacing aging pipes, fittings, and fixtures with more durable materials and by controlling system pressure with a properly sized pressure-reducing valve (PRV).
Long-term upgrades include switching to copper or PEX, replacing corroded valves and unions, insulating connections, and installing a PRV to prevent excessive pressure that stresses tanks and joints.
Troubleshooting Checklist Before Calling for Help
Before calling for professional help, a short troubleshooting checklist helps identify common issues and speeds up repair.
The homeowner should note simple diagnostics—such as whether the unit is still leaking, unusual noises, and whether the gas or power supply is on—then gather clear photos and model/serial information.
These steps reduce time on-site and help the technician come prepared.
- Check if leak is active and its approximate source (top, bottom, fittings, or tank).
- Note recent changes (service, pressure fluctuations, or cold snaps).
- Photograph the heater, visible labels (model/serial), and the leak area.
- Record current settings, any error codes, and whether power/gas is connected.
Quick diagnostics to perform and note for the technician
Check a few simple items and record their conditions so the technician can diagnose the leak more quickly.
Note water pooling location, approximate drip rate (drops/minute or steady), visible corrosion, temperature setting, recent pressure fluctuations, valve positions, and whether tank feels warm.
Confirm power/gas supply status and whether the shutoff valve isolates the heater.
Keep notes concise and factual.
Photos and information to collect for faster service
What photos and details will speed repairs? Photograph the water heater’s make, model, serial number, data plate, visible leaks, corroded areas, pressure relief valve, and plumbing connections.
Record symptoms: leak location, onset time, water temperature, recent maintenance, water hardness, and any noise.
Note shutoff valve accessibility and serial timestamps of photos. Share these with the technician before arrival.
Common Mistakes to Avoid When Repairing a Water Heater
Repair attempts can introduce new hazards if performed without proper knowledge, especially on gas models where mistakes may cause leaks or carbon monoxide risk.
Technicians and DIYers alike should avoid over-tightening fittings or substituting incorrect parts, which can worsen leaks or damage components.
Persistent corrosion, wet spots around the tank, or an aging unit should not be ignored, as they often indicate tank failure and the need for replacement rather than repair.
Risks of working on gas units without expertise
Although DIY instincts are understandable, attempting repairs on gas water heaters without proper training can create immediate and serious hazards.
Risks include gas leaks, carbon monoxide exposure, fire, and explosion from improper valve or burner handling.
Incorrect venting or faulty ignition work may cause deadly backdrafts.
Professionals guarantee safe diagnosis, compliant repairs, and proper testing to protect occupants and property.
Over-tightening fittings and using incorrect parts
Tightening a fitting until it feels secure can seem like the logical fix, but over-torquing and installing incorrect parts are frequent causes of leaks, stripped threads, and premature failure in water heaters.
Professionals recommend correct, manufacturer-specified parts, proper thread sealant, and torque within spec.
Using wrong valves, fittings, or cheap components often amplifies damage and voids warranties, necessitating costly repairs.
Ignoring signs of tank failure or past-due replacement
When corrosion, bulging, wet spots, or rusty water appear, they signal that a water heater tank may be failing and needs prompt evaluation rather than temporary patching.
Continuing repairs on an aging tank risks leaks, floods, and inefficiency.
Regular assessment, adherence to manufacturer lifespan guidelines, and timely replacement prevent costly damage.
Professionals should be consulted when structural failure is suspected.
Conclusion
When a water heater leaks, the homeowner should act swiftly—turning off power and water—then assess the source. Small fixes, like tightening fittings or replacing a sacrificial anode, may plug the drip; severe corrosion or tank failure demands replacement. Think of maintenance as insurance against a flood. With clear cost expectations and a checklist, one can decide whether to DIY or call a professional, avoiding costly mistakes and preserving long-term reliability.