How to Plumb a Shallow Well Pump?
Are you looking to install a shallow well pump but unsure how to get started? In this article, we will walk you through the step-by-step process of plumbing a shallow well pump, providing you with all the information you need to successfully complete the project.

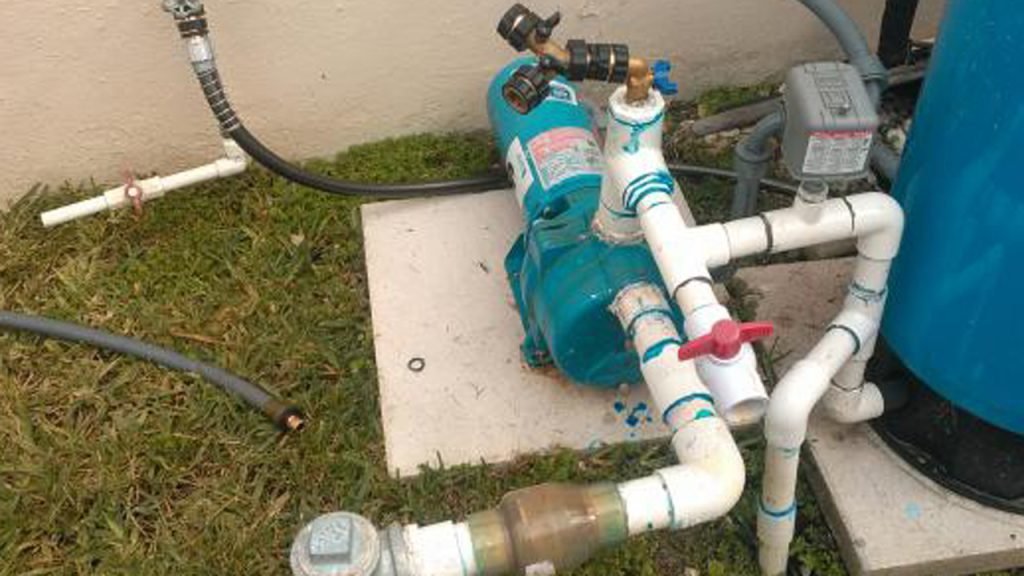
Photo by gms-tunisie
Components of a Shallow Well Pump System
Before diving into the installation process, it’s important to understand the different components that make up a shallow well pump system. This knowledge will help you gain a better understanding of how everything works together.
A shallow well pump system typically consists of the following components:
Well Casing
This is the outer shell that protects the well and prevents contamination of the water source. It is usually made of PVC or steel and is inserted into the ground during the well drilling process.
Well Cap
The well cap is located on top of the well casing and provides access to the well. It is essential for sealing the well and protecting it from debris, insects, and other contaminants.
Well Pump
The well pump is responsible for extracting water from the well and delivering it to your home or property. There are different types of well pumps available, including submersible pumps and jet pumps.
Pressure Tank
The pressure tank helps maintain a steady water supply by storing water and providing pressure when the pump is not actively running. It also helps reduce the number of times the pump needs to turn on and off.
Now that we have a basic understanding of the components, let’s move on to the tools and materials you’ll need for plumbing a shallow well pump.
See also What is a 1/8 bend in plumbing?
Tools and Materials Needed for Plumbing a Shallow Well Pump
To ensure a successful installation, it’s important to have the right tools and materials on hand. Here’s a list of what you’ll need:
Well Pump
Choose a well pump that is suitable for your specific needs and water requirements. Consider factors such as flow rate, pressure, and the depth of your well.
Pipe and Fittings
You’ll need pipes and fittings to connect the well pump to your water supply. PVC pipes are commonly used for shallow well systems due to their durability and affordability.
Pressure Tank
Select a pressure tank that matches the capacity and pressure requirements of your well pump. It’s important to choose a tank that can handle the demands of your household.
Electrical Wiring
Ensure you have the necessary electrical wiring and connections to power the well pump. It’s important to consult with a professional electrician to ensure safety and compliance with electrical codes.
Pipe Sealant and Teflon Tape
Use pipe sealant and Teflon tape to create watertight connections and prevent leaks.
Drill and Hole Saw
A drill and hole saw will be necessary if you need to create openings in walls or other surfaces to accommodate the pipes and fittings.
Now that we have all the necessary tools and materials, let’s move on to the step-by-step guide to installing a shallow well pump.
See also What are the Different Types of Plumbing Pipes?
Installing a Shallow Well Pump
Installing a shallow well pump may seem daunting, but with our step-by-step guide, you’ll be able to tackle the project with confidence.
Step 1: Select the Right Location
The first step in plumbing a shallow well pump is to select the right location for your well. Choose an area that is away from potential sources of contamination, such as septic tanks, chemical storage areas, or livestock areas.
Step 2: Drill the Well
If you don’t already have a well, you’ll need to drill one. It’s recommended to hire a professional drilling company for this task, as they have the expertise and equipment to ensure a proper well is created.
Step 3: Install the Well Casing
Once the well is drilled, it’s time to install the well casing. The casing should be inserted into the drilled hole and secured in place using a cement grout or bentonite clay.
Step 4: Connect the Well Pump
Next, it’s time to connect the well pump to the water supply. Follow the manufacturer’s instructions for your specific pump model. Ensure all connections are secure and watertight.
Step 5: Install the Pressure Tank
After connecting the well pump, install the pressure tank. Position it in a suitable location and connect it to the pump using the appropriate fittings. Ensure the tank is properly supported and anchored to prevent movement.
Step 6: Connect to the Water Supply
Once the pressure tank is installed, it’s time to connect the well pump to your water supply. This typically involves connecting the pipes from the pressure tank to your home’s plumbing system. Use the appropriate fittings and ensure all connections are secure.
Step 7: Test the System
After completing the installation, it’s important to test the system to ensure everything is functioning properly. Turn on the pump and check for any leaks or abnormal noises. Monitor the water flow and pressure to ensure they meet your expectations.
See also What is Sanitary Landfill Technology?
Tips for Ensuring Proper Water Flow and Pressure
Once your shallow well pump is installed, there are a few tips and tricks you can follow to ensure optimal water flow and pressure. Here are some recommendations:
Proper Pump Sizing
Ensure your well pump is correctly sized for your water needs. An undersized pump may result in inadequate water flow, while an oversized pump can lead to excessive pressure and unnecessary wear on the system.
Regular Maintenance
Schedule regular maintenance checks to keep your well pump in optimal condition. This includes inspecting the pressure tank, checking for leaks, and cleaning or replacing filters as needed.
Avoid Overuse
Be mindful of your water usage to avoid overtaxing the well pump system. Distribute water usage throughout the day and consider water-saving fixtures and appliances to reduce strain on the system.
Monitor Water Quality
Regularly test the water quality to ensure it meets health and safety standards. If you notice any changes in water color, odor, or taste, consult with a water treatment professional.
By following these tips, you can ensure a reliable water supply and prolong the lifespan of your shallow well pump system.
Troubleshooting Common Issues with Shallow Well Pumps
Even with proper installation and maintenance, shallow well pumps may encounter issues from time to time. Here are some common problems and possible solutions:
No Water or Low Water Pressure
This could indicate a clogged filter, a faulty pressure switch, or a problem with the well pump itself. Check the filter, reset or replace the pressure switch, and inspect the pump for any issues.
Water Hammer
Water hammer is a loud banging noise that occurs when the water flow is suddenly stopped or redirected. This can be caused by a faulty check valve or a pressure tank that is not properly pressurized. Consult a professional plumber to diagnose and resolve the issue.
Leaks
Leaks can occur at various points in the system, including pipe connections, fittings, or the pressure tank. Inspect all connections and fittings for signs of leaks and repair or replace as necessary.
If you’re unsure about any troubleshooting or repair tasks, it’s always best to consult with a professional plumber or well pump technician.
Maintenance and Care for a Shallow Well Pump
To ensure the longevity and optimal performance of your shallow well pump, regular maintenance is key. Here are some maintenance tasks you should incorporate into your routine:
Inspect the Pressure Tank
Regularly check the pressure tank for any signs of damage, leaks, or corrosion. Ensure the tank is properly pressurized according to the manufacturer’s recommendations.
Clean or Replace Filters
Depending on your water quality, filters may need to be cleaned or replaced periodically. Follow the manufacturer’s instructions for proper maintenance.
Monitor Motor and Wiring
Inspect the motor and electrical wiring for any signs of damage or wear. Ensure all connections are secure and free of corrosion.
Keep the Well Area Clean
Regularly remove any debris, leaves, or other materials from the well area to prevent clogging or contamination.
By regularly maintaining your shallow well pump system, you can avoid costly repairs and ensure a reliable water supply for years to come.
Safety Precautions When Plumbing a Shallow Well Pump
When working with well pumps and plumbing systems, it’s important to prioritize safety. Here are some safety precautions to keep in mind:
Shut Off Power
Before starting any installation or maintenance tasks, always shut off the power to the well pump. This will help prevent electrical shocks or accidents.
Use Protective Gear
Wear appropriate protective gear, such as gloves and safety glasses, to protect yourself from potential hazards.
Follow Manufacturer’s Instructions
Always follow the manufacturer’s instructions for installation, maintenance, and troubleshooting tasks. This will help ensure safety and prevent damage to the system.
Consult Professionals
If you’re unsure about any aspect of the installation or maintenance process, it’s best to consult with a professional plumber or well pump technician. They have the knowledge and experience to handle complex tasks safely.
Alternative Options for Well Water Supply
While shallow well pumps are a popular choice for residential water supply, there are alternative options worth considering:
Deep Well Pumps
Deep well pumps are suitable for properties with deeper water sources. They are designed to extract water from greater depths and provide higher water flow rates.
Rainwater Harvesting Systems
Rainwater harvesting systems collect and store rainwater for various uses, including irrigation and non-potable household needs. These systems can help reduce reliance on well water.
Municipal Water Supply
If your property is located in an area with access to a reliable municipal water supply, connecting to the municipal system may be a viable option.
Consider your specific needs, budget, and property requirements when evaluating alternative options for your water supply.
Conclusion
Plumbing a shallow well pump doesn’t have to be a daunting task. With our comprehensive guide, you now have the knowledge and confidence to tackle the installation process with ease.
Understand the components of a shallow well pump system, gather the necessary tools and materials, and follow the step-by-step guide for a successful installation.
Ensure proper water flow and pressure, troubleshoot common issues, and prioritize regular maintenance and safety precautions.


