How to Install Drainage Pipe: Step-by-Step DIY Guide
How to Install Drainage Pipe: A Quick Guide
To install a drainage pipe effectively, follow these key steps:
- Check Local Codes: Ensure compliance with local regulations.
- Call Utility Marking Services: Identify any underground utilities before digging.
- Choose a Drainage System: Decide on a type, such as a French drain, trench drain, or sump pump.
- Measure Elevations: Determine the inlet and outlet elevations for proper drainage.
- Plan Slope: Aim for a slope of 1%–2% to facilitate water flow.
- Mark Trench Route: Clearly outline where the trench will be dug.
- Excavate: Dig the trench according to your plan.
- Add Gravel Base: Lay a 2–4 inch compacted gravel base for proper support.
- Install Pipe and Fittings: Place the drainage pipe and any necessary fittings.
- Install Catch Basins: Add catch basins in areas where water collects.
- Backfill: Fill the trench in layers to avoid settling.
- Test Flow: Check for proper drainage, clearing any clogs or adjusting the slope as needed.
By following these steps, you can ensure a successful drainage pipe installation. For detailed troubleshooting and further instructions, refer to additional resources.
Check Local Codes and Locate Underground Utilities
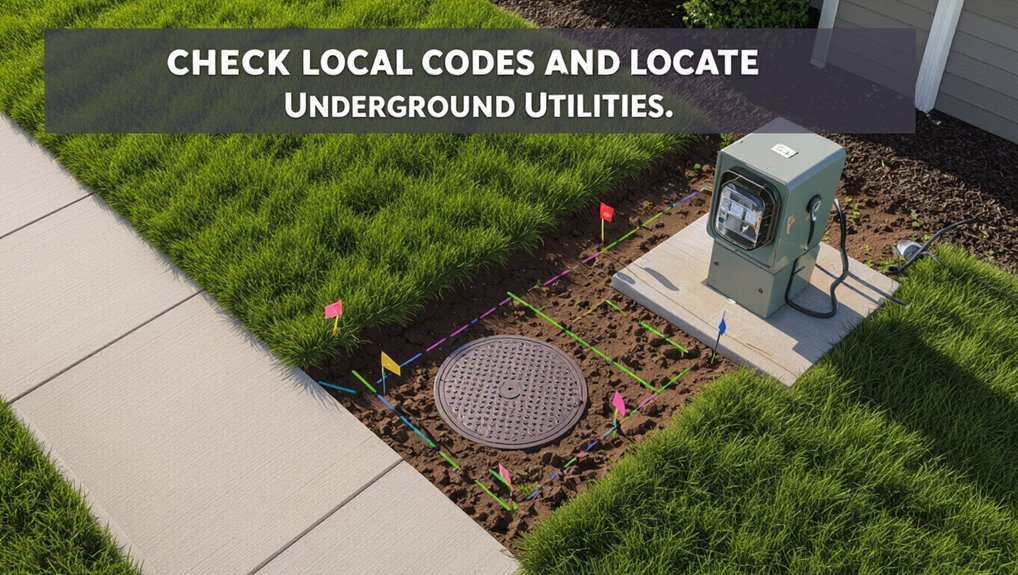
Before any digging begins, the installer must review local building and drainage codes and contact utility-marking services to locate underground lines.
The installer verifies setback, slope, and permit requirements, noting required pipe materials and connection standards. Utility markings are reviewed on-site; flagged areas are recorded and avoided.
If discrepancies arise, the installer pauses and consults authorities or utility owners. Documentation of approvals and marked locations is retained with the project plan.
Safe excavation practices are scheduled around marked utilities, and any required inspections are arranged before trenching. Compliance and utility awareness reduce risk and guarantee lawful, functional drainage installation.
What This Guide Covers and Quick 3-Step Plan
The guide provides a quick project overview outlining goals, timeline, and common challenges.
It lists essential materials and tools required for a typical installation.
A simple three-step plan summarizes site preparation, pipe placement and grading, and final inspection and cleanup.
Quick Project Overview
This guide outlines the scope, required materials, and safety considerations for installing a residential or small commercial drainage pipe, then presents a concise three-step plan (site preparation, pipe installation, and final testing/covering) to complete the work efficiently and correctly. The overview summarizes sequence, typical timelines, and inspection checkpoints so a competent DIYer can plan tasks, permits, and assistance. Risk points and when to consult a pro are noted. The plan emphasizes proper slope, secure connections, and adequate backfill/compaction to guarantee long-term function.
| Step | Goal | Quick Tip |
|---|---|---|
| 1 | Prepare site | Mark utilities |
| 2 | Install pipe | Maintain slope |
| 3 | Test/cover | Verify flow |
Essential Materials Needed
With the project plan and safety checkpoints established, attention turns to the materials and tools required to complete each phase efficiently and safely.
The guide covers required pipe types (perforated and solid PVC or corrugated), fittings, connectors, end caps, and fabric filter socks.
Essential consumables include gravel, sand, landscape fabric, adhesive/primer for PVC, and primer/solvent or clamp fittings for corrugated pipe.
Tools listed are trenching shovel or trencher, level, tape measure, saw for cutting pipe, gloves, safety glasses, and wheelbarrow.
Optional items: catch basins, erosion control stakes, and marker paint for layout.
Simple Three-Step Plan
A clear three-step workflow breaks the drainage installation into planning and layout, trenching and pipe placement, and final backfill and testing, giving readers a concise roadmap before detailed instructions.
The guide outlines objectives: assess site slope and permits, choose pipe type and fittings, and mark the route.
Step one covers measurements, grade calculations, and material list.
Step two explains trench depth, bedding with gravel, proper pipe slope, joining methods, and installing catch basins.
Step three details backfilling in layers, compacting, restoring surface, and conducting water tests to confirm flow and seal integrity before finishing.
Choose Between French Drain, Trench Drain, or Sump Pump
Which system best suits a property depends on soil type, slope, water volume, and access: a French drain collects and redirects subsurface water through perforated pipe and gravel, a trench drain captures surface runoff along a linear channel, and a sump pump actively evacuates concentrated groundwater from a collection basin.
Choice hinges on problem location and permanence: French drains suit seepage near foundations or soggy yards; trench drains work where surface flow concentrates along driveways or low spots; sump pumps fit basements or sites where gravity discharge is impossible.
Budget, maintenance, and local code also influence selection; combine methods when a single solution is insufficient.
Pick the Right Drain Pipe Type and Size
The selection of pipe material—commonly PVC, corrugated HDPE, or perforated pipe for French drains—affects durability, flexibility, and resistance to clogging.
Equally important is choosing the correct pipe diameter to handle expected flow; residential yard drains often use 3–4 inch pipe while higher volumes require 6 inches or more.
Matching material and diameter to soil conditions and runoff rates guarantees a reliable drainage system.
Pipe Material Options
Several common materials suit residential drainage—PVC, ABS, corrugated HDPE, cast iron, and clay—each offering distinct strengths and limitations. Selection depends on budget, durability, soil conditions, chemical exposure, and local codes. PVC is lightweight, inexpensive, and easy to join; ABS resists impact in cold; corrugated HDPE flexes for uneven terrain; cast iron offers longevity and noise reduction; clay suits older sewer systems but is brittle. Longevity, joint type, and installation complexity guide choice. Compare properties quickly:
| Material | Strengths | Limitations |
|---|---|---|
| PVC | Affordable, easy | UV degrades, brittle cold |
| HDPE | Flexible, chemical resistant | Special couplings needed |
| Cast iron | Durable, quiet | Heavy, costly |
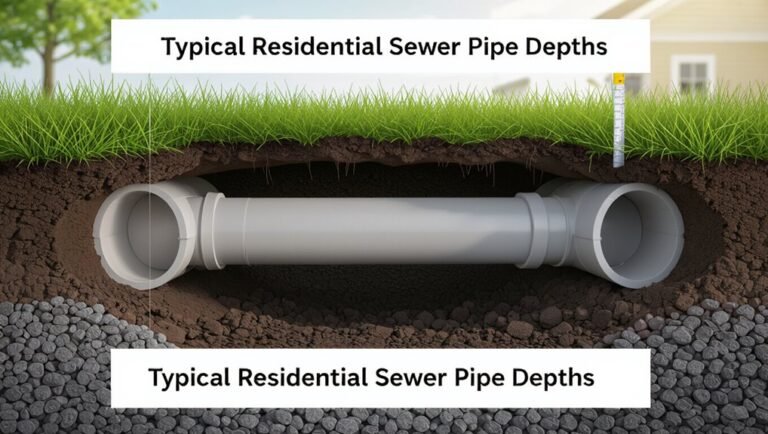
Correct Pipe Diameter
When determining correct pipe diameter, designers must match flow requirements, fixture load, and slope to prevent backups or slow drainage.
Selection is based on fixture units, peak flow, and local code; undersized piping causes clogs, oversized runs can reduce velocity and allow sedimentation.
Calculations convert fixture units to flow rate, then to diameter using Manning or charted tables.
Consider future capacity and access for cleaning.
Common residential sizes are 1½”–4″ for traps and building drains, larger for sewer mains.
- Water rushing through a narrow pipe
- Sediment settling in an oversized run
- A technician measuring flow rates
Calculate Drain Slope and Plan Your Trench Route
Because proper slope guarantees water moves without pooling or eroding the pipe bedding, calculating the correct grade before digging is essential.
The installer measures start and outlet elevations, determines required fall (commonly 1%–2% for perforated systems), and converts that into inches per foot to set trench depth. A string line with a level or a laser level verifies continuous grade along the planned route.
The route avoids utilities, tree roots, and low spots while keeping the shortest practical run to the outlet. Marked stakes and spray paint outline the trench path and grade reference before excavation begins.
Gather Tools and Materials Before You Dig
With slope and route established, the installer assembles the tools and materials needed to complete the trench and lay the pipe. A clear checklist prevents delays: durable corrugated or PVC pipe sized to plans; gravel for bedding and backfill; fittings, couplers, and catch basins matched to pipe.
Safety and finishing items include gloves, eye protection, and marking paint. Hand and power tools are staged nearby to avoid unnecessary trips.
Images of the setup:
- Coiled pipe segments stacked beside a neatly bagged pile of gravel
- A line of couplers, elbows, and a catch basin on a tarp
- Shovels, level, and a wheelbarrow ready to work
Mark and Excavate the Trench Safely
Before any digging begins, the location of underground utilities must be confirmed by contacting local marking services and inspecting site plans.
Once utilities are identified and clearly marked, the trench route is laid out and measured to the required depth and slope.
Excavation proceeds with appropriate shoring, sloping, or benching and using the correct equipment to protect workers and prevent collapse.
Locate Underground Utilities
How does one begin safely when underground utilities may cross the planned route? A locator contacts the regional utility notification service to request markings before any digging. The area is scanned with detection equipment; visible marks and flags define no-dig zones.
Documentation of markings and utility maps is kept on-site.
- colored flags along the route indicating gas, water, and electric
- a technician tracing lines with a handheld receiver
- a printed map annotated with depths and owner contacts
Excavation plans adjust to avoid marked utilities; hand digging and potholing are planned where crossings are uncertain.
Safe Trench Excavation
A clear, continuous layout line and marked limits establish the trench footprint and safe zones before any soil is removed. Workers verify utility clearances, set batter boards, and mark spoil areas at least one meter from edges.
Excavation proceeds in short sections with hand digging near suspected lines. Sloping, benching, or shoring is implemented according to trench depth and soil type; protective systems are inspected daily and after weather events.
Access and egress ladders are placed within 7.6 meters of workers. Spoil and equipment are kept clear of edges. Continuous monitoring for hazardous atmospheres and unstable conditions guarantees worker safety.
Prep the Trench Base With Gravel Bedding
Lay a level layer of coarse gravel along the trench floor to create a stable, well-draining bedding for the pipe.
The installer spreads and compacts a 2–4 inch base, checking slope with a level and string line. Gravel removes voids, supports the pipe, and prevents settling.
Edges are kept clear of clumps and organic material; sharp stones are avoided to protect the pipe. Final surface is raked smooth and lightly tamped to uniform density before pipe placement.
- A flat, evenly textured gravel bed stretching the trench length
- Small hand tamp smoothing the surface
- Clean, grit-free edges ready for pipe
Lay Landscape Fabric and Position Perforated Pipe
With the gravel bed set and smoothed to the correct slope, landscape fabric is rolled out along the trench to separate the drainage media from surrounding soil and to inhibit root intrusion.
The fabric is cut to length, extended a few inches up trench sides, and overlapped at seams by 6–12 inches.
A perforated pipe is laid centrally on the gravel, holes facing downward or sideways per design, ensuring consistent slope and alignment.
Pipe is lightly bedded with gravel to secure position; fabric edges are folded over the top of the pipe before backfilling to fully enclose the drainage assembly.
Install Pipe Connections and Catch Basins
The next step covers selecting appropriate pipe fittings to guarantee secure, leak-free connections and proper flow direction.
It also addresses placement and installation of catch basins to collect surface runoff and channel it into the drainage system.
Practical tips for sizing, sealing joints, and positioning basins will follow.
Choosing Pipe Fittings
Selecting appropriate pipe fittings is a critical step that guarantees secure connections, proper flow direction, and long-term performance of a drainage system. The installer considers material compatibility (PVC, ABS, or corrugated), diameter matching, and joint type (socket, compression, or solvent-weld).
Elbows, tees, couplings, and adapters are chosen to minimize bends and turbulence. Proper slope and access for cleaning guide placement. Use durable, UV- and freeze-resistant fittings where exposed.
Seal methods and gasket ratings are verified against expected pressures and soil movement. Visualize connection points as maintenance access, not just joins:
- a smooth 45° elbow easing flow
- a clean tee for lateral tie-in
- a removable coupling for service
Installing Catch Basins
Many drainage systems rely on properly placed catch basins to collect surface runoff, protect downstream pipes, and provide access for maintenance.
The installer selects basin locations at low spots and near discharge points, ensuring grade directs water into the inlet. Excavation accommodates the basin plus gravel bedding for stability and drainage.
Pipe openings are cut to match inlet/outlet sizes, fitted with watertight connectors or couplers, and sealed with appropriate gaskets or silicone.
Backfill is compacted in layers to prevent settling, and the top is adjusted to finished grade.
Finally, grates are secured and the basin inspected for proper flow.
Tie Into External Drains (Not Indoor Plumbing)
When tying a new drainage run into existing external drains, assess the outlet type, flow direction, and elevation to guarantee a proper, gravity-fed connection.
The installer measures invert levels, matches pipe diameter and material, and plans a smooth approach to prevent silt traps or backflow.
Use appropriate fittings—wyes, adapters, or saddles—sized to maintain slope and avoid constrictions.
Compact trench bedding and secure joints against movement.
Test by running water and observing steady discharge without pooling.
- A sloped trench leading into a concrete chamber
- A PVC stub with a rubber coupling
- An angular wye aligning two pipes
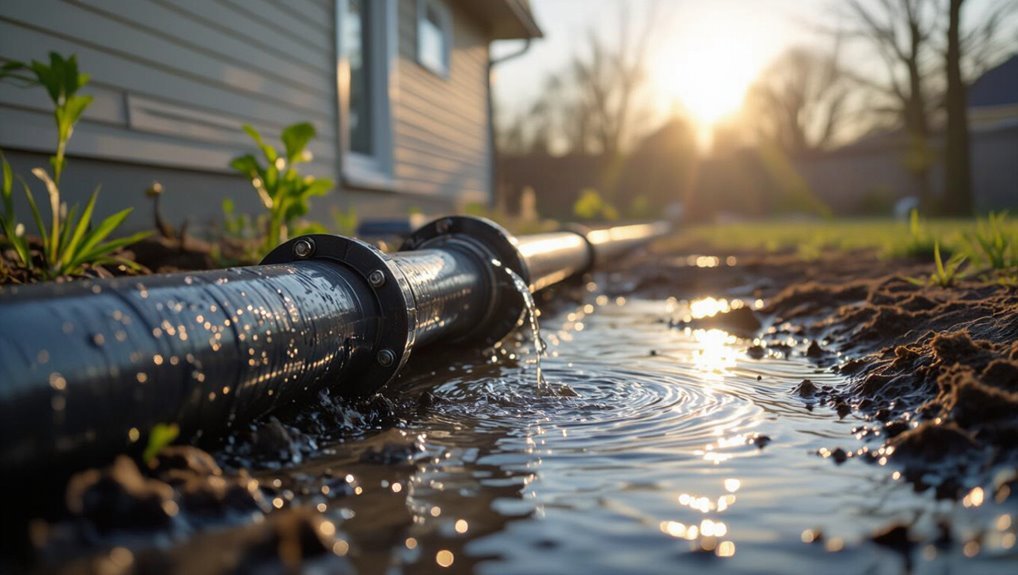
Install Outlet, Discharge Point, or Sump Connection
Installers position the outlet, discharge point, or sump so it provides an unobstructed, gravity-assisted path for collected water to leave the system.
They set the outlet elevation to maintain continuous fall from the perforated pipe, confirming slope with a level or transit.
Connections are watertight: use appropriate couplings, solvent welds, or gasketed fittings rated for exterior drainage.
For sump installations, install the basin level and secure the incoming pipe through a sealed bulkhead; add a removable grate or trap to keep debris out.
Verify flow by running water, inspect for leaks, and adjust alignment before finalizing the connection.
Backfill, Compact, and Finish the Surface
With the outlet secured and flow verified, attention turns to backfilling, compacting, and restoring the surface to guarantee long-term performance and stability.
The trench receives clean granular fill in 4–6 inch lifts, avoiding large clods or organic material. Each lift is lightly tamped to achieve uniform compaction without crushing pipe.
Final grading reinstates original slope and directs runoff away from foundations. Surface is restored with sod, gravel, or pavement as appropriate, ensuring aesthetics and function.
Inspect for settled spots and recompact as needed to prevent future depressions.
- a hand tamper compressing sandy fill
- fresh sod trimmed to edge
- gravel neatly raked to grade
Test Drain Flow, Clear Clogs, and Adjust Slope
Before closing the job, the drainage system is tested to confirm unobstructed flow. Any blockages are cleared, and the pipe slope is fine-tuned to guarantee consistent drainage.
Water is run from the highest inlet while observers watch downstream points and outlets for steady, laminar flow and prompt discharge. Any slow spots prompt localized excavation to locate debris, compressions, or misaligned joints.
A sewer snake or pressurized hose clears minor obstructions; significant blockage requires section removal and inspection. Levels are checked with a laser or spirit level; adjust bedding to achieve the designed fall (typically 1%–2%).
Retest until flow is consistent and free.
Common Failures (Clogs, Roots, Frost): Fixes That Work
Confirming steady flow and correcting slope reduce many problems, but routine failures still occur and require targeted fixes.
Clogs often respond to mechanical clearing, root intrusion to cutting and chemical treatment, and frost damage to insulation or deeper burial.
Regular inspection finds early signs: slow drainage, wet spots, or surface upheaval.
Repairs prioritize locating the fault, isolating affected segments, and restoring flow with appropriate tools and materials.
Visualize common scenes:
- A gummed-up pipe being rodded free, brown water flushing out.
- Roots peeled away from a cracked joint, soil exposed.
- Frost heave lifting a shallow trench, pipe re-bedded.
When to Hire a Drainage Pro vs. DIY
When should a homeowner call a drainage professional rather than attempting a DIY repair?
A homeowner should hire a pro for persistent backups, foul odors indicating sewer issues, structural damage, or recurring problems after attempted fixes.
Complex tasks—re-routing mains, repairing collapsed lines, or installing sump systems—require permits, specialized equipment, and skilled diagnostics.
Professionals are also advised when landscaping, grading, or municipal codes are involved, or when safety risks like contaminated water or deep trenches exist.
For simple clogs, surface grading, or installing short segments of pipe, DIY is reasonable.
Choosing professional help prevents costly mistakes and guarantees code compliance and long-term reliability.
Conclusion
Proper planning and careful execution turn a wet, muddy problem into a tidy, long‑lasting solution. By checking codes, locating utilities, choosing the right system and pipe, laying a correctly sloped trench, and backfilling with proper compaction, a homeowner can tame water like a gardener directs a stream. Regular testing, clog clearing, and timely repairs prevent failures from taking root; when complexity or risk grows, calling a pro keeps the job sound and safe.